background image

19

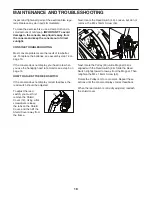
HOW TO ADJUST THE DRIVE BELT

If you can feel the pedals slip while you are pedaling, 
even when the resistance is adjusted to the highest 
level, the drive belt may need to be adjusted. 

To adjust the drive belt, you must remove the right 
pedal, the shield cover, and the right shield (see the 
instructions below). 

Using an adjustable wrench, turn the right pedal coun-
terclockwise and remove it. 

See HOW TO ADJUST THE REED SWITCH on page 
18 and remove the Shield Cover (12).

Next, see the EXPLODED DRAWING near the end of 
this manual and remove the M4 x 16mm Screws (56) 
from the Right and Left Shields (38, 39). Then, using a 
flat screwdriver to release the tabs and the V-clip (27), 
gently remove the Right Shield.

Hold the two M8 Locknuts (57) and loosen the two 
M8 x 16mm Flat Head Screws (34). Next, loosen the 
M10 x 35mm Hex Screw (30) until the Drive Belt (23) is 
tight. Then, hold the M8 Locknuts and tighten the M8 x 
16mm Flat Head Screws.

Then, reattach the right shield, the top shield, and the 
right pedal.

30

34

57

23

Summary of Contents for Pro 11.2x

Page 1: ... in the space above for reference QUESTIONS If you have questions or if parts are damaged or missing DO NOT CONTACT THE STORE please contact Customer Care IMPORTANT Please register this product see the limited warranty on the back cover of this manual before contacting Customer Care CALL TOLL FREE 1 866 699 3756 Mon Fri 6 a m 6 p m MT Sat 8 a m 4 p m MT ON THE WEB www wesloservice com USER S MANUA...

Page 2: ...ROUBLESHOOTING 18 EXERCISE GUIDELINES 20 PART LIST 22 EXPLODED DRAWING 23 ORDERING REPLACEMENT PARTS 24 LIMITED WARRANTY 24 This drawing shows the location s of the warning decal s If a decal is missing or illegible see the front cover of this manual and request a free replacement decal Apply the decal in the location shown Note The decal s may not be shown at actual size WESLO is a registered tra...

Page 3: ...urface with a mat beneath it to protect the floor or carpet Make sure that there is at least 2 ft 0 6 m of clearance around the exercise bike 7 Inspect and properly tighten all parts regu larly Replace any worn parts immediately 8 Keep children under age 12 and pets away from the exercise bike at all times 9 Wear appropriate clothes while exercising do not wear loose clothes that could become caug...

Page 4: ...efore you use the exercise bike If you have questions after reading this manual please see the front cover of this manual To help us assist you note the product model number and serial number before contacting us The model number and the location of the serial number decal are shown on the front cover of this manual Before reading further please familiarize yourself with the parts that are labeled...

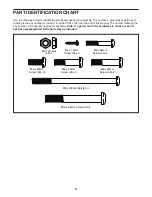
Page 5: ...ION CHART Use the drawings below to identify the small parts needed for assembly The number in parentheses below each drawing is the key number of the part from the PART LIST near the end of this manual The number following the key number is the quantity needed for assembly Note If a part is not in the hardware kit check to see if it has been preassembled Extra parts may be included ...

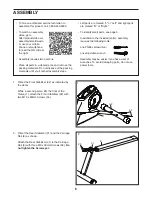
Page 6: ...2480 To watch an assembly video go to http productvideo co assembly kmart weslo or use your mobile phone or smartphone to read the QR code at the right Assembly requires two persons Place all parts in a cleared area and remove the packing materials Do not dispose of the packing materials until you nish all assembly steps Left parts are marked L or Left and right parts are marked R or Right To iden...

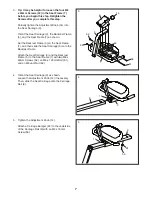
Page 7: ... M6 x 40mm Screws 42 in the Seat Frame 7 before you begin this step Retighten the Screws after you complete this step Partially tighten the Adjustment Knob 14 into the Seat Carriage 3 Orient the Seat Carriage 3 the Backrest Frame 5 and the Seat Frame 7 as shown Set the Backrest Frame 5 on the Seat Frame 7 and then slide the Seat Carriage 3 onto the Backrest Frame Attach the Seat Carriage 3 and the...

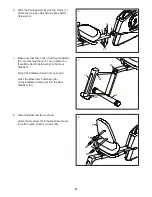
Page 8: ...to the Backrest Frame 5 with four M6 x 36mm Screws 63 9 1 55 55 5 63 6 63 7 31 25 15 25 7 Make sure that both ends of the Rear Stabilizer 31 are touching the floor Then tighten the three M8 x 36mm Screws 26 in the Rear Stabilizer Orient the Stabilizer Shield 15 as shown Press the Mushroom Fasteners 25 on the Stabilizer Shield 15 into the Rear Stabilizer 31 26 ...

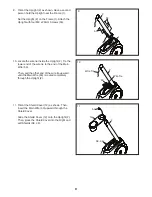
Page 9: ...ht 2 Tie the lower end of the wire tie to the end of the Main Wire 53 Then pull the other end of the wire tie upward until the Main Wire 53 is routed completely through the Upright 2 2 2 53 38 39 12 53 Wire Tie Wire Tie 11 Orient the Shield Cover 12 as shown Then insert the Main Wire 53 upward through the Shield Cover Slide the Shield Cover 12 onto the Upright 2 Then press the Shield Cover into th...

Page 10: ...use old and new batteries together or alkaline standard and rechargeable batter ies together IMPORTANT If the Console has been exposed to cold temperatures allow it to warm to room temperature before insert ing batteries Otherwise you may damage the console displays or other electronic components Remove the battery covers from the back of the Console 4 and insert batteries into the battery compart...

Page 11: ...into the Console Plate 11 or into the Console 4 Tip Avoid pinching the wires Attach the Console 4 to the Console Plate 11 with four M4 x 16mm Screws 56 43 36 Strap Tab 16 Identify the Right Pedal 36 Using an adjustable wrench firmly tighten the Right Pedal 36 clockwise into the right side of the Crank 43 Firmly tighten the Left Pedal not shown coun terclockwise into the left side of the Crank not ...

Page 12: ...OW TO ADJUST THE PEDAL STRAPS To adjust the pedal straps first pull the ends of the straps off the tabs on the pedals Adjust the straps to the desired position and then press the ends of the straps onto the tabs HOW TO LEVEL THE EXERCISE BIKE If the exercise bike rocks slightly on your floor during use turn one or both of the leveling caps on the rear stabilizer until the rocking motion is elimina...

Page 13: ... seven weight loss and seven timed workouts Each preset workout automatically changes the resistance of the pedals and prompts you to vary your pedaling speed as it guides you through an effective workout You can even connect your MP3 player or CD player to the console sound system and listen to your favorite music or audio books while you exercise To use the manual mode see page 14 To use a prese...

Page 14: ...s tance that you have pedaled in miles or kilometers Profile When a workout is selected this display mode will show a profile of the resistance settings of the workout Pulse This display mode will show your heart rate when you use the handgrip heart rate monitor see step 5 on page 15 Resistance Res This display mode will show the resistance level of the pedals for a few seconds each time the resis...

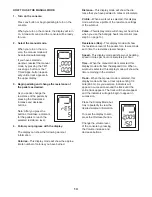
Page 15: ...egin pedaling to turn on the console When you turn on the console the display will turn on A tone will sound and the console will be ready for use 2 Select a preset workout To select a preset workout press the 7 Wt Loss Apps button or the 7 Timed Apps button repeatedly until the number of the desired workout appears in the lower display When you select a preset workout a profile of the resistance ...

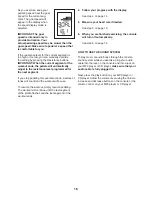
Page 16: ... series of tones will sound and the workout will pause To resume the workout simply resume pedaling The workout will continue until the last segment of the profile flashes and the last segment of the workout ends 4 Follow your progress with the display See step 4 on page 14 5 Measure your heart rate if desired See step 5 on page 15 6 When you are finished exercising the console will turn off autom...

Page 17: ... equipment does cause harmful interference to radio or television reception which can be determined by turning the equipment off and on try to correct the interference by one or more of the following measures Reorient or relocate the receiving antenna Increase the separation between the equipment and the receiver Connect the equipment into an outlet on a circuit different from that to which the re...

Page 18: ...JUST THE REED SWITCH If the console does not display correct feedback the reed switch should be adjusted To adjust the reed switch you must first remove the Shield Cover 12 Using a flat screwdriver release the tabs on the Shield Cover and then lift the Shield Cover away from the frame Next locate the Reed Switch 46 Loosen but do not remove the M4 x 16mm Screw 56 Next rotate the Pulley 43 until a M...

Page 19: ... TO ADJUST THE REED SWITCH on page 18 and remove the Shield Cover 12 Next see the EXPLODED DRAWING near the end of this manual and remove the M4 x 16mm Screws 56 from the Right and Left Shields 38 39 Then using a flat screwdriver to release the tabs and the V clip 27 gently remove the Right Shield Hold the two M8 Locknuts 57 and loosen the two M8 x 16mm Flat Head Screws 34 Next loosen the M10 x 35...

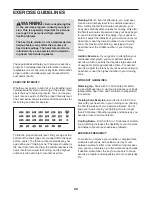
Page 20: ...ic Exercise If your goal is to strengthen your cardiovascular system you must perform aerobic exercise which is activity that requires large amounts of oxygen for prolonged periods of time For aerobic exercise adjust the intensity of your exercise until your heart rate is near the highest number in your training zone WORKOUT GUIDELINES Warming Up Start with 5 to 10 minutes of stretch ing and light...

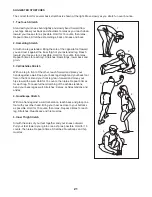
Page 21: ...illes Stretch With one leg in front of the other reach forward and place your hands against a wall Keep your back leg straight and your back foot flat on the floor Bend your front leg lean forward and move your hips toward the wall Hold for 15 counts then relax Repeat 3 times for each leg To cause further stretching of the achilles tendons bend your back leg as well Stretches Calves achilles tendo...

Page 22: ...ew 35 2 Wheel 36 1 Right Pedal Strap 37 1 Left Pedal Strap 38 1 Right Shield 39 1 Left Shield 40 2 M10 Flange Nut 41 2 M10 x 41mm Shoulder Screw 42 4 M6 x 40mm Screw 43 1 Crank Pulley 44 2 Magnet 45 1 Bearing Assembly 46 1 Reed Switch 47 1 Clamp 48 1 Eddy Mechanism 49 1 Flywheel Axle 50 1 Idler 51 1 Resistance Motor 52 1 Resistance Cable 53 1 Main Wire 54 2 M10 x 80mm Screw 55 12 M8 x 20mm Screw 5...

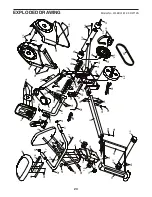
Page 23: ...5 45 39 56 38 56 36 35 41 32 35 41 54 23 56 52 49 40 44 44 43 37 31 33 33 8 4 11 12 18 18 10 10 19 17 17 42 42 28 28 42 22 7 58 58 61 62 3 9 56 24 24 56 6 21 21 20 63 63 5 55 55 13 55 55 55 2 14 29 29 16 16 60 15 25 25 26 51 27 25 56 Model No WLEX31812 0 R0712A ...

Page 24: ...le or liable for indirect special or consequential damages arising out of or in con nection with the use or performance of the product damages with respect to any economic loss loss of property loss of revenues or pro ts loss of enjoyment or use or costs of removal or installation or other consequential damages of any kind Some states do not allow the exclusion or limitation of incidental or conse...

Reviews: