


37
21
74
27
5L
28
21
38
37
21
28
5R
27
21
38
74
6L
6R
5
5R
5L
31
18
10L
18
1
31
18
31
18
10R
26
26
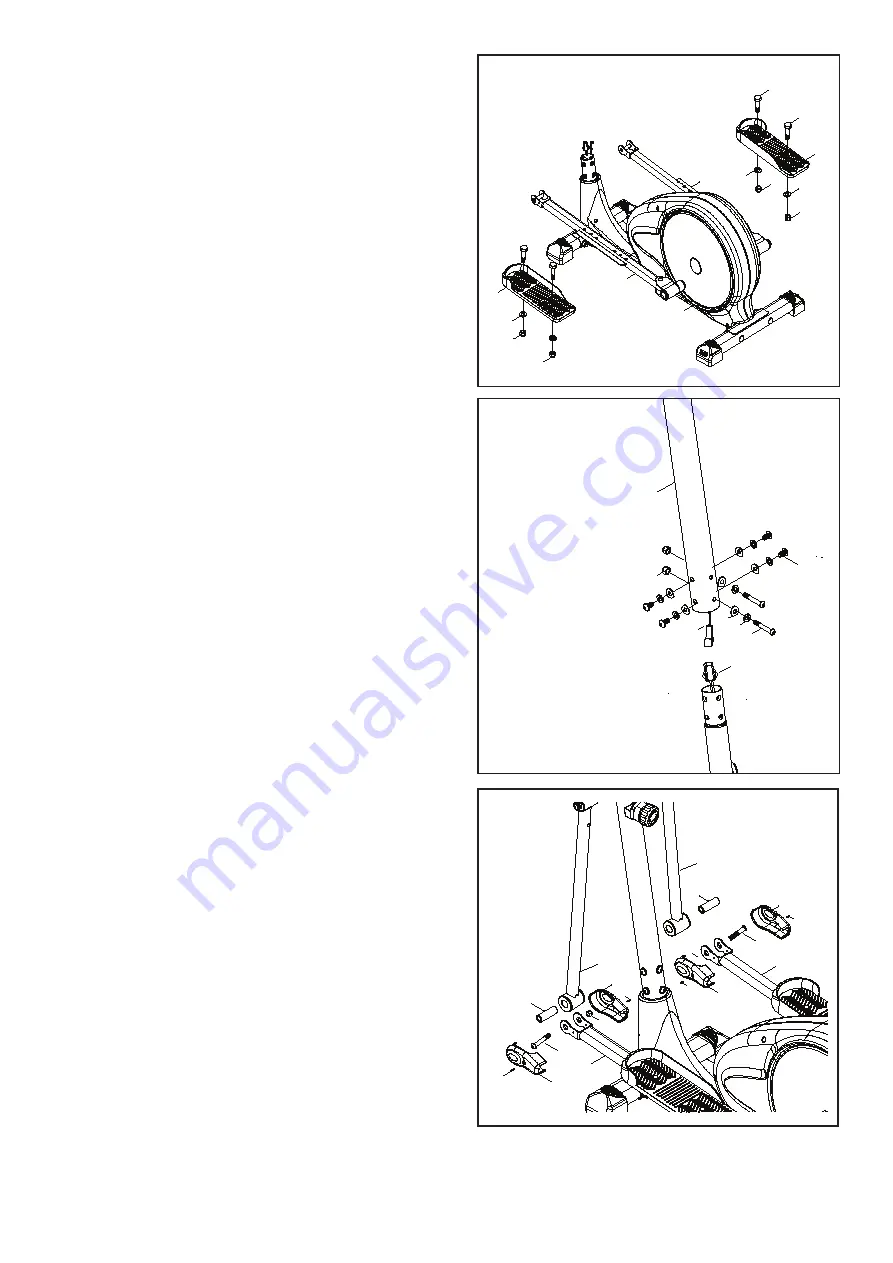
STEP 3 Pedals :
Attach the right pedal (10R) on the right pedal tube (5R).
Insert the outer hexagon screw M10*40 (26) through the
pedal and pedal tube. Use M10 flat washer (31) and
M10 nylon cap (18) to lock them tight.
Attach the left pedal (10L) on the left pedal tube (5L).
Insert the outer hexagon screw M10*40 (26) through the
pedal and pedal tube. Use M10 flat washer (31) and
M10 nylon cap (18) to lock them tight.
STEP 4 Meter Post :
Please adjust the TCD (tension control device) at its
lowest resistance level (Level 1) which enables TCD
upper segment to come out longest. This will help a lot
when you connect the TCD upper and lower segment.
Remove the 2pcs of M8*70 inner hexagon screws (13),
M8 nylon caps (36); 6pcs of M8 spring washers (23);
M8 arch washers (17) and 4pcs of M8*20 screws (19)
which are pre-assembled a the lower part of the meter
post (4).
Move the meter post (4) close to the main frame; con-
nect the upper sensor wire (94) and lower sensor wire
(90).
Finally slide the meter post onto the frame and use the
removed screws, caps, washers to lock them tight.
STEP 5 Lower swing bar and pedal tube :
Use 5MM and 6MM Allen wrench to dis-assmble the
2pcs of M6*20 inner hexagon screws (27), M6*12 inner
hexagon screws (28), lower swing bar axles (74) which
are pre-assembled on the L and R lower siwng bar (5L,
5R)
Insert the swing bar axle (74) into the bottom bushing of
lower swing bar (6L).
Keep the lower swing bar (6L) between the U plate of
the pedal tube. Use the removed M6*20 inner hexagon
screws (27), M6*12 inner hexagon screws (28) to fix
them. Finally tighten them firm by the 5MM and 6MM
Allen wrench
Cover this joint part with pedal tube housing 1 (37) and
pedal tube housing 2 (38). Use M10*4 round cross
screw (21) to lock it tight.
NOTE: The lower swing bar (6R) assembly way is
exactly the same as the left one.
100
18
11
11
94
4
13
23
17
19
36
90
23
19
17
96
79


