background image

5

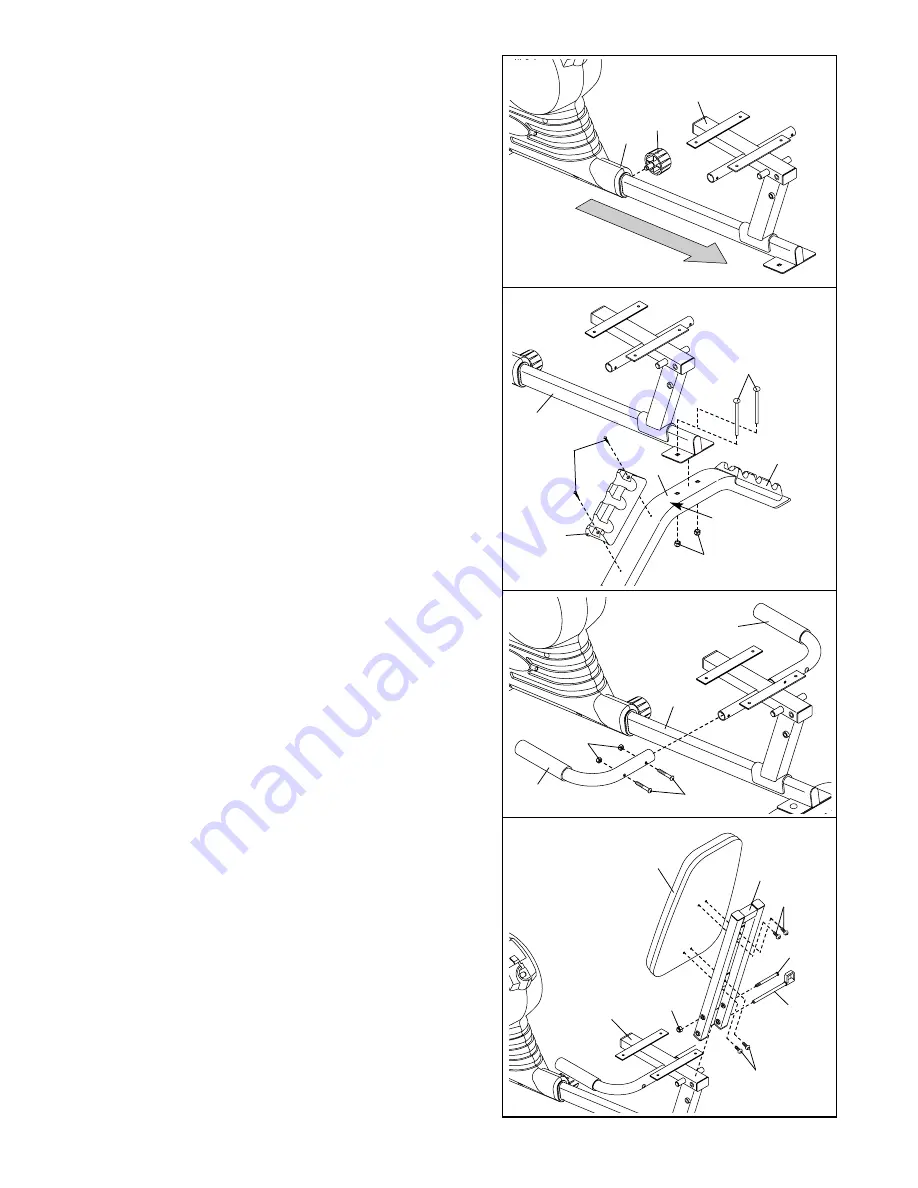
2. Extend the Seat Frame (3) to the position shown.

Firmly tighten the Adjustment Knob (28) into the indi-
cated opening in the Right Side Shield (18).

3. Orient the Rear Stabilizer (9) so the caution decal is on

the left side, as shown. Attach the Rear Stabilizer to
the Seat Frame (3) with two M10 x 54mm Zinc
Carriage Bolts (49) and two M10 Zinc Nylon Locknuts
(61). 

Orient a Hand Weight Rack (4) as shown, and attach it
to the left side of the Rear Stabilizer (9) with two M4 x
16mm Screws (59). Attach the other Hand Weight
Rack in the same way. Note: If the Hand Weight Racks
are not oriented correctly, they will not support the
Hand Weights (not shown). 

Set the six Hand Weights (not shown) on the Hand
Weight Racks (4) as shown on page 3. 

3

59

3

28

18

4

4

9

Decal

49

61

4. Slide a Handlebar (7) onto one side of the Seat Frame

(3). Attach the Handlebar with two M6 x 36mm Zinc
Button Bolts (52) and two M6 Zinc Nylon Locknuts (53).

Attach the other Handlebar (7) to the Seat Frame (3) in
the same way.

7

7

52

53

4

3

3

5. Attach the Backrest Frame (5) to the Seat Frame (3)

with an M10 x 136mm Zinc Bolt (51) and an M10 Zinc
Nylon Locknut (61).

Raise the Backrest Frame (5) until it is nearly vertical.
Insert the Adjustment Pin (55) into the pin hole in the
Backrest Frame and the pin hole in the Seat Frame (3).

Attach the Backrest (10) to the Backrest Frame (5)
with four M6 x 16mm Zinc Screws (57).

5

10

57

57

5

51

61

3

55

2

Summary of Contents for WLEX14930

Page 1: ...ions or if there are missing parts we will guarantee complete satisfac tion through direct assistance from our factory TO AVOID DELAYS PLEASE CALL DIRECT TO OUR TOLL FREE CUSTOMER HOT LINE The trained...

Page 2: ...mmediately 6 Keep children under age 12 and pets away from the crosstrainer at all times 7 The crosstrainer should not be used by per sons weighing more than 250 pounds 8 Wear appropriate exercise clo...

Page 3: ...assist you please note the product model number and serial number before calling The model number is WLEX14930 The serial number can be found on a decal attached to the crosstrainer see the front cove...

Page 4: ...the part from the PART LIST on page 14 The second number refers to the quantity used in assembly Note Some small parts may have been pre assembled for shipping If a part is not in the parts bag check...

Page 5: ...they will not support the Hand Weights not shown Set the six Hand Weights not shown on the Hand Weight Racks 4 as shown on page 3 3 59 3 28 18 4 4 9 Decal 49 61 4 Slide a Handlebar 7 onto one side of...

Page 6: ...he Resistance Control 13 8 Identify the Left Pedal 24 which is marked with an L Using an adjustable wrench firmly tighten the Left Pedal counterclockwise into the left arm of the Crank 27 Tighten the...

Page 7: ...ll the ends of the straps off the tabs on the pedals Adjust the straps to the desired positions and then press the ends of the straps back onto the tabs HOW TO ADJUST THE RESISTANCE To increase the re...

Page 8: ...O OPERATE THE CONSOLE 1 Turn on the console To turn on the console press the mode button or simply begin pedaling The entire display will appear for two seconds the console will then be ready for use...

Page 9: ...n sor wire is plugged fully into the console and that the pulse sensor is attached properly You may have to experiment to find the best position for the pulse sensor Note The pulse sensor is more accu...

Page 10: ...onged periods of time This increases the demand on the heart to pump blood to the muscles and on the lungs to oxygenate the blood For aerobic exercise adjust the intensity of your exercise until your...

Page 11: ...ook or magazine to find exercises that can be per formed using hand weights and a weight bench To give balance to your workouts vary the exercises from workout to workout Begin with 1 set of 12 repeti...

Page 12: ...les Stretch With one leg in front of the other reach forward and place your hands against a wall Keep your back leg straight and your back foot flat on the floor Bend your front leg lean forward and m...

Page 13: ...ant To avoid damage to the console keep liquids away from the console and keep the console out of direct sunlight BATTERY REPLACEMENT If the console display becomes dim the batteries should be replace...

Page 14: ...Endcap 32 1 Left Rear Endcap 33 2 Split Bushing Set 34 1 Crank Washer 35 4 Backrest Frame Endcap 36 2 Seat Frame Endcap 37 1 Flywheel 38 1 Magnet 39 1 Flywheel Axle 40 2 Flywheel Bearing 41 1 Cable Cl...

Page 15: ...27 3 19 13 25 41 21 48 61 61 65 40 39 8 47 42 44 46 46 44 42 47 8 40 49 61 32 9 56 24 26 66 59 50 17 60 18 59 50 28 36 36 53 52 53 23 23 57 57 52 12 10 11 57 5 57 35 35 7 7 37 33 30 14 13 33 30 6 38 5...

Page 16: ...to any product or damage to a product caused by or attributable to freight damage abuse mis use improper or abnormal usage or repairs not provided by an ICON authorized service center products used fo...

Reviews: