background image

5

32

26

22

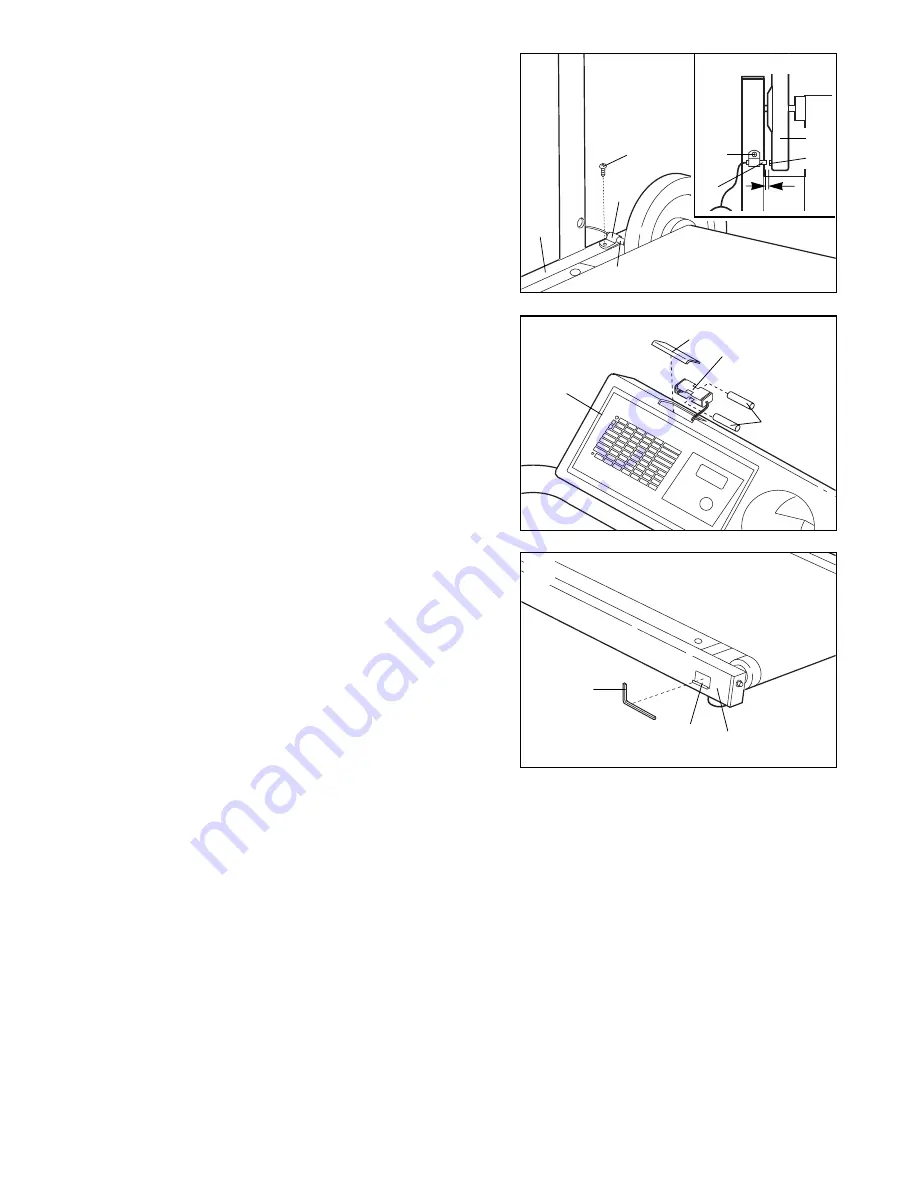
6.  Remove the backing from the Adhesive Clip (22). Press

the Adhesive Clip onto the Frame (32) in the indicated
location. Press the Allen Wrench (26) into the Adhesive
Clip.

7.

Make sure that all parts are tightened before you use the treadmill.

To protect the floor or carpet, place a

mat under the treadmill.

4

4. Insert the Reed Switch (7) into the Reed Switch Clip

(14). Attach the Reed Switch Clip to the Frame (32) with
the Clip Screw (13). 

Refer to the inset drawing. Locate the Magnet (15) on
the left Flywheel (12). Turn the Flywheel until the
Magnet is aligned with the Reed Switch (7). 

Make sure

that there is a 1/8Ó gap between the Magnet and the
Reed Switch.

If necessary, loosen the Clip Screw (13)

and move the Reed Switch slightly. Retighten the Clip
Screw.

13

14

7

32

6

1

33

5. The Console (1) requires two "AA" batteries (not includ-

ed). Alkaline batteries are recommended. Open the
Battery Cover (33) by sliding it upward. Insert two batter-
ies into the battery clip, 

making sure that the negative

(Ð) ends of the batteries are touching the springs in
the battery clip.

Insert the battery clip back into the

Console and slide the Battery Cover (33) back into
place.

5

Batteries

Battery Clip

15

12

13

7

1/8Ó

Top View

Summary of Contents for WLTL23580

Page 1: ...TO AVOID UNNECESSARY DELAYS PLEASE CALL DIRECT TO OUR TOLL FREE CUSTOMER HOT LINE The trained techni cians on our customer hot line will provide immediate assis tance free of charge to you CUSTOMER HO...

Page 2: ...n use 11 Always hold the handrail when mounting dismounting or exercising on the treadmill 12 If you feel pain or dizziness while exercising stop immediately and begin cooling down 13 Use the treadmil...

Page 3: ...other treadmills For your benefit read this manual carefully before using the WALKING TREADMILL If you have other questions please call our Customer Service Department toll free at 1 800 999 3756 Mon...

Page 4: ...Frame with one of the three sets of holes in the Handrail 6 Insert a Long Pin 5 into each side of the Handrail and the Frame Make sure that both Long Pins are at the same level Refer to the inset draw...

Page 5: ...t Flywheel 12 Turn the Flywheel until the Magnet is aligned with the Reed Switch 7 Make sure that there is a 1 8 gap between the Magnet and the Reed Switch If necessary loosen the Clip Screw 13 and mo...

Page 6: ...e number of fat calories you have burned See BURNING FAT on page 9 Calories CALS This mode shows the approx imate number of calories you have burned If desired the display can be reset by pressing the...

Page 7: ...han your back Raise the treadmill to the vertical position 2 Move your left hand to the posi tion shown and hold the treadmill firmly Using your right hand insert the Short Pin 4 through the Handrail...

Page 8: ...elt is correct you should be able to lift each side of the walking belt 2 to 3 inches Walk on the treadmill for a few minutes Repeat until the walking belt is properly tightened Be careful to keep the...

Page 9: ...at calories for energy If your goal is to burn fat adjust the intensity of your exercise until your heart rate is between the lower two numbers in your training zone as you exercise Aerobic Exercise I...

Page 10: ...nge without notice See the back cover for information about ordering replacement parts PART LIST Model No WLTL23580 R0898A A cool down consisting of five to ten minutes of stretching Stretching after...

Page 11: ...0 9 10 9 10 11 8 12 8 9 3 27 3 27 30 29 28 28 29 30 31 23 20 21 24 25 10 13 17 19 23 20 21 21 20 5 16 7 11 15 7 3 3 3 2 12 32 9 10 9 10 9 10 9 10 33 22 26 4 14 13 18 18 EXPLODED DRAWING Model No WLTL2...

Page 12: ...nt proof of purchase All returns must be pre authorized by ICON This warranty does not extend to any product or damage to a product caused by or attributable to freight damage abuse misuse improper or...

Reviews: