background image

B

EFORE 

U

SING FOR THE 

F

IRST 

T

IME


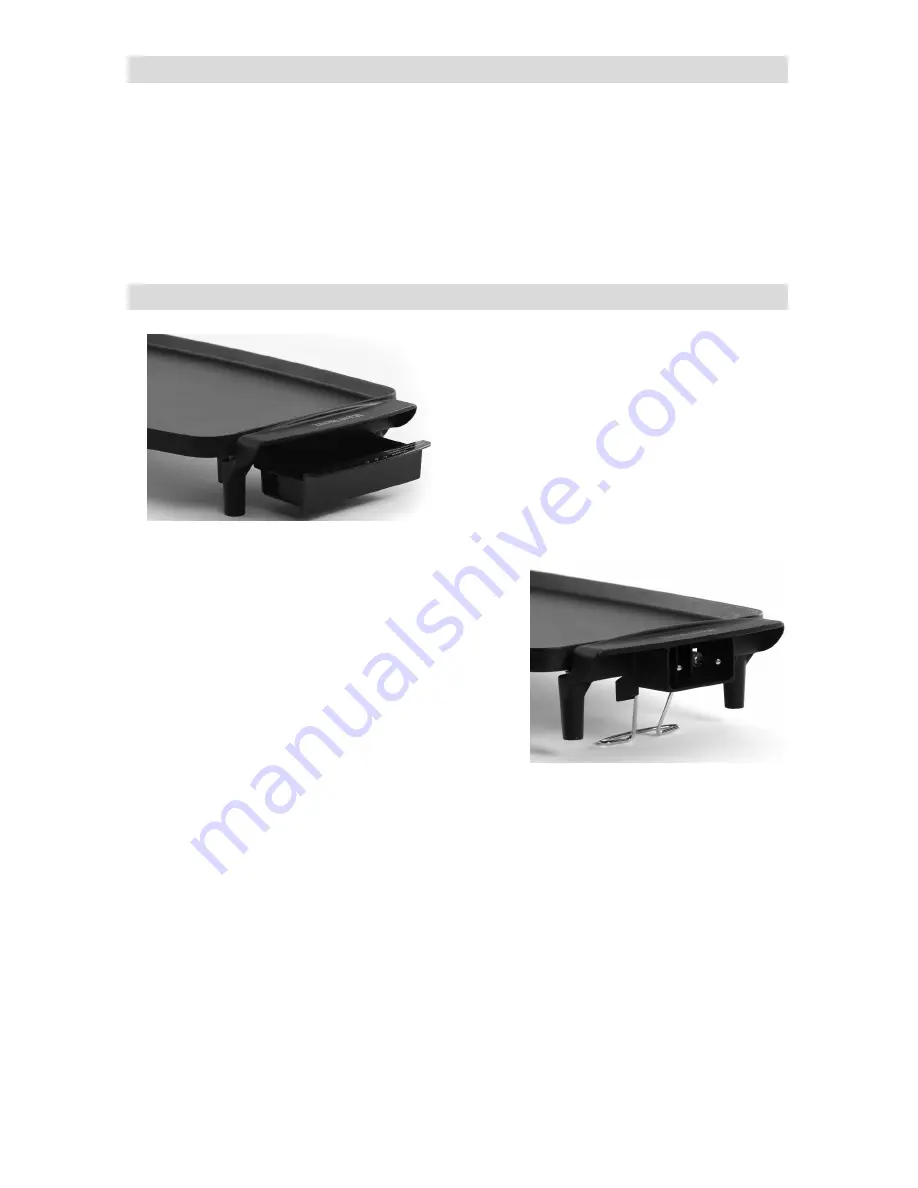
1.  Wash the griddle and grease tray thoroughly in hot soapy water with a dishcloth 

or sponge to remove any manufacturing oils.  Rinse thoroughly and dry.  Be 

sure temperature control socket is completely dried.  Slide the grease tray into 

the holder below the drain hole.  Always use the griddle with the grease tray in 

place to collect grease that drains from foods while cooking. 

2.  Condition the non-stick finish by lightly wiping two teaspoons of cooking oil with 

paper toweling or a soft cloth over the entire, cool, surface.  Let the cooking oil 

remain on the finish.  Do not use butter or shortening to condition the non-stick 

surface. 

U

SING 

Y

OUR 

G

RIDDLE


1.  Always use the griddle on a dry, level, 

heat-resistant surface.  Do not operate 

the griddle when hands are wet.  

Attach the temperature control to the 

griddle.  Be sure that the dial is set to 

“OFF.”  Be sure that the grease tray is 

in position below the drain hole on the 

griddle surface.  Do not block airflow 

under griddle. Plug the cord into a 120 

volt, AC electrical outlet ONLY. Do 

not use any thermo-plug other than that which came with your griddle. 

2.  To aid in the drainage of grease, open the tilt 

leg into position to angle the griddle. See 

image to the right. 

3.  Refer to the temperature guide in this 

booklet for selecting correct heat settings. If 

food is taken directly from the freezer, use 

the heat setting as indicated in the guide, but 

allow longer times to cook.  Most foods will 

require a preheat period.   

4.  The signal light on the temperature control 

will go out when the cooking temperature has been reached; add food.  Heat 

may be increased or decreased, depending upon personal preference and the 

type or amount of food being prepared.  The signal light will go on and off 

periodically to indicate that proper temperature is being maintained. 

5.  Foods may be prepared with or without fats.  When frying, the use of a small 

amount of butter, fat or oil will improve the flavor, color and crispness of foods.  

When frying fatty foods such as bacon or sausage, excess grease will drain into 

the grease tray below the drain hole on surface of griddle.  Do not remove the 

grease tray during cooking. Always allow the griddle to cool completely before 

removing the grease tray. 

6.  Nylon, plastic, wooden or rubber cooking tools are recommended for use on the 

non-stick surface.  Smooth-edged metal cooking tools may be used with care.  

Do not use sharp-edged cooking tools such as forks, knives or food choppers as 

scratching may occur.  Minor scratching will affect only the appearance of the 

finish; it will not harm its non-stick property. 

Summary of Contents for 76225

Page 1: ...ebsite www registerfocus com Important Safeguards 2 Before Using for the First Time 4 Using Your Griddle 4 Cleaning Your Griddle 5 Temperature Guide 6 Warranty 8 SAVE THIS INSTRUCTION MANUAL FOR FUTUR...

Page 2: ...must be used when moving an appliance containing hot oil or other hot liquids Always attach plug to appliance first then plug cord into the wall outlet To disconnect turn any control to OFF then remov...

Page 3: ...If the plug does not fit fully into the outlet or extension cord reverse the plug If the plug still does not fit contact a qualified electrician Do not attempt to modify the plug in any way Do not us...

Page 4: ...angle the griddle See image to the right 3 Refer to the temperature guide in this booklet for selecting correct heat settings If food is taken directly from the freezer use the heat setting as indicat...

Page 5: ...water and dry completely including temperature control socket area 5 Your griddle and grease tray with the temperature control removed may be cleaned in an automatic dishwasher Clean the grease tray i...

Page 6: ...s per side EGGS fried 250 F Fry with or without cooking oil or butter Fry about 3 minutes per side FRENCH TOAST 350 F Dip bread in milk egg mixture Place bread on ungreased griddle or saut in butter B...

Page 7: ...ftened butter or dip in French toast batter Grill 3 to 4 minutes per side SAUSAGE 300 F Brown about 8 to 10 minutes per side Pork should always be served well done STEAK 400 F Score fat on sirloin por...

Page 8: ...the original purchase date will be required for all warranty claims hand written receipts are not accepted You may also be required to return the appliance for inspection and evaluation Return shippi...

Page 9: ...Internet www registerfocus com Pr cautions Importantes 2 Avant la Premi re Utilisation 4 Utilisation de Votre Plaque 4 Nettoyage de Votre Plaque 5 Guide de Temp rature 6 Garantie 8 CONSERVEZ CE MODE D...

Page 10: ...rior de quelque mani re que ce soit Pour des renseignements sur les r parations voir la page de garantie L utilisation d accessoires non recommand s par Focus Electrics risque de provoquer des blessur...

Page 11: ...uis l extr mit du plan de travail de la table ou de toute zone o des enfants pourraient tirer dessus ou tr bucher Cet appareil est pourvu d une fiche polaris e une lame est plus large que l autre Afin...

Page 12: ...l vacuation de la graisse ouvrez le pied d inclinaison en position pour incliner la plaque lectrique Voir l image droite 3 Consultez le guide des temp ratures de ce livret pour s lectionner les r gla...

Page 13: ...opre mais sans enlever les minuscules particules alimentaires qui peuvent s incruster dans les finitions N utilisez pas de tampon r curer m tallique ou de poudre r curer abrasive 3 Nettoyez le dessous...

Page 14: ...s indiqu es sur les pages suivantes sont les quantit s maximales qui peuvent tre grill es en m me temps ALIMENT TEMP ALIMENT TEMP ALIMENT TEMP Lard 300 F 150 C Jambon 325 F 160 C Sandwiches 375 F 190...

Page 15: ...mati re grasse v g tale ou de beurre sur le grill Faites dorer les pommes de terre en les m langeant et en les retournant de temps en temps SANDWICHES 375 F 190 C Placez la garniture entre les tranche...

Page 16: ...n justificatif prouvant la date d achat d origine sera exig pour toutes les demandes de prise en charge dans le cadre de la garantie les factures manuscrites ne sont pas accept es Focus Electrics n es...

Page 17: ...i s t e r f o c u s c o m e n I n t e r n e t Precauciones Importantes 2 Antes de Usar por Primera Vez 4 C mo Usar su Plancha 4 C mo Limpiar su Plancha 5 Gu a de Temperaturas 6 Garant a 8 CONSERVE ES...

Page 18: ...electrodom stico funciona mal o ha sido da ado de cualquier manera Para informaci n relativa al servicio de reparaciones vea la p gina de garant as El uso de accesorios no recomendados por Focus Elect...

Page 19: ...gue del borde de un mostrador mesa u otra superficie donde pueda ser halado por ni os o se pueda tropezar con l Este artefacto electrodom stico tiene un enchufe polarizado una clavija es m s ancha que...

Page 20: ...tapa t rmica que no sea la que vino con la plancha el ctrica 2 Para ayudar en el drenaje de la grasa abra la pata inclinable para colocar la plancha el ctrica en un ngulo Vea la imagen a la derecha 3...

Page 21: ...erior de aluminio no recubierto de la plancha el ctrica con agua caliente jabonosa y una esponja met lica de lana de acero llena de jab n Quite las manchas con un limpiador dom stico Elimine la grasa...

Page 22: ...sas 325 F 160 C Salchicha 300 F 150 C Pescado 350 F 175 C Panqueques 350 F 175 C Bistec 400 F 205 C Frankfurters 300 F 150 C Papas 350 F 175 C Torrejas 350 F 175 C Chuletas de Cerdo 325 F 160 C ALIMEN...

Page 23: ...n Unte la parte externa del s ndwich con mantequilla suave o m jelo en la masa de torrejas Fr a 4 a 4 minutos cada lado SALCHICHA 300 F 150 C Dore cada lado unos 8 a 10 minutos El cerdo siempre debe s...

Page 24: ...olsables Para todas las reclamaciones de garant a se requerir un recibo que demuestra la fecha de compra original los recibos escritos a mano no son aceptados Focus Electrics LLC no se hace responsabl...

Reviews: