background image

 5 


SALT

 has several functions in making bread.  It inhibits the yeast growth while strengthening the gluten structure to make 

the dough more elastic, plus it adds flavor.  Use ordinary table salt in your bread maker.  Using too little or eliminating the salt 
will cause the dough to over-rise.  Using too much can prevent the dough from rising as high as it should.  “Light” salt can be 
used as a substitute for ordinary table salt, providing it contains both potassium chloride and sodium.  Use same amount as 
recommended for table salt

.  When adding salt to pan, add to one corner to keep it away from yeast, especially when using timer 

as the salt can retard its growth. 


YEAST

 is a living organism, which, through fermentation, feeds on carbohydrates in flour and sugar to produce carbon 

dioxide gas, which makes the bread rise.  Active dry, fast rising or bread machine yeast can be used in your bread maker. Use 
only the amount stated in the recipe. Using a little more can cause the dough to over-rise and bake into the top of bread maker.  
Fast rising yeast and bread machine yeast are virtually the same and interchangeable with one another.


DO NOT USE COMPRESSED CAKE YEAST

.  Recipes in this book were tested using only active dry, fast rising and bread 

machine yeast. 
 
Keep yeast stored in the refrigerator.  You may find it handy to purchase yeast in glass jars so as to measure the exact amount 
without having to waste any.  If using yeast packed in a   ¼-ounce foil envelope, it is best to open a fresh envelope every time you 
bake.  If you save the unused amount from the open envelope, store in a dry, airtight container in the refrigerator.  Date the 
container and use promptly.  Do not mix old and new yeast in a recipe.  A ¼-ounce foil envelope of yeast contains 2¼ teaspoons. 
 

ALWAYS MAKE SURE YEAST IS FRESH AND HAS NOT EXPIRED THE “USE BY “ DATE PRINTED ON THE 
JAR OR ENVELOPE. 


VITAL WHEAT GLUTEN

 is the gluten protein, which has been rinsed from wheat flour and then dried.  Vital gluten 

will increase the protein content in flour to product a higher loaf of bread with lighter texture.  About the only time you may 
wish to consider adding vital gluten is for 100% whole wheat bread or recipes containing a high percentage of whole wheat 
or other whole grain flours or cereals.  As a guideline, add one (1) teaspoon vital gluten per cup of flour used in the recipe.  
Check the dough during kneading; you may need to add a little water as the vital gluten absorbs liquid.  Vital gluten can be 
obtained at most health food stores.  Do not use gluten flour, as this contains less protein and is less effective.


Or, to increase the protein content, you can use a large egg as a substitute for vital gluten.  Just add it to the liquid in the 
bottom of pan and 

reduce the recommended amount of liquid in recipe by two (2) ounces (¼ cup).  

Again, check the 

condition of the dough during the knead cycle. 


CINNAMON AND GARLIC

: Adding too much cinnamon or garlic can affect the texture and size of the loaf.  

Cinnamon can break down the structure of the dough, affecting height and texture, and garlic can inhibit the yeast activity.  
Use only the amount of cinnamon and garlic recommended in the recipe; don’t be generous.


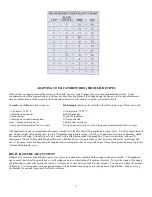
MEASURING INGREDIENTS: THE KEY TO SUCCESSFUL BREAD MAKING 


The most important part of bread making is to 

MEASURE THE INGREDIENTS PRECISELY AND ACCURATELY

.  You may 

need to adjust your measuring habits, but the rewards for doing so will be great.  Follow these very important tips: 


READ 

the recipe first and organize the ingredients in the order in which they are added to the pan.  Many bread disasters 

occur because an ingredient was left out or added twice.


DO NOT EXCEED

 the ingredient capacity of the bread maker.  Use only fresh ingredients.


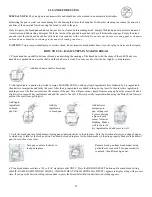
ALWAYS ADD INGREDIENTS

 in the order listed: liquid ingredients first, then butter or margarine, dry ingredients 

next and finally yeast in the very center.  Before adding yeast, 

ALWAYS

 tap the pan to settle dry ingredients into corners of 

pan to prevent liquid from seeping up.  Make a slight well in center of dry ingredients and place the yeast in the well. This 
sequence is very important, especially when using the 

timer

 to prevent yeast from getting wet before bread making begins.


1.  ALWAYS 

use standard glass or plastic “see-through” liquid measuring cups to measure liquids.  Place cup on flat surface and  

Summary of Contents for L4972T

Page 1: ...than cleaning See warranty section in this booklet for service details Do not attempt to repair it yourself For household use only An off odor from motor may be noted with first use which is normal a...

Page 2: ...POON DRY INGREDIENTS especially bread flour into measuring cups then level with a knife DO NOT SCOOP measuring cups into flour as this will cause dough to be too dry and result in short loaves USE set...

Page 3: ...ol on rack 15 to 30 minutes before slicing See Clean After Each Use section in this book for cleaning pan and knead bar QUICK START STEPS FOR MAKING A RECIPE IN THIS BOOK Choose one of the many bread...

Page 4: ...ou know the bread maker is not in operation 10 DO NOT COVER bread maker with anything during operation as this can cause malfunction 11 DO NOT TOUCH control panel buttons after bread maker has been tu...

Page 5: ...d to 75 85 F before adding to bread pan Warm in a glass measuring cup in microwave or in a small pan on top of the range DO NOT HEAT MILK ABOVE 110 F AS THIS COULD AFFECT THE YEAST WATER used in combi...

Page 6: ...r texture About the only time you may wish to consider adding vital gluten is for 100 whole wheat bread or recipes containing a high percentage of whole wheat or other whole grain flours or cereals As...

Page 7: ...EL not rounded or heaping as a little difference can affect the bread See Diagram 4 DO NOT USE TABLEWARE AS MEASURING SPOONS as these vary in size and will not be accurate USING BREAD MIXES IN YOUR BR...

Page 8: ...ry ingredients in pan Make a slight well and add yeast to well Program for appropriate setting After 8 to 10 minutes of continuous kneading check the condition of dough It should be soft a bit sticky...

Page 9: ...8...

Page 10: ...lian type breads which have crisp chewy crusts Either active dry or bread machine fast rising yeast can be used at this setting An audible alert will sound during knead cycle to add extra ingredients...

Page 11: ...ff press and hold start stop button down for about three 3 seconds or until the red ON light goes out Once you have started the bread maker the colon between hours and minutes will flash and minutes w...

Page 12: ...edients first followed by dry ingredients then butter or margarine and lastly the yeast After the dry ingredients are added to the pan tap to settle then level dry ingredients pushing some of the flou...

Page 13: ...display and an audible alert will sound to let you know the bread is done If program is locked in hold LOCK button down for 3 seconds or until word LOCK disappears from display Turn bread maker off by...

Page 14: ...an and follow recipe directions to complete the recipe The bread maker will automatically turn itself off after the dough cycle is complete the red ON light will go out and the LOCK button will automa...

Page 15: ...washed in an automatic dishwasher This can cause damage to the bearing that turns the knead bar and reduce the non stick qualities of the coating causing the bread to stick 1 Unplug cord from electric...

Page 16: ...dd ingredients such as raisins nuts cheese etc to prevent over mixing or crushing Ignore alert if not adding ingredients If you need to make any adjustment to the recipe such as adding a little more f...

Page 17: ...Too much flour Increase liquid by 1 tablespoon Measure flour accurately leveling off measuring cup See pg 5 5 Dark crust color too thick DARK crust setting used Use LIGHT or MEDIUM crust color settin...

Page 18: ...rogramming control panel press start stop button to turn machine on Knead bar must be on shaft in bottom of pan before adding ingredients 16 Burning odor noted during operation Ingredients spilled ins...

Page 19: ...nner Rolls Bread Sticks Total Calories 128 4 Total Fat g 2 4 Total Carb g 23 4 Total 59 6 Total Fat g 1 5 Total Carb g 9 8 Total Protein g 4 0 Fiber g 1 0 Chol mg 5 1 Protein g 1 9 Fiber g 0 3 Chol mg...

Page 20: ...gredients pushing some of the mixture into the corners Place butter into corners of pan 3 Make a well in center of dry ingredients add yeast Lock pan into bread maker 4 Program for recommended Bread S...

Page 21: ...gredients except yeast to pan Tap pan to settle dry ingredients then level ingredients pushing some of the mixture into the corners Place butter into corners of pan 3 Make a well in center of dry ingr...

Page 22: ...dry ingredients then level ingredients pushing some of the mixture into the corners Place butter into corners of pan 3 Make a well in center of dry ingredients add yeast Lock pan into bread maker 4 Pr...

Page 23: ...for SWEET and desired Bread Color Program TIMER if being used Start bread maker When alert sounds during kneading period add raisins and nuts if desired Close cover When done turn off and remove brea...

Page 24: ...o settle dry ingredients then level ingredients pushing some of the mixture into the corners Place butter into corners of pan 3 Make a well in center of dry ingredients add yeast Lock pan into bread m...

Page 25: ...Brush with butter or slightly beaten egg white and bake in preheated 350 F oven for 15 to 20 minutes or until golden brown Serve warm CRESCENT ROLLS FOUR LEAF CLOVER ROLLS Divide dough into 4 equal pi...

Page 26: ...Place dough onto floured surface Knead dough about 1 minute then let rest 15 minutes 5 Roll dough into a rectangle about 15 x 10 inches Spread cup softened butter over dough to within 1 inch of edges...

Page 27: ...r online at www westbend com Be sure to include the catalog number of your Bread Maker 410 found on the back of your machine a description of what you want and the quantity Along with this information...

Reviews: