
If your mic. works perfectly, you may continue to the next step.
3. CONNECT A SERIAL CABLE:
(SKIP THIS STEP FOR VOX OPERATION) Use
a standard modem cable connected between an available serial port on your computer
and the RIGblaster (do not use a null-modem cable).
Boot up your computer with the RIGblaster in the ‘‘auto’’ mode. Watch the ‘‘digital’’ light
on the RIGblaster and the PTT transmit indicator on your radio. During the boot up
sequence you should see the lights turn on together for several seconds, twice. After boot
up they should be off. This test confirms that the cable, the computer, and the RIGblaster
are working properly together. All the hardware is working!
If this test is correct continue to the next step.
4. AUTO SERIAL CONTROL SET UP AND TEST:
(SKIP THIS STEP FOR VOX
OPERATION) Start the program that you have installed and have working. Go to this
software’s configuration menu (consult the software documentation) and configure the
software to use the COM port that you have your serial cable plugged in to. You may also
need to set the software to use either DTR or RTS lines; the RIGblaster monitors both.
Set the RIGblaster to the ‘‘auto’’ mode. Put your software in transmit (TX) and check that
the ‘‘digital’’ light comes on and that your radio automatically switches to transmit (you
should not see any RF output until you complete the next step).
Continue to the next step only if you have this working.
5. CONNECT TRANSMIT AUDIO CABLE:
Connect a STEREO audio cable from your
sound card line output (laptop headphone output) to the RIGblaster's audio input. You
may plug your computer speakers back into the RIGblaster’s audio output so that they
still operate.
6. SET THE AUDIO LEVEL TO YOUR RIG:
Use your normal mic. gain setting with
your speech compressor off and the transmitter RF drive all the way up.
Confirm that the RIGblaster’s audio level control is turned all the way up (full clockwise
as viewed from the back) (DO NOT USE FORCE! You can damage this control).
Open your Windows sound control panel (double click the yellow speaker icon) and un-
mute or select the wave output and master output. Set the virtual sliders for master and
wave to one notch down from the top. Also set the virtual balance sliders to the center.
If your computer speakers are hooked up and they have a volume control knob, turn tha
t
knob most of the way, but not all the way, down.
Set the RIGblaster channel selector switch to both channels and the vox/auto switch to
auto. Consult the section in this manual on setting transmit audio to get the cleanest
signal.
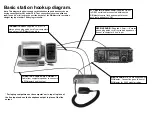
RIGblaster
rig to sound card interface
Thank you for buying the RIGblaster. We are sure you will find it provides many hours
of amateur radio enjoyment. Please read and follow these instructions carefully for
a fast and easy installation.
INSTALLATION INSTRUCTIONS
(PROCEED IN ORDER, STEP BY STEP!)
1. INSTALL SOFTWARE AND START RECEIVING:
You do not need the RIGblaster
to receive so leave it in the box. Use our CD or check for newer versions of the software
on the internet. If you do not have a preference for which program or mode you would
like to try first, we recommend that you start with WinPSK or DIGIpan.
Hook up a receive audio cable according to the diagram in this manual. We recommend
that the speaker output from your radio goes to the line input on your computer for the
receive audio connection. Other connections may used but they may require proper
grounding . One grounding precaution is make sure that your computer is plugged in
to the same grounded outlet as your radio. Do not try to run your computer on one circuit
in your house and your radio on another; you are asking for problems.
Read your software documentation carefully and you should be up and receiving in
minutes. Most start-up problems are software related!
After you get your software receiving, next check the transmit audio. You should be able
to hear transmit sound from the software. This is an important test of your sound card’s
proper operation.... no transmit sound...no transmit! Do not proceed further until you fix
this.
If you have any problem with the software you try initially, simply try another program. If
several programs do not work, you probably have a sound card set up problem. Sound
card problems are supported by the hardware manufacturer. Please do not contact us
if you have a sound card problem, we probably cannot help.
Continue to the next step only after you have confirmed that you can receive and have
transmit sound. See the software documentation if you have problems.
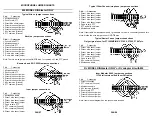
2. CHECK AND SET THE RIGblaster JUMPERS:
Jumpers are not installed for
operation as shipped out of the box; they are packed separately. Install the jumpers. See
the section later in this manual for jumper installation details.
Next, hook up the RIGblaster mic. cable, connect the power supply, and plug in your
stock mic (the one that came with the radio). Confirm that EVERYTHING on the original
mic. works perfectly, including on-the-air audio reports. If the stock mic. works perfectly,
this confirms that the jumpers are installed correctly. If you were using another mic.
install it and check it also.
PAGE 2
PAGE 1


