background image

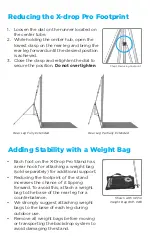
Reducing the X-drop Pro Footprint

Adding Stability with a Weight Bag

1.  Loosen the dial on the runner located on 

the center tube.

2.  While holding the center hub, open the 

lowest clasp on the rear leg and bring the 

rear leg forward until the desired position 

is achieved. 

3.  Close the clasp and retighten the dial to 

secure the position. 

Do not over tighten

.

•  Each foot on the X-Drop Pro Stand has 

a rear hook for attaching a weight bag 

(sold separately) for additional support. 

•  Reducing the footprint of the stand 

increases the chance of it tipping 

forward. To avoid this, attach a weight 

bag to the base of the rear leg for a 

counterbalance.  

•  We strongly suggest attaching weight 

bags to the base of each leg during 

outdoor use.

•  Remove all weight bags before moving 

or transporting the backdrop system to 

avoid damaging the stand.

Rear Leg Fully Extended

Shown with H2Pro 

Weight Bag #HP-WB1

Rear Leg Partially Extended

Step 1, Reducing Footprint

Summary of Contents for drop Pro

Page 1: ...Quick Start Guide ...

Page 2: ...on arm into the middle receptacle of the X drop s center hub with the black hooks facing forward 2 Slide the 2 remaining extension arms into the outermost position of the outer receptacles To release the arms simply pull the arms out of the center hub 3 Open both sets of clasps on each arm 4 Fully extend the outermost sections and close the clasps to lock them into place 5 Attach the top of the ba...

Page 3: ...asps closest to the foot of each leg 3 Fully extend the lower section of each leg and close the clasps to lock them into place 6 Extend the remaining section until the top of the backdrop is straight and taut Close the clasps to secure the position 7 Locate the two grommets at the bottom of the backdrop and attach them to the hooks on the front legs 5 x 7 and 5 x 12 Backdrop Assembly Step 6 Upper ...

Page 4: ...ull the arm out of the receptacle 3 Open both sets of clasps on each arm 4 Fully extend the outermost sections and close the clasps to lock them into place 5 Attach the top of the backdrop that has 3 grommets to the corresponding arm s hook 6 Extend the next section about halfway until the top of the backdrop is straight and taut Close the clasps to secure the position 7 Locate the two grommets at...

Page 5: ... the X Drop Pro Stand has a rear hook for attaching a weight bag sold separately for additional support Reducing the footprint of the stand increases the chance of it tipping forward To avoid this attach a weight bag to the base of the rear leg for a counterbalance We strongly suggest attaching weight bags to the base of each leg during outdoor use Remove all weight bags before moving or transport...

Page 6: ...demark trade name or logo affixed to them This warranty does not apply to a damage caused by accident abuse misuse flood fire earthquake mold or other external causes b damage caused by operating the product outside the permitted or intended uses described by Westcott c a product or part that has been modified to alter functionality or capability without the written permission of Westcott or d cos...

Reviews: