Section BXB-19D-20A
030-100689 Rev. A
R
11
1009IARA
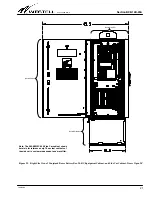
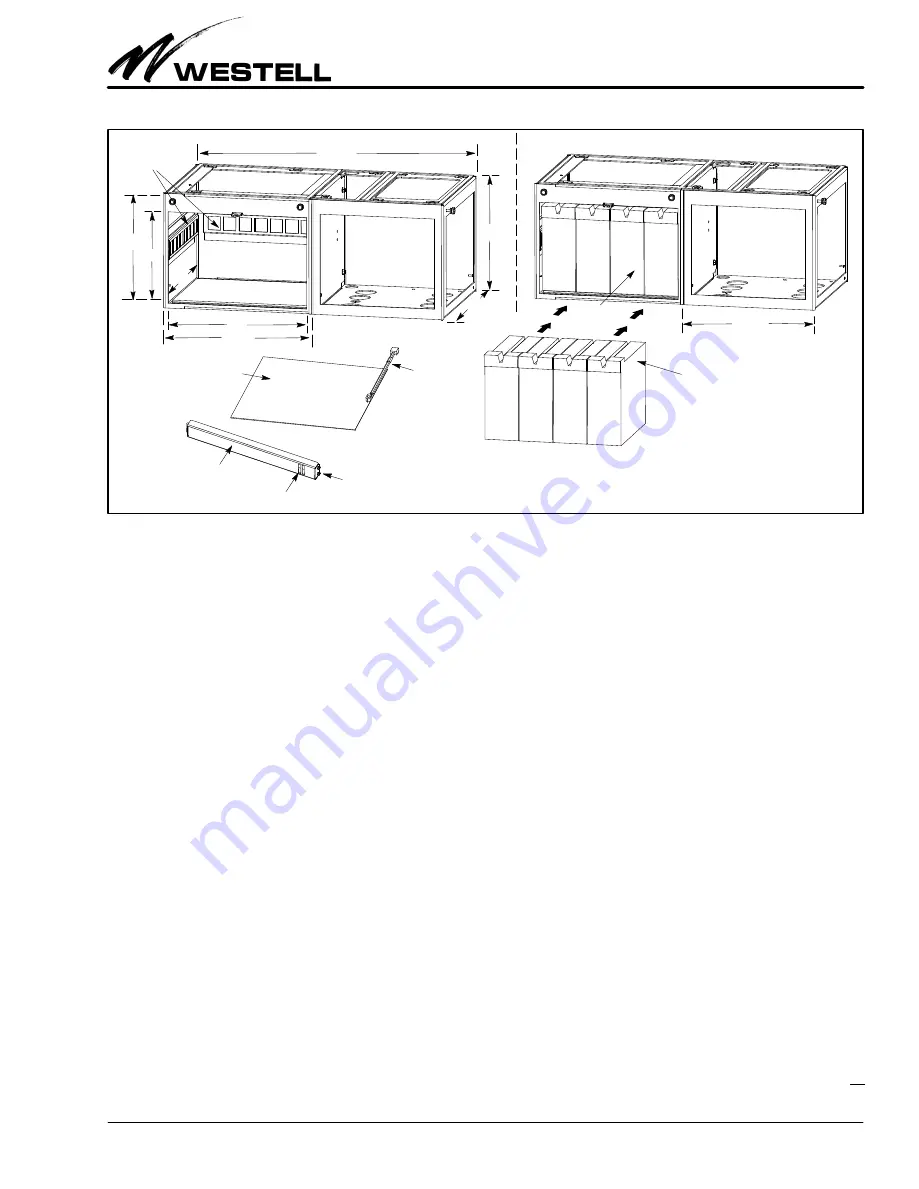
Figure 13. Placing Batteries in Battery Compartment
Batteries (not provided)
Tie-down
34.5"
11.1"
13.25"
Battery Compartment
Use battery spacer block
if using smaller batteries
at rear of battery compartment
Slot to tie battery strap
After batteries are installed,
tie them down using the
provided tie-down strap:
railings
Pass the strap through the left wall
tie-down railing, route the strap
around the front and right side of the
battery group, then pass the strap
through a back wall railing (or the
right divider wall railing), then clip the
strap ends/connectors together and
tighten the strap, to snug the batteries
up against the rear and left walls of
the compartment.
Cable Compartment
Battery heater pad (optional)
(Place in battery compartment
before batteries)
Installed
Cable Compartment
18.6"
14"
Secures block to
divider wall
Pad
connector
cable
17"
18"
18"
batteries
16.5"
8.
Connect AC plug to AC duplex outlet in main cabinet.
In
the equipment cabinet, insert the battery cable’s AC plug
(Connector E) into the AC duplex outlet at the bottom of
the cabinet.
9.
Connect temperature sensor probe connector to battery
charger.
Locate connector F of the battery cable and con-
nect it to the appropriate connector of the battery charger
(rectifier) in the cabinet.
3.8.3
Installing the Batteries
Before battery installation, first install the battery cable by per-
forming the steps in Paragraph 3.8.2, then install the optional
heater pad (see Figure 13), then install the batteries, per com-
pany practice or per the steps below. The total battery weight
cannot exceed 250 pounds. See Figure 13 and Table 1 for bat-
tery compartment dimensions.
1.
Select batteries.
Select the appropriate size and type of
batteries per company practice and per the equipment re-
quirements.
2.
Install the optional battery spacer block.
To help insure a
snug battery fit, install the optional battery spacer block if
the batteries are small enough to accommodate the instal-
lation of all the batteries plus the spacer block. The left
wall tie-down railing can be used to adjust the installation
depth of this spacer block. Orient the block as shown in
Figure 13, and insert the left side flange of the block into
the left-wall tie-down railing, per the battery depth. Se-
cure the right side of the block to the holes located in the
compartment divider wall.
3.
Verify the optional battery heater pad is installed.
If using
the optional battery heater pad, install it per Step 6 in
Paragraph 3.8.2.
4.
Place batteries in the battery compartment.
Gently place
the batteries in the battery compartment, on top of the op-
tional installed heater pad. Press the batteries up against
the left and rear compartment walls (or the battery spacer
block). Do not place a battery on the heater pad
cable
or
connector
, to avoid possible damage.
5.
Jumper the batteries together.
Jumper the batteries to-
gether, per company practice.
6.
Connect battery cable connectors to batteries.
In the bat-
tery compartment, locate Connectors A and B of the
battery cable (see Figure 12) and connect them to the
proper battery terminals, per company practice.
7.
Make battery compartment temperature sensor connec-
tions.
Locate the battery compartment’s temperature
sensor cable (install it if not pre-installed with the batter-
ies) and connect it to Connector D of the battery cable.
8.
Connect DC leads to screw terminals of battery charger
(user provided).
Locate the battery cable’s DC leads (G
and H in Figure 12) and connect them to the screw termi-
nals of the battery charger’s DC screw terminal strip, per
company practice. Connect the red positive lead to the +V
screw terminal, and connect the black negative lead to the
-V terminal.
3.8.4
Installing the Battery Tie-down Strap
Once the batteries are placed in the battery compartment, use
the provided battery strap to secure the batteries in place. To


