Section DSA-WM2-140-202
030-101674 Rev. A
R
4
0803I2RA
Enclosure
Back Plate
Channel of 19" or
23" Equipment Rack
DSAWM-214
Enclosure
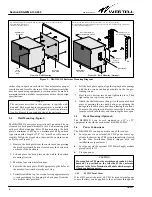
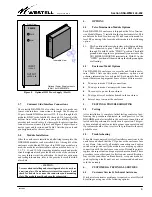
Enclosure can be mounted in racks with either 1" or 1.75" rack unit spacing.
Kit # 080-500455 is designed to mount 214 to rack. First mount kit to mounting , then mount
enclosure to kit mounting plate.
Figure 3. DSAWM-214 Enclosure Mounting Diagram
ÍÍÍÍÍÍÍÍ
ÍÍÍÍÍÍÍÍ
ÍÍÍÍÍÍÍÍ
ÍÍÍÍÍÍÍÍ
ÍÍÍÍÍÍÍÍ
ÍÍÍÍÍÍÍÍ
ÍÍÍÍÍÍÍÍ
ÍÍÍÍÍÍÍÍ
ÍÍÍÍÍÍÍÍ
ÍÍÍÍÍÍÍÍ
ÍÍÍÍÍÍÍÍ
ÍÍÍÍÍÍÍÍ
È
È
È
È
È
È
È
È
È
ÈÈÈÈÈÈÈÈ
ÈÈÈÈÈÈÈÈ
ÈÈÈÈÈÈÈÈ
ÈÈÈÈÈÈÈÈ
DSAWM-214
Enclosure
Rack Mounting (Optional)
Wall Mounting
The back mounting plate is designed with two top keyhole slots to facilitate mounting.
First install back plate to wall,
then mount enclosure to plate.
Knock-Out Hole for
Optional Cable Access
Figure 3a.
Figure 3b.
TB1
Wire
Access
Hole
Cable Access
Holes to
Back Panel
Mounting Ear
inches of open space on each side of the enclosure for proper
ventilation and for cable clearance. If the enclosure is installed
near heat-producing equipment, provisions must be made to
maintain installed module temperatures within their design
specifications.
- NOTE -
The enclosure described in this practice is typically wall-
mounted. Rack mounting in equipment racks is available with
rack-mount kits (Figure 3). See Table 5 for ordering informa-
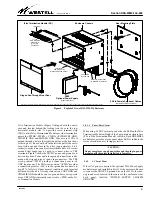
tion. See Figure 4 for an exploded view of the enclosure.
3.2
Wall Mounting (Typical)
The DSAWM-214 enclosure is typically wall-mounted. The en-
closure has a back panel which serves as a wall-mounting plate
with predrilled mounting holes. When mounting the back
plate, a minimum of #12 up to a maximum of #16 pan-head
type screws with a length of 7/8" to 1" must be used to ensure
stability. Follow the steps below to mount the enclosure on a
wall (also see Figure 3).
1. Remove the back plate from the enclosure by depressing
the black metal push buttons located near the bottom on
each side of the enclosure.
2. Lift and place the back plate on the wall in the desired
mounting location.
3. Mark the four screw hole locations.
4. Set aside the back plate. Drill appropriate pilot holes at
the marked locations before the next step.
5. Partially install the top two screws, leaving approximately
¼-inch protruding for hanging the back panel from the
two keyhole slots provided.
6. Lift the back plate again, align the top keyhole openings
with the two screws and hang back plate on the two pro-
truding screws.
7. Start the two bottom screws and tighten in place. Then
tighten the two top screws in place.
8. Attach the shelf enclosure (hang it) to the mounted back
plate by pressing the two push buttons, positioning the
unit against the back plate, and then releasing the buttons.
To access the plug-in module slots, insert the key in the
front door lock, turn the key and then swing the door open.
3.3
Rack Mounting (Optional)
The DSAWM-214 can be rack mounted in a 19" or 23"
equipment rack with the rack-mount kit # 080-500455.
3.4
Power Connections
The DSAWM-214 can be powered in one of three ways:
D
Local power via an external -48 VDC power source ap-
plied to the barrier-type TB1 screw terminal strip (located
on the
Telco Termination Module
shipped with and
installed in every enclosure)
D
Local power via the optional 2555 Power Supply module
placed into Slot 15
D
Via span power
- CAUTION -
Power applied to TB1 must be wired through conduit. A hole
knock-out is provided on the left side of the enclosure
adjacent to the Telco Termination Module which accepts a
½-inch conduit connector.
3.4.1
-48 VDC Local Power
If local DC power is desired, -48 VDC from an external power
source (battery) can be applied to the enclosure through the


