background image


Manoeuvrable. 
Compact. 
Powerful. 

Cleanmeleon 2 

XL


Summary of Contents for Cleanmeleon 2 XL

Page 1: ...Manoeuvrable Compact Powerful Cleanmeleon 2 XL...

Page 2: ...r the operator 9 4 6 Danger zone 10 4 7 Foreseeable misuse Reasonably foreseeable misuse 11 4 8 Behaviour in case of emergency 11 4 8 1 Personal injury 11 4 8 2 Case of fire 11 4 8 3 Technical complic...

Page 3: ...2 Running in period 26 11 3 Short engine running time 27 11 4 Functional overview 27 12 Attachments 29 12 1 Attachment of the equipment 30 13 Maintenance and servicing 31 13 1 General 31 13 2 Table of...

Page 4: ...Spare parts list 45 19 1 Cover plate 45 19 2 Base frame 46 19 3 Power lift 47 19 5 Hydraulic lines 48 19 6 Rear wheel bearing 49 19 7 Foot pedal 50 19 8 Parts components 51 19 9 Steering console 52 2...

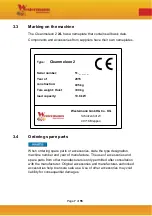
Page 5: ...on 2 XL Make Westermann GmbH Co KG Serial number 51 _ _ _ _ Model type description CM2 XL Description The Cleanmeleon 2 XL is a self propelled compact work machine that does not fully comply with road...

Page 6: ...t and risk reduction ISO 12100 2010 The following other technical specifications were applied Name and address of the person authorised to compile the technical documentation Westermann GmbH CO KG Mr...

Page 7: ...tary rights rights of use or other rights by provision of the content The user is prohibited from registering rights of any kind for the know how or parts thereof The dissemination transfer and other...

Page 8: ...g is compliance with all safety instructions and operating procedures given in this operating manual The local accident prevention regulations and general safety regulations for the specific applicati...

Page 9: ...ngerous situation that will result in serious injury or death if not avoided Draws your attention to a dangerous situation that can result in serious injury or death if not avoided Draws your attentio...

Page 10: ...if ignored are specially marked with the following pictograms Pictogram Importance General warning sign Falling hazard Automatic start up hazard Opposing rollers hazard Entanglement risk Harmful or ir...

Page 11: ...r and year of manufacture The use of accessories and spare parts from other manufacturers is only permitted after consultation with the manufacturer Original accessories and manufacturer authorised ac...

Page 12: ...p fodder littering stables or similar work The Cleanmeleon 2 XL has no attachment in its basic version The approved implements can be found under the accessories chapter Any use over and above this is...

Page 13: ...lusively by trained maintenance personnel Refrain from modifying converting or altering the design or individual pieces of equipment with the aim of changing the area of application or usability Only...

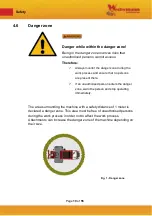
Page 14: ...hat no persons are present there If an unauthorised person enters the danger zone warn the person and stop operating immediately The area surrounding the machine with a safety distance of 1 meter is d...

Page 15: ...imits 4 8 Behaviour in case of emergency 4 8 1 Personal injury If during use an event occurs from which personal injury results the measures taken depend on the severity of the injury 4 8 2 Case of fi...

Page 16: ...following criteria must be met Safe assembly of the machine Temperature range of max 10 C to 40 C Suitable area of use which guarantees safe usage of the CM2 XL 4 9 2 Disposal For environmentally soun...

Page 17: ...the manufacturer immediately of any damage detected The operator must provide the personnel with the necessary protective equipment and check maintain and replace defective parts in accordance with r...

Page 18: ...tart up Instructed operating personnel for operation Able to carry out the work entrusted and to independently recognize and avoid dangerous situations due to professional training knowledge and exper...

Page 19: ...ntained in the operating manual are subject to technical modifications necessary for the improvement of the machine 4 13 Residual hazards and protective measures The knowledge and technical implementa...

Page 20: ...et from heavy falling parts slip prevention piercing of footwear by sharp edged parts Wear protective clothing Close fitting workwear with low tear resistance with tight sleeves and no protruding part...

Page 21: ...y cover make sure all moving parts of the vehicle have come to a standstill Removed parts must be re attached after maintenance Never refuel with a running or hot engine Keep away from flames and unde...

Page 22: ...pecifications 6 1 General technical data CM2 XL Basic dimensions Value Unit Machine length 1 78 meters m Machine width 0 85 meters m Machine height 1 26 meters m Speed 10 km h Dry weight 405 kilograms...

Page 23: ...Engine variant Kubota Z602 Engine type 2 cylinder standing water cooled Number of cylinders 2 Combustion system swirl chamber Intake system naturally aspirated Engine power 10 8 14 7 kW PS Revs 3200 r...

Page 24: ...ulic oil HLP 46 Oil pressure in bar 210 bar Drive pump at maximum engine speed 45 l min Work hydraulics at maximum engine speed 24 l min Hydraulic oil tank 17 litres Diesel tank 17 litres Maximum incl...

Page 25: ...g unit is subject to all applicable DIN EN standards Operator training and instruction are required and further reduce the safety risk 7 2 Assembly The complete assembly and first start up is carried...

Page 26: ...effortless working with various accessories and attachments while being always ready for operation The CM2 XL can be moved forwards or backwards via the right foot pedal Furthermore it is possible due...

Page 27: ...e foot pedal and steering wheel with a steering angle of 88 degrees 9 1 Controls Fig 5 Controls Position Description Function 1 Speed regulation Regulation of diesel engine speed 2 Way valve Hydraulic...

Page 28: ...ick is located on the left side of the engine in the direction of travel at frame recess level Checking the hydraulic oil level The oil quantity is checked with a dipstick Pull dipstick out Oil quanti...

Page 29: ...om starting and are indicated by the red LED light Temperature gage Indicates engine overheating that results in an immediate engine stop Control By pressing the START STOP button for a short time 1s...

Page 30: ...XL for a long time The engine can be run from start to full speed but heavy loads should be avoided Stalling the engine is to be avoided Check fluid levels oil frequently during running in and check...

Page 31: ...condition 11 4 Functional overview Fig 10 Seat adjustment Fig 11 Handbrake Fig 12 Gearbox release Seat adjustment The lever for seat adjustment to optimally position yourself on the machine is locate...

Page 32: ...dius due to the wheel geometry The chain guided steering is translated via the steering wheel to the rear wheel This allows turning in narrow passages and spaces on the spot Fig 15 Speed control Regul...

Page 33: ...ments The attachments themselves must not be changed The safety regulations in chapter 4 apply The conversion or modification of the attachments by the operator or a third person causes liability for...

Page 34: ...t weights are required they must be connected to the CM2 XL at the designated attachment points according to the instructions When attaching or coupling the attachments particular caution is necessary...

Page 35: ...regulations in chapter 4 apply Note before starting work Check for externally visible damage and defects Immediately report any changes including those regarding operating behaviour to the responsibl...

Page 36: ...of the third party manufacturer if necessary Maintenance work requiring specialist knowledge can only be carried out by service personnel The intervals specified in the maintenance schedule must be ad...

Page 37: ...XL 10 Hydraulic oil X Change every 500 hours 11 Hydraulic oil filter X Change every 500 hours 12 Lock chain C X X X X X Check every 100 hours 13 Accelerator pedal play C X X X X X Check every 100 hou...

Page 38: ...12 9 13 4 Tensioning the V belt Fig 19 Tensioning V belt Engine V belt When the engine cover is raised the engine V belt is on the right in the direction of travel To adjust and tension the belt the s...

Page 39: ...the chain tension for the lock chain is on the left in the direction of travel To tighten the lock chain the screw connections of the tensioner must be loosened The long holes in the vehicle frame all...

Page 40: ...other equipment used have been removed from the work area Clean work area and remove any leaked liquids Remove cleaning material such as cloths etc Make sure all safety devices are working properly 13...

Page 41: ...sure all fasteners are properly connected and undamaged In case of visible oil loss stop operation immediately and switch off the machine Use the provided personal protection equipment Hot surfaces Ri...

Page 42: ...g around such as tools cables and components are potential sources of accidents Operation movements Risk of injury due to moving components During operation individual components or components of the...

Page 43: ...accident The CM2 XL is to be checked to ensure it is in a safe condition and secured to prevent it rolling away Fig 23 T handle switch Fig 24 Vehicle Park the vehicle level Activate the parking brake...

Page 44: ...Release handbrake Turn ball valve Renew or tension Hydraulic Attachment does not turn Vehicle will hoist not move inoperable V belt Hydraulic connections not working properly Hydraulic oil level too l...

Page 45: ...ine is to be shut down for a long time it may be necessary to take preservation measures to prevent corrosion and other damage 17 2 Dismantling Disposal Disassembly disposal should be carried out by a...

Page 46: ...cognised and remedied by repair or replacement of parts via a Westermann dealer 3 Exempted from this are wear parts such as Bowden cables starter cord V belts bearings clutch plates tires air filters...

Page 47: ...e end customer the end customer s signature as well as the indication of use private commercial professional to Westermann customer service 9 The warranty period for original Westermann spare parts is...

Page 48: ...available or deliverable by Westermann customer service If a replacement part is no longer available the purchase price paid by you will be refunded 12 The defective parts or machines are to be sent...

Page 49: ...Spare parts list 19 Spare parts list 19 1 Cover plate Fig 25 Cover Pos Item no Description DIN Amount 1 LA 00 00457 Engine cover 1 2 LA 00 00458 Cover sheet 1 3 PE 00 00019 Cover holder 1 4 KT 00 004...

Page 50: ...riangle 1 2 LA 00 00010 Lower link 1 3 LA 00 00473 Chassis tub 1 4 LA 00 00470 Front crosspiece 1 5 KT 00 00035 Hydraulic cylinders 2 6 KT 00 00011 Top link 1 7 LA 00 00469 Angular plate connections 1...

Page 51: ...9 3 Power lift Fig 27 Power lifter Pos Item no Description DIN Amount 1 KT 00 00004 Triangle 1 2 LA 00 00010 Lower link 1 3 KT 00 00011 Top link 1 4 KT 00 00035 Hydraulic cylinders 2 5 MBG_Hydr Hose_L...

Page 52: ...ntil_Work Hydr_low yellow 1 5 HYS 00 00064 MBG_Hydr Hose_A Valve Work hydr upper purple 1 6 HYS 00 00063 MBG_Hydr Hose_P valve pump 1 7 HYS 00 00070 MBG_Hydr Hose_D Drivepump_Cooler in orange 1 8 HYS...

Page 53: ...l bearing Fig 29 Rear wheel bearing Pos Item no Description DIN Amount 1 MO 00 00023 Orbital engine rear 1 2 HYS 00 00080 MBG_Hydr Hose_Drive motor bk 1 3 LA 00 00464 Rear wheel swingarm 1 4 LA 00 004...

Page 54: ...age 50 of 55 19 7 Foot pedal Fig 30 Foot pedal Pos Item no Description DIN Amount 1 LA 00 00454 Accelerator 1 2 DR 00 00095 Accelerator shaft 1 3 VMBG 00 00012 Accelerator rod 1 4 KT 00 00167 Adjustme...

Page 55: ...00 00618 Work pump 1 2 KT 00 00611 615 Flange coupling 1 3 MO 00 00022 Diesel engine 1 4 KT 00 00611 Fan 1 5 MO 00 00023 Orbital engine rear 1 6 MO 00 00024 Orbital engine front 2 7 SB 00 00029 Combin...

Page 56: ...3 DR 00 00102 Steering stub 1 4 DR 00 00096 Steering rod lower 2 5 LA 00 00450 Gear wheel m2 z 50 2 6 HT 00 0046 Sprocket 06 B 1 z 16 2 7 KT 00 00042 Expansion tank 1 8 KT 00 00067 Universal joint 1...

Page 57: ...Page 53 of 55 Plans and other information 20 Plans and other information 20 1 Hydraulic plan...

Page 58: ...Page 54 of 55 Plans and other information 20 2 Engine control circuit diagram...

Page 59: ...ase 27 Fig 13 Accelerator pedal 28 Fig 14 Steering 28 Fig 15 Speed control 28 Fig 16 Controls 28 Fig 17 Attachments 29 Fig 18 Fitting attachments 30 Fig 19 Tensioning V belt 34 Fig 20 Replacing V belt...

Reviews: