background image

DATA LIFEGUARD DIAGNOSTICS (DLGDIAG)

DLGDIAG FOR DOS – 13

 USER MANUAL

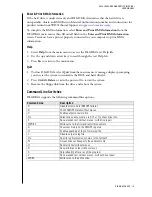
Write Zeros To Drive

If you tested the hard drive, checked all hardware in the system, and verified that the BIOS is 
correctly set up, and are still experiencing problems, you might want to reinstall the software 
on your system. Before reinstalling the software, you can use the Write Zeros To Drive option 
to erase the entire hard drive, including the MBR (master boot record), all partition tables, 
and all data.

1. Press

 F

 for Full Erase or 

Q

 for quick erase.

2. Press 

Esc

 to return to the main menu.

View Test Results

View Test Results displays the results of the most recent test run on your currently selected 
hard drive including results messages and error/status codes.

Print Test Results

Print Test Results prints the results of the most recent test run on your currently selected hard 
drive including results messages and error/status codes. You must have a printer properly 
connected to your computer to use this option.

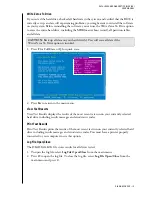
Log File Open/Close

The DLGDIAG.LOG file stores results for all drives tested.

1. To open the log file, select 

Log File Open/Close 

from the main menu. 

2. Press 

to open the log file. To close the log file, select 

Log File Open/Close 

from the 

main menu and press 

C

.

CAUTION: 

Back up all data on your hard drive(s). You will erase all data if the 

Write Zeros To Drive option is invoked.

Summary of Contents for Data Lifeguard Diagnostic Utility

Page 1: ...Software Manual Data Lifeguard Diagnostic Utility...

Page 2: ...from its use No license is granted by implication or otherwise under any patent or patent rights of WD WD reserves the right to change specifications at any time without notice Western Digital is a r...

Page 3: ...2 DLGDIAG for Windows 3 Supported Products 3 Supported Operating Systems 3 Installing DLGDIAG for Windows 4 Using DLGDIAG for Windows 5 3 DLGDIAG for DOS 10 Supported Products 10 Creating Bootable DLG...

Page 4: ...ctors Test may take several hours to complete depending on the size of the drive Write Zeros writes zeros to the drive using the Full Erase or Quick Erase option Erases all data on the drive by writin...

Page 5: ...n to confirm your hard drive integrity DLGDIAG s Repair Drive feature allows the user to restore any errors found during the Extended Test scan of your hard drive without destroying all data on the dr...

Page 6: ...cs utility The utility can perform drive identification diagnostics and repairs on a WD FireWire EIDE or USB drive In addition it can provide the drive s serial and model numbers Supported Products In...

Page 7: ...and download the Data Lifeguard Diagnostics for Windows program WinDLG zip 2 Extract and run the Setup exe program 3 The WD Diagnostics InstallShield Wizard screen appears Click the Next button 4 Clic...

Page 8: ...ogram screen displays The top window shows the drives in your system that are available for testing The model number serial number and capacity of each drive are displayed In the bottom window the par...

Page 9: ...low S M A R T information to be read from the hard drive For more information please contact the manufacturer of the controller to determine if the controller supports S M A R T attribute reading 1 Cl...

Page 10: ...with the option to perform a quick erase or full erase Selecting the write zeros option the file system and all data on the drive being tested 1 Click Extended Test then click Start 2 If you are sure...

Page 11: ...DLGDIAG DLGDIAG FOR WINDOWS 8 USER MANUAL View Test Result View Test Result displays the results of the most recent test s run on your system s hard drive s 1 Click View Test Result then click Start...

Page 12: ...y DLGDIAG Under the SMART Status column a question mark icon displays if the S M A R T feature is not available A red X icon displays for a specific attribute if and only if it s value falls below the...

Page 13: ...e Zip file 2 Double click the DlgDiagvxxx Diskette Creator icon on your desktop follow the instructions in each screen to create your DLGDIAG floppy disk You can now boot to your DLGDIAG floppy disk M...

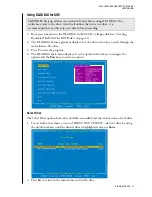
Page 14: ...eys to navigate the options and the Enter key to select an option Select Drive The Select Drive option shows a list of all drives installed and the current status of each drive 1 For each drive that s...

Page 15: ...as Test Completed Without Errors displays along with a corresponding error status code Press Esc to return to the main menu See the list of error status codes on page for more information Extended Tes...

Page 16: ...Test Results displays the results of the most recent test run on your currently selected hard drive including results messages and error status codes Print Test Results Print Test Results prints the...

Page 17: ...message displays prompting you to reset the system to reinitialize the BIOS and hard drive s 2 Press Ctrl Alt Delete or turn the power off to restart the system 3 Remove the floppy disk from the driv...

Page 18: ...FAILURE 4 ELECTRICAL ELEMENT FAILURE 5 SERVO SEEK ELEMENT FAILURE 6 READ ELEMENT FAILURE 7 HANDLING FAILURE 8 UNKNOWN TEST STATUS 9 UNKNOWN TEST STATUS 10 UNKNOWN TEST STATUS 11 UNKNOWN TEST STATUS 12...

Page 19: ...2 RANDOM SEEK ERROR 143 THIRD STROKE ERROR 144 FULL STROKE ERROR 145 SEEK OVERHEAD ERROR 146 BAD ID PARAMETERS 147 NOT SELECTED 148 MASTER SLAVE ERROR 149 UNKNOWN ERROR 150 PARK ERROR 151 WRITE PROTEC...

Page 20: ...1 10 UNCORR ECC ERRORS 212 2 9 DAM ERRORS 213 10 DAM ERRORS 214 2 9 IDNF ERRORS 215 10 IDNF ERRORS 216 2 9 SERVO ERRORS 217 10 SERVO ERRORS 218 DRIVE CABLE ERROR 219 DRIVE IS LOCKED 220 TEST NOT SUPPO...

Page 21: ...WD Technical Support using the online form You may also call the phone numbers listed below When calling for support have your WD hard drive serial number system hardware and software versions availa...

Reviews: