Chapter
11
11 System Upgrades
The 4U60 G2 Storage Enclosure comes with a number of system upgrades that add increased capacity and
functionality to the system. This section describes these upgrades and any information that must be understood
by the user to integrate them into their system.
11.1
Daisy Chaining Enclosures
The 4U60 G2 Storage Enclosure has the option to connect to other 4U60 G2 Storage Enclosure by daisy
chaining up to four enclosures together. The connections are done through the SAS ports on the front of the
Enclosure Storage Module (ESM). This option allows for the capacity of four enclosures to be combined into
one stream. Using a connection to the customer host, with the use of SES, the enclosure connections can be
managed and verified. Once the upgrade is complete, the SES pages can be utilized to ensure all components
and drives are visible to the host server.
11.1.1
Daisy Chaining Enclosures
Personnel
Warnings
Required Tools
1
Disconnect cabling before
servicing.
None
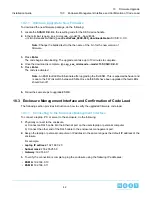
To install the scale out the enclosure, do the following:
1. From a computer, connect to an sg_utils enabled server.
2. From a Linux machine, launch a Terminal.
3. Verify that the first enclosure is connected to the Host.
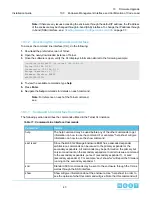
a) To identify the SES target, type lsscsi –g into the terminal and press Enter.
All of the SES target components appear.
b) Identify the 4U60G2_STOR_ENCL appears near the top of the results.
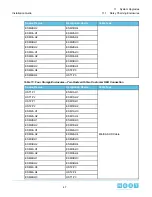
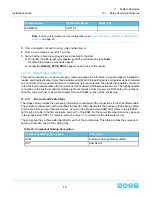
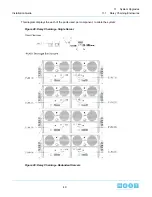
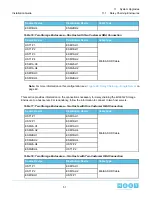
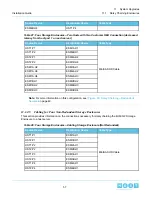
4. From the front of the enclosures, follow the following cabling reference to Daisy Chan four enclosures.
Important: For more information on cabling smaller configurations and how to read the cabling
reference, see,
on page 48.
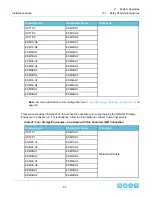
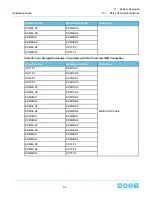
Table 12: Four Storage Enclosures—Two Hosts with One Customer HBA Connection
Cable Type
Destination Device
Source Device
MiniSAS HD Cable
ESM1A.H1
HST1.P1
ESM1B.H1
HST2.P1
ESM1A.H3
ESM2A.H1
ESM1A.H4
ESM2A.H2
ESM1B.H3
ESM2B.H1
46
11
System Upgrades
Installation Guide
11.1
Daisy Chaining Enclosures

