LEONARDO PRO X
User manual
EN
12
2.2.2.2. Pylontech Batteries
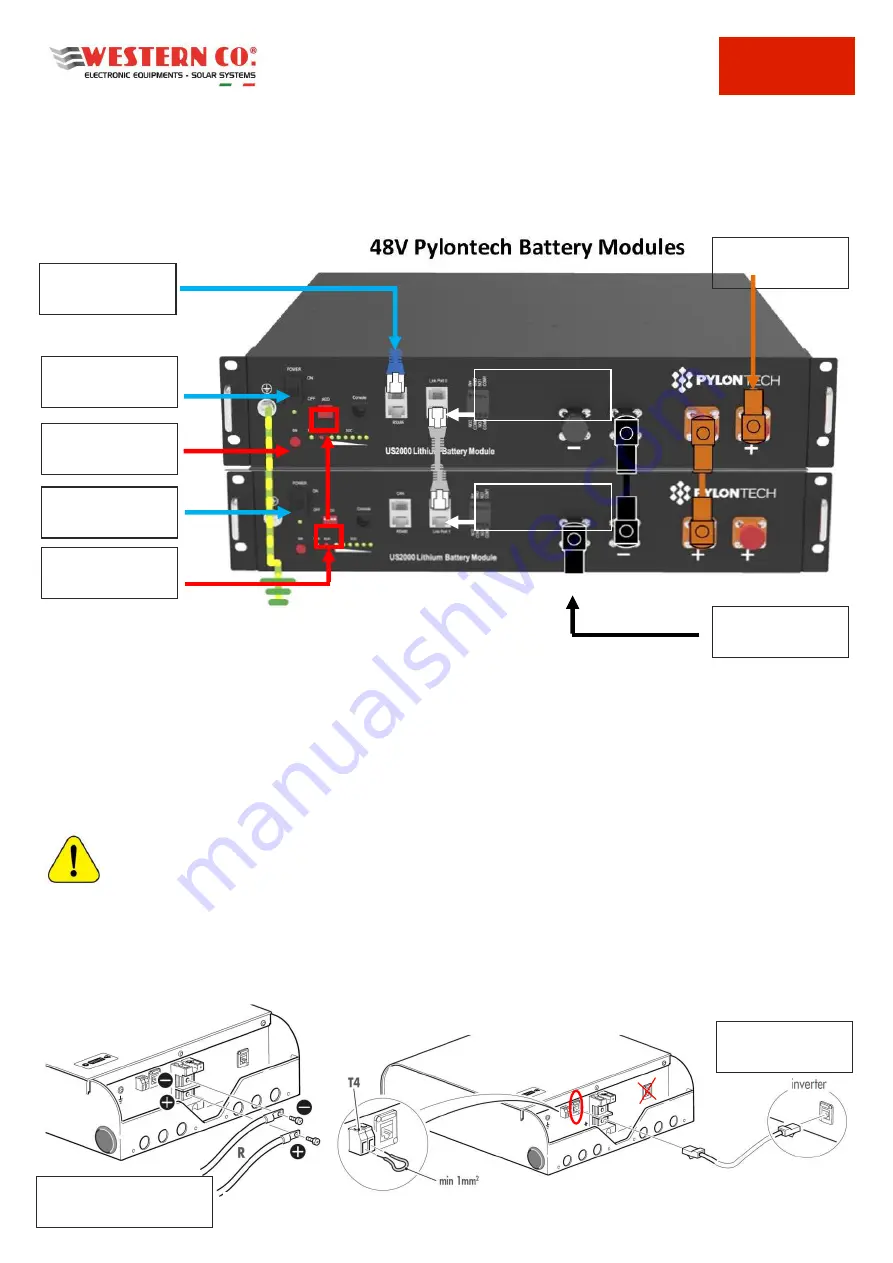
Connect the quick clamps of the power cables supplied: positive (+, orange), negative (-, black) to the battery and the
CAN communication cable (included), as in
Pic.9
.
Make sure that the quick clamps are correctly inserted into the battery (you should hear a "click" once they are in the
correct position).
Pic.9 - Cable installation on Pylontech battery
Internal connection to the Pylontech accumulator bank
1.
Connect the parallel cables (ORANGE and BLACK) between the MASTER battery and SLAVE battery;
2.
connect the battery communication
LINK cable
: MASTER battery on Port 1, SLAVE battery on Port 0;
3.
set all
ADDRESS configuration switches to the OFF position
, as they are not used.
2.2.2.3. Midac Batteries
ATTENTION: For configurations of MIDAC RES 4.2 batteries in parallel, and for all other information, refer
to the battery installation manual.
Configuration with single RES 4.2 battery
Connect the eyelets of the battery cables: positive (+, red), negative (-, black) of the battery as shown in
Pic.10
, the CAN
communication cable (included) and the T4 jumper, as shown in
Pic.11
.
2 - INVERTER CAN
CABLE
3 - LINK SLAVE
CABLE on Port 1
6 - BUTTON
BATTERY START
3 - LINK SLAVE
CABLE on Port 0
5 - POWER
SWITCH 1
5 - POWER
SWITCH 2
1 - POSITIVE
INVERTER
1 - NEGATIVE
INVERTER
4 - ADDRESS SW
ALL OFF
Pic.10
Pic.11
CAN CABLE
INVERTER
POSITIVE/NEGATIVE
INVERTER

