background image

 Lit. No. 21857

June 15, 2003

21

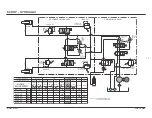
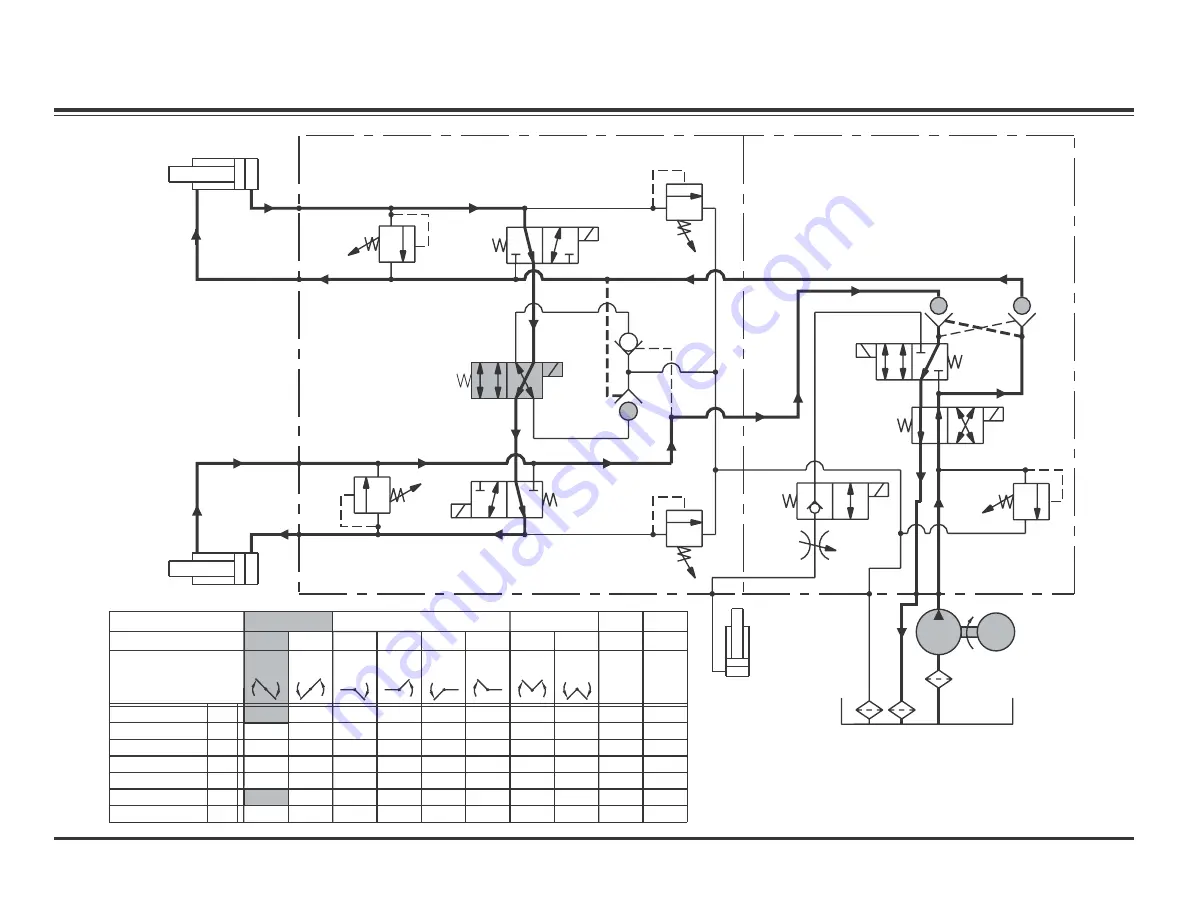
ANGLE RIGHT – HYDRAULIC

LEFT

RIGHT

3000 PSI

3000 PSI

3500 PSI

3500 PSI

1750 PSI

S6

S3

S1

S4

S2

(C)

(D)

(A)

(B)

LIFT

M

S5

ON

ON

ANGLE

RIGHT

(DEFAULT)

STRAIGHT BLADE

R/VEE

PRIMARY

RELIEF

VALVE

RELIEF VALVE

SECONDARY

VALVE

RELIEF

PUMP

RELIEF VALVE

SECONDARY

SECONDARY BLOCK ASSY.

PRIMARY BLOCK ASSY.

PRIMARY

RELIEF

VALVE

MOTOR

SV08-2004

SV08-40
SV08-43

SV08-40

SV08-30

S6

S5

S3

S2

S1

M

S4

SV08-30

ON

ON

ON

ON

ON

ON

ON

ON

ON

ON

ON

ON

ON

ON

ON

ON

ON

ON

ON

MOVEMENT

BLADE

RAISE

LOWER

ANGLE

LEFT

RIGHT

EXTEND

RIGHT

RETRACT

LEFT

RETRACT

SCOOP

VEE

L/SCP

R/VEE *

R/VEE *

WING

CONTROLLER MODE

CONTROLLER BUTTON

V / SCOOP

L/SCP *

L/SCP

R/VEE

RAISE

LOWER

ALL

ALL

* NOTE - SEE BLADE MOVEMENT TEXT

FOR BUTTON OPERATION

EXTEND

LEFT

L/SCP *

ON

ON

ON

VALVE

CHECK

P/O

VALVE

CHECK

P/O

VALVE

CHECK

P/O

VALVE

P/O CHECK

Summary of Contents for UniMount MVP

Page 1: ...June 15 2003 Lit No 21857 MECHANIC S GUIDE SNOWPLOWS CAUTION Read this manual before servicing the WESTERN MVP snowplow ...

Page 2: ...lenoid Cartridge Valve Identification and Location 8 Relief Valve Identification and Location 9 Pilot Operated Check Valve Identification and Location 10 Vehicle Harness and Vehicle Cable Location 11 Operating the Snowplow 12 Theory of Operation 15 Hydraulic and Electrical Schematics 17 Electrical Schematic 18 Hydraulic Schematic 19 Angle Right 20 Angle Left 22 Right Retract 24 Right Extend 26 Lef...

Page 3: ...rked Temperature changes could change hydraulic pressure causing the blade to drop unexpectedly or damaging hydraulic components Failure to do this can result in serious personal injury BEFORE YOU BEGIN VENTILATION If you work on the vehicle or snowplow in a garage or other enclosed area be sure to vent exhaust gas directly to the outside through a leakproof exhaust hose FIRE AND EXPLOSION Be care...

Page 4: ...LICATION RECOMMENDATIONS 59900 SAFETY INFORMATION CAUTION Batteries normally produce explosive gases which can cause personal injury Therefore do not allow flames sparks or lit tobacco to come near the battery When charging or working near a battery always cover your face and protect your eyes and also provide ventilation Batteries contain sulfuric acid which burns skin eyes and clothing Disconnec...

Page 5: ... Fluid ATF Dexron III to 10 F 23 C or Texaco 1537 Aircraft Hydraulic Oil for temperatures below 25 F 32 C REQUIRED TOOLS For servicing the electrical and hydraulic system Solenoid Valve Spool Travel 0 07 Inches for three way and four way valves Electrical System approximate values Solenoid Coil Resistance 7 Ohms at room temperature Solenoid Coil Amp Draw 1 5 Amp Motor Relay Coil Resistance 16 17 O...

Page 6: ...003 HOSE ROUTING 90 Street Elbow and Straight Swivel 18 Hose 38 Hose 36 Hose Hydraulic Unit 45 Swivel 38 Hose 36 Hose Base End Lift Cylinder Passenger Side Right Angle Cylinder Base End Base End Driver Side Left Angle Cylinder ...

Page 7: ...P FLOSTAT PARTS DIAGRAM Old Style Oil Pick Up Tube Motor Solenoid Valve Coil Solenoid Valve Cartridge Relief Valve Pilot Operated Check Valve Reservoir Pump Filter Pump Oil Return Line Quill Secondary Valve Block Primary Valve Block ...

Page 8: ...ALVE IDENTIFICATION AND LOCATION Solenoid Cartridge Valve S1 SV08 2004 Solenoid Cartridge Valve S6 SV08 30 Solenoid Cartridge Valve S4 SV08 30 Solenoid Cartridge Valve S5 SV08 40 Solenoid Cartridge Valve S3 SV08 43 Solenoid Cartridge Valve S2 SV08 40 ...

Page 9: ...9 Lit No 21857 June 15 2003 RELIEF VALVE IDENTIFICATION AND LOCATION Right Secondary Relief Valve Right Primary Relief Valve Left Primary Relief Valve Left Secondary Relief Valve Pump Relief Valve ...

Page 10: ...No 21857 June 15 2003 PILOT OPERATED CHECK VALVE IDENTIFICATION AND LOCATION Pilot Operated P O Check Valve B Pilot Operated P O Check Valve D Pilot Operated P O Check Valve C Pilot Operated P O Check Valve A ...

Page 11: ...Stripping Connector Blue Vehicle Wire Controlled by Ignition Switch Wires to Headlamp Relays Vehicle Cable Assembly Black Wire Red Wire Vehicle Harness To Negative Battery Terminal 22 Red Cable Secondary Large Terminals Motor Relay Primary Small Terminals Brown Red Orange Black Firewall Grommet S m a l l R e d W i r e Vehicle Cable Assembly Connector Vehicle Harness Connector Faston Connector Brow...

Page 12: ... after a period of time This is to help prolong the battery charge The time out period for the RAISE function is 2 5 seconds while all others are 4 25 seconds The control will automatically turn off after being idle for 20 minutes 2 Press the PWR button on the control The control indicator light will glow red indicating the control is on The control indicator light will glow red whenever the contr...

Page 13: ...float mode indicated by green FLT lamp L SCP Press this button to angle both wings to the left R VEE Press this button to angle both wings to the right Button Description of Operation Raise Press this button to raise the plow and to cancel the float mode NOTE Plow will automatically stop raising after 2 5 seconds To resume raising the plow release the button and press again Lower Press this button...

Page 14: ...n Raise Press this button to raise the plow and to cancel the float mode NOTE Plow will automatically stop raising after 2 5 seconds To resume raising the plow release the button and press again Lower Press this button to lower the plow NOTE After reaching the desired height release the button Holding the button down for more than 3 4 second will activate the float mode indicated by green FLT lamp...

Page 15: ...LEFT L SCP large current flow which energizes the motor which in turn rotates the internal pump and creates fluid flow Motor relay does not energize in lower function Testing Low Side Drive Systems To test a low side drive system connect the negative lead of the test instrument volt meter to ground and the positive lead to the negative side of the load coil relay etc A reading of 12 volts should b...

Page 16: ...y open contacts The normally closed contacts power the vehicle headlamps The normally open contacts power the plow headlamps Refer to the Headlamp Test Diagram in the Troubleshooting Guide It should be noted that The relay with the yellow orange and black wires operates the low beam headlamps The relay with the green red and white wires operates the high beam headlamps The parking lamp circuit pro...

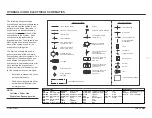
Page 17: ...EMENT LINE TO RESERVOIR BELOW FLUID LEVEL LINES CROSSING LINES JOINING LINE PILOT FOR CONTROL LINE WORKING MAIN FLOW DIRECTION OF HYDRAULIC FLUID SOLENOID SINGLE WINDING SPRING VALVE ADJUSTABLE PRESSURE RELIEF VALVE FLOW CONTROL ADJUSTABLE NON COMPENSATED VALVE TWO POSITION TWO CONNECTION TWO WAY VALVE TWO POSITION THREE CONNECTION THREE WAY VALVE TWO POSITION FOUR CONNECTION FOUR WAY HYDRAULIC LE...

Page 18: ...EHICLE HEADLAMPS GRY BRN PUR FROM VEHICLE HEADLAMP CONNECTOR RED HIGH ORN LOW COMPONENTS LOCATED NEAR FRONT OF VEHICLE LOW BEAM TO PARK LAMP BULLET TO LEFT TURN LAMP BULLET TO RIGHT TURN LAMP BULLET BLK ORN BRN 86 85 87 87A 30 BLU GND BLU GND LT BLU ORN BLK WHT YEL LT GRN LT BLU BLK ORN WHT LT BLU WHT YEL LT GRN BRN GRN RED ORN BLK BRN RED WHT BLK S6 SOLENOID LT BLU ORN PUMP MOTOR 6 RED M 6 BLK S3...

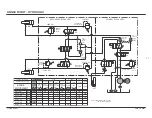
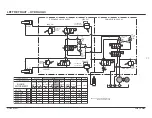
Page 19: ...04 SV08 40 SV08 43 SV08 40 SV08 30 S6 S5 S3 S2 S1 M S4 SV08 30 ON ON ON ON ON ON ON ON ON ON ON ON ON ON ON ON ON ON ON ON ON MOVEMENT BLADE RAISE LOWER ANGLE RIGHT ANGLE LEFT RIGHT EXTEND RIGHT RETRACT LEFT RETRACT SCOOP VEE DEFAULT STRAIGHT BLADE R VEE L SCP R VEE R VEE WING CONTROLLER MODE CONTROLLER BUTTON V SCOOP L SCP L SCP R VEE RAISE LOWER ALL ALL NOTE SEE BLADE MOVEMENT TEXT FOR BUTTON OP...

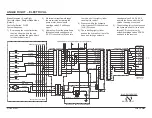
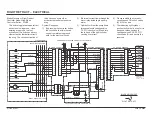
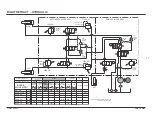
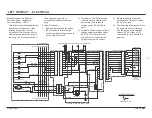
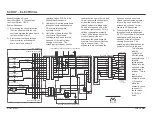
Page 20: ...ENOID S1 SOLENOID BLADE MOVEMENT ANGLE RIGHT FASTON BRN BRN VIO WHT M Blade Movement Angle Right Controller Mode Straight Blade Mode Default Controller Button R VEE System Response 1 By pressing the controller button the circuit board within the cab control completes the ground path for the electrical circuit 2 Electrical current flows through the motor relay activating the pump motor and solenoid...

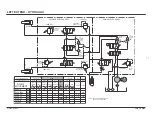
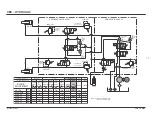
Page 21: ...RY BLOCK ASSY PRIMARY RELIEF VALVE MOTOR SV08 2004 SV08 40 SV08 43 SV08 40 SV08 30 S6 S5 S3 S2 S1 M S4 SV08 30 ON ON ON ON ON ON ON ON ON ON ON ON ON ON ON ON ON ON ON MOVEMENT BLADE RAISE LOWER ANGLE LEFT RIGHT EXTEND RIGHT RETRACT LEFT RETRACT SCOOP VEE L SCP R VEE R VEE WING CONTROLLER MODE CONTROLLER BUTTON V SCOOP L SCP L SCP R VEE RAISE LOWER ALL ALL NOTE SEE BLADE MOVEMENT TEXT FOR BUTTON O...

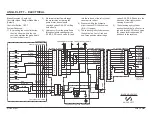
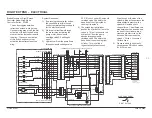
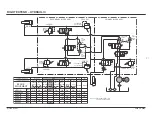
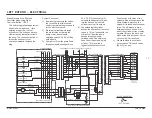
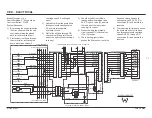
Page 22: ...OID S1 SOLENOID FASTON BLADE MOVEMENT ANGLE LEFT BRN BRN VIO WHT M Blade Movement Angle Left Controller Mode Straight Blade Mode Default Controller Button L SCP System Response 1 By pressing the controller button the circuit board within the cab control completes the ground path for the electrical circuit 2 Electrical current flows through the motor relay activating the pump motor and solenoid car...

Page 23: ...IMARY RELIEF VALVE VALVE RELIEF PUMP MOTOR SV08 2004 SV08 40 SV08 43 SV08 40 SV08 30 S6 S5 S3 S2 S1 M S4 SV08 30 ON ON ON ON ON ON ON ON ON ON ON ON ON ON ON ON ON ON MOVEMENT BLADE RAISE LOWER ANGLE RIGHT RIGHT EXTEND RIGHT RETRACT LEFT RETRACT SCOOP VEE R VEE R VEE R VEE WING CONTROLLER MODE CONTROLLER BUTTON V SCOOP L SCP L SCP R VEE RAISE LOWER ALL ALL NOTE SEE BLADE MOVEMENT TEXT FOR BUTTON O...

Page 24: ...s P O check valves A D to open 5 The retracting right cylinder pushes the hydraulic oil out of its base end through solenoid cartridge valves S6 S5 P O check valve D and back to the reservoir COMPONENTS LOCATED FRONT LEFT OF VEHICLE LEFT SIDE PLOW LAMP RIGHT SIDE PLOW LAMP V I O PLOW ASSEMBLY REPRESENTATION OF PRINTED CIRCUIT BOARD 11 8 10 9 7 6 4 5 3 CONTROL 1 2 ORN 11 10 9 7 8 5 6 TAN BLK BRN GR...

Page 25: ...ALVE RELIEF PUMP MOTOR SV08 2004 SV08 40 SV08 43 SV08 40 SV08 30 S6 S5 S3 S2 S1 M S4 SV08 30 ON ON ON ON ON ON ON ON ON ON ON ON ON ON ON ON ON ON ON ON MOVEMENT BLADE RAISE LOWER ANGLE RIGHT ANGLE LEFT RIGHT EXTEND LEFT RETRACT SCOOP VEE DEFAULT STRAIGHT BLADE R VEE L SCP R VEE CONTROLLER MODE CONTROLLER BUTTON V SCOOP L SCP L SCP R VEE RAISE LOWER ALL ALL NOTE SEE BLADE MOVEMENT TEXT FOR BUTTON ...

Page 26: ...D MTR RLY 10AFB LOCATED UNDER DASH BLU ORN LT BLU ORN BLK WHT LT BLU LT GRN BRN RED WHT YEL 11 12 9 10 7 8 5 6 3 4 2 1 12 11 10 9 7 8 5 6 3 4 2 1 RED BRN GRN 6 BLK 6 RED G R Y BLK ORN BRN BLK WHT LOCATED AT GRILLE PUMP MOTOR 6 RED 6 BLK RED BLK ORN S6 SOLENOID LT BLU ORN BLU ORN BLK WHT WHT YEL LT BLU LT GRN IGNITION 1 8 12 11 9 10 4 6 7 5 2 3 8 12 11 9 10 4 6 7 5 2 3 1 4 2 3 1 1 2 3 4 S5 SOLENOID...

Page 27: ... VALVE RELIEF PUMP MOTOR SV08 2004 SV08 40 SV08 43 SV08 40 SV08 30 S6 S5 S3 S2 S1 M S4 SV08 30 ON ON ON ON ON ON ON ON ON ON ON ON ON ON ON ON ON ON ON MOVEMENT BLADE RAISE LOWER ANGLE RIGHT ANGLE LEFT RIGHT RETRACT LEFT RETRACT SCOOP VEE R VEE L SCP R VEE CONTROLLER MODE CONTROLLER BUTTON V SCOOP L SCP L SCP R VEE RAISE LOWER ALL ALL NOTE SEE BLADE MOVEMENT TEXT FOR BUTTON OPERATION EXTEND LEFT L...

Page 28: ...e hydraulic circuit causes P O check valves B C to open 5 The retracting left cylinder pushes the hydraulic oil out of its base end through solenoid cartridge valves S4 S5 through P O check valve C and back to the reservoir COMPONENTS LOCATED FRONT LEFT OF VEHICLE RIGHT SIDE PLOW LAMP LEFT SIDE PLOW LAMP VIO PLOW ASSEMBLY REPRESENTATION OF PRINTED CIRCUIT BOARD 11 8 10 9 7 6 4 5 3 CONTROL 1 2 ORN ...

Page 29: ... VALVE RELIEF PUMP MOTOR SV08 2004 SV08 40 SV08 43 SV08 40 SV08 30 S6 S5 S3 S2 S1 M S4 SV08 30 ON ON ON ON ON ON ON ON ON ON ON ON ON ON ON ON ON ON ON MOVEMENT BLADE RAISE LOWER ANGLE RIGHT ANGLE LEFT RIGHT EXTEND RIGHT RETRACT SCOOP VEE R VEE L SCP R VEE R VEE CONTROLLER MODE CONTROLLER BUTTON V SCOOP L SCP R VEE RAISE LOWER ALL ALL NOTE SEE BLADE MOVEMENT TEXT FOR BUTTON OPERATION EXTEND LEFT L...

Page 30: ...ton and every other activation thereafter retracts the wing The second activation of this button and every other activation thereafter extends the wing System Response 1 By pressing the controller button the circuit board within the cab control completes the ground path for the electrical circuit 2 Electrical current flows through the motor relay activating the pump motor and solenoid cartridge va...

Page 31: ...LIEF PRIMARY PRIMARY RELIEF VALVE VALVE RELIEF PUMP MOTOR SV08 2004 SV08 40 SV08 43 SV08 40 SV08 30 S6 S5 S3 S2 S1 M S4 SV08 30 ON ON ON ON ON ON ON ON ON ON ON ON ON ON ON ON ON ON ON ON ON MOVEMENT BLADE RAISE LOWER ANGLE RIGHT ANGLE LEFT RIGHT EXTEND RIGHT RETRACT LEFT RETRACT SCOOP VEE STRAIGHT BLADE DEFAULT R VEE L SCP R VEE R VEE CONTROLLER MODE CONTROLLER BUTTON V SCOOP L SCP L SCP R VEE RA...

Page 32: ...t cylinder pushes Blade Movement Scoop Controller Mode V Scoop Mode Controller Button L SCP System Response 1 By pressing the controller button the circuit board within the cab control completes the ground path for the electrical circuit 2 Electrical current flows through the motor relay activating the pump motor and solenoid the hydraulic oil out of its rod end This oil mixes with the hydraulic o...

Page 33: ...E RELIEF PUMP MOTOR SV08 2004 SV08 40 SV08 43 SV08 40 SV08 30 S6 S5 S3 S2 S1 M S4 SV08 30 ON ON ON ON ON ON ON ON ON ON ON ON ON ON ON ON ON MOVEMENT BLADE RAISE LOWER ANGLE RIGHT ANGLE LEFT RIGHT EXTEND RIGHT RETRACT LEFT RETRACT VEE DEFAULT STRAIGHT BLADE R VEE L SCP R VEE R VEE WING CONTROLLER MODE CONTROLLER BUTTON L SCP R VEE RAISE LOWER ALL ALL NOTE SEE BLADE MOVEMENT TEXT FOR BUTTON OPERATI...

Page 34: ...ic oil out of its base end through solenoid cartridge valves S6 S5 P O check valve D and back to the reservoir 8 The retracting left cylinder pushes the hydraulic oil out of its base end through solenoid cartridge valves S4 S5 through P O check valve C and back to the reservoir COMPONENTS LOCATED FRONT LEFT OF VEHICLE RIGHT SIDE PLOW LAMP LEFT SIDE PLOW LAMP VIO PLOW ASSEMBLY REPRESENTATION OF PRI...

Page 35: ...EF PUMP MOTOR SV08 2004 SV08 40 SV08 43 SV08 40 SV08 30 S6 S5 S3 S2 S1 M S4 SV08 30 ON ON ON ON ON ON ON ON ON ON ON ON ON ON ON ON ON ON ON MOVEMENT BLADE RAISE LOWER ANGLE RIGHT ANGLE LEFT RIGHT EXTEND RIGHT RETRACT LEFT RETRACT SCOOP DEFAULT STRAIGHT BLADE R VEE L SCP R VEE R VEE WING CONTROLLER MODE CONTROLLER BUTTON L SCP L SCP RAISE LOWER ALL ALL NOTE SEE BLADE MOVEMENT TEXT FOR BUTTON OPERA...

Page 36: ...LOCATED UNDER DASH BLU ORN LT BLU ORN BLK WHT LT BLU LT GRN BRN RED WHT YEL 11 12 9 10 7 8 5 6 3 4 2 1 12 11 10 9 7 8 5 6 3 4 2 1 RED BRN GRN 6 BLK 6 RED GRY BLK ORN BRN BLK WHT LOCATED AT GRILLE PUMP MOTOR 6 RED 6 BLK RED BLK ORN S6 SOLENOID LT BLU ORN BLU ORN BLK WHT WHT YEL LT BLU LT GRN IGNITION 1 8 12 11 9 10 4 6 7 5 2 3 8 12 11 9 10 4 6 7 5 2 3 1 4 2 3 1 1 2 3 4 S5 SOLENOID S4 SOLENOID S3 SO...

Page 37: ...LIEF PUMP MOTOR SV08 2004 SV08 40 SV08 43 SV08 40 SV08 30 S6 S5 S3 S2 S1 M S4 SV08 30 ON ON ON ON ON ON ON ON ON ON ON ON ON ON ON ON ON ON MOVEMENT BLADE LOWER ANGLE RIGHT ANGLE LEFT RIGHT EXTEND RIGHT RETRACT LEFT RETRACT SCOOP VEE DEFAULT STRAIGHT BLADE R VEE L SCP R VEE R VEE WING CONTROLLER MODE CONTROLLER BUTTON V SCOOP L SCP L SCP R VEE LOWER ALL NOTE SEE BLADE MOVEMENT TEXT FOR BUTTON OPER...

Page 38: ...1 2 ORN 11 10 9 7 8 5 6 TAN BLK BRN GRN RED BLU COIL CORD HARNESS 4 3 1 2 WHT GRY YEL VIO 13 14 ORN BLK RED 14 13 12V BATTERY LOCATED AT VEHICLE FRONT RIGHT 6 RED MTR RLY 10AFB LOCATED UNDER DASH BLU ORN LT BLU ORN BLK WHT LT BLU LT GRN BRN RED WHT YEL 11 12 9 10 7 8 5 6 3 4 2 1 12 11 10 9 7 8 5 6 3 4 2 1 RED BRN GRN 6 BLK 6 RED GRY BLK ORN BRN BLK WHT LOCATED AT GRILLE PUMP MOTOR 6 RED 6 BLK RED ...

Page 39: ...F PUMP MOTOR SV08 2004 SV08 40 SV08 43 SV08 40 SV08 30 S6 S5 S3 S2 S1 M S4 SV08 30 ON ON ON ON ON ON ON ON ON ON ON ON ON ON ON ON ON ON ON MOVEMENT BLADE RAISE ANGLE RIGHT ANGLE LEFT RIGHT EXTEND RIGHT RETRACT LEFT RETRACT SCOOP VEE R VEE L SCP R VEE R VEE WING CONTROLLER MODE CONTROLLER BUTTON V SCOOP L SCP L SCP R VEE RAISE ALL NOTE SEE BLADE MOVEMENT TEXT FOR BUTTON OPERATION EXTEND LEFT L SCP...

Page 40: ... RAISE LOWER ANGLE RIGHT ANGLE LEFT RIGHT EXTEND RIGHT RETRACT LEFT RETRACT SCOOP VEE DEFAULT STRAIGHT BLADE R VEE L SCP R VEE R VEE WING CONTROLLER MODE CONTROLLER BUTTON V SCOOP L SCP L SCP R VEE RAISE LOWER ALL ALL NOTE SEE BLADE MOVEMENT TEXT FOR BUTTON OPERATION EXTEND LEFT L SCP ON ON ON P O CHECK VALVE P O CHECK VALVE P O CHECK VALVE P O CHECK VALVE HOLD IN RAISE POSITION HYDRAULIC Blade Mo...

Page 41: ...O CHECK VALVE STRAIGHT BLADE DEFAULT Blade Movement Striking an Object While Plowing Forward Controller Mode All Modes Controller Button None System Response 1 Hydraulic oil is trapped in the base end of the right cylinder by the right primary relief valve right secondary relief valve and P O check valve D Hydraulic oil is trapped in the base end of the left cylinder by left primary relief valve l...

Page 42: ...FT FORCE APPLIED WHEN BACK DRAGGING FORCE APPLIED WHEN BACK DRAGGING RELIEF VALVE SECONDARY RELIEF VALVE SECONDARY SECONDARY BLOCK ASSY PRIMARY BLOCK ASSY VALVE RELIEF PRIMARY PRIMARY RELIEF VALVE VALVE RELIEF PUMP MOTOR SV08 2004 SV08 40 SV08 43 SV08 40 SV08 30 S6 S5 S3 S2 S1 M S4 SV08 30 ON ON ON ON ON ON ON ON ON ON ON ON ON ON ON ON ON ON ON ON ON MOVEMENT BLADE RAISE LOWER ANGLE RIGHT ANGLE L...

Page 43: ...AMPS GRY BRN PUR FROM VEHICLE HEADLAMP CONNECTOR RED HIGH ORN LOW COMPONENTS LOCATED NEAR FRONT OF VEHICLE LOW BEAM TO PARK LAMP BULLET TO LEFT TURN LAMP BULLET TO RIGHT TURN LAMP BULLET BLK ORN BRN 86 85 87 87A 30 BLU GND BLU GND LT BLU ORN BLK WHT YEL LT GRN LT BLU BLK ORN WHT LT BLU WHT YEL LT GRN BRN GRN RED ORN BLK BRN RED WHT BLK S6 SOLENOID LT BLU ORN PUMP MOTOR 6 RED M 6 BLK S3 SOLENOID LT...

Page 44: ...HICLE HEADLAMPS GRY BRN PUR FROM VEHICLE HEADLAMP CONNECTOR RED HIGH ORN LOW COMPONENTS LOCATED NEAR FRONT OF VEHICLE LOW BEAM TO PARK LAMP BULLET TO LEFT TURN LAMP BULLET TO RIGHT TURN LAMP BULLET BLK ORN BRN 86 85 87 87A 30 BLU GND BLU GND LT BLU ORN BLK WHT YEL LT GRN LT BLU BLK ORN WHT LT BLU WHT YEL LT GRN BRN GRN RED ORN BLK BRN RED WHT BLK S6 SOLENOID LT BLU ORN PUMP MOTOR 6 RED M 6 BLK S3 ...

Page 45: ...LE HEADLAMPS GRY BRN PUR FROM VEHICLE HEADLAMP CONNECTOR RED HIGH ORN LOW COMPONENTS LOCATED NEAR FRONT OF VEHICLE LOW BEAM TO PARK LAMP BULLET TO LEFT TURN LAMP BULLET TO RIGHT TURN LAMP BULLET BLK ORN BRN 86 85 87 87A 30 BLU GND BLU GND LT BLU ORN BLK WHT YEL LT GRN LT BLU BLK ORN WHT LT BLU WHT YEL LT GRN BRN GRN RED ORN BLK BRN RED WHT BLK S6 SOLENOID LT BLU ORN PUMP MOTOR 6 RED M 6 BLK S3 SOL...

Page 46: ...d for circuit testing When directed to check for 12 volts 12V ground the test lamp lead and probe the terminal When asked to check for ground attach the test lamp lead to 12V and probe the terminal Note that 12V is a nominal value If using a voltmeter actual voltage will vary with the vehicle and presence of loads in tested circuits Introduction This guide consists of a series of tables diagrams f...

Page 47: ...lack Stripe 9 Brown With Green Stripe 10 CAUTION Fill the reservoir to the full level only Do not overfill Overfilling could damage the unit CAUTION Do not mix different types of hydraulic fluid Some fluids are not compatible and may cause performance problems and product damage 4 Hydraulic reservoir is filled to dipstick level with recommended fluid when plow is in vee position and lift cylinder ...

Page 48: ...Quill adjusted in too far Adjust quill out Lift cylinder packing nut too tight Adjust lift cylinder packing nut Clogged pump filter all functions are affected Clean or replace filter flush reservoir Worn or damaged pump Go to Pump Pressure Test Snowplow raises slowly or partially motor runs Malfunctioning controller Go to Control Test Air in angle cylinders Cycle wings stop to stop to remove air R...

Page 49: ...unction Hydraulic system malfunction Go to Hydraulic System Test Red wire in plow harness going to solenoid valve coils is shorted to ground Repair wire or replace plow harness Red wire in vehicle harness going to terminal 3 of the vehicle battery connector is shorted to ground Repair wire or replace harness Red wire from fuse to terminal 8 of the 14 pin connector is shorted to ground Repair wire ...

Page 50: ...L circuitry Vehicle daytime running lamps DRLs do not work snowplow removed No output from DRL module Repair vehicle electrical system GENERAL DIAGNOSTIC TABLE PACKING NUT ADJUSTMENT NOTE This adjustment applies to the lift cylinder only Angle cylinders use gland nuts which are torqued to specifications CAUTION Do not overtighten the packing nut Over tightening affects the operation and life of th...

Page 51: ... Motor Relay Test Diagram YES Go to Motor Relay Test Momentarily attach jumper cable between battery and motor side of motor relay secondary Does motor run Repair or replace motor or pump NO NO Repair ground black wire in vehicle or plow battery cable NO Repair positive red wire in vehicle or plow battery cable Momentarily attach jumper cables from the battery to respective motor terminals Does mo...

Page 52: ...tor Terminal Motor Terminal Large Red Wire Black Orange Plow Battery Cable Vehicle Battery Cable Large Red Wire Large Red To Vehicle Brown Green Wire Brown Red Wire Secondary Motor Relay Small Red Large Black Wire Wire Harness Wire Terminals Wire Primary Terminals Motor Relay Large Black Wire Faston Connector ...

Page 53: ...ith brown green wire Attach a jumper cable across the motor relay secondary terminals Does motor run YES YES YES Go to Vehicle Harness Test Motor Relay NO NO NO Motor runs continuously YES NO Attach a ground jumper wire from battery to relay primary terminal with brown red wire Does motor run Repair or replace cable from battery to motor relay Go to Vehicle Harness Test Motor Relay Replace motor r...

Page 54: ...l retract A moving or falling blade could cause personal injury 14 Pin Connector 1 4 8 12 3 7 11 14 YES YES NO NO YES NO YES NO Is there 12V at pin 8 Install a jumper wire between pins 8 and 10 Does motor run Is there 12V at motor relay primary terminal with brown green wire Is there 12V at pin 7 Remove jumper wire Go to Control Test Verify vehicle power source and 10a fuse in red wire Repair red ...

Page 55: ...YES NO Replace PC board Replace coil cord harness CONTROL TEST CAUTION Printed circuit board PCB is subject to damage from static electricity Follow instructions below to safely handle PCB To safely handle PCB 1 Place control on its side and remove top half of handle leaving the PCB in lower half 2 Remove PCB from housing by only touching the edges of the PCB 3 Touch a clean finger to metal part o...

Page 56: ...amp draw greater than 190 amps at pump relief Go to Solenoid Coil Activation test YES Adjust to 1750 100 psi YES YES NO Go to Hydraulic System Test Remove pump Is pump O ring damaged YES Is pump relief pressure 1750 100 psi Go to Relief Valve Inspection and Adjustment NO Repair or replace motor NO Adjust pump relief clockwise1 4 turn to increase pressure Did pressure change NO Inspect pump relief ...

Page 57: ...g with retract when wing mode is first entered 1 Disconnect the red battery cable from the motor and isolate it 2 Remove bolt attaching lift cylinder rod to lift arm Tip the hydraulic unit forward and remove solenoid valve covers Reattach cylinder to lift arm 3 Verify wires are properly attached to solenoid coils Refer to table below Electrical Schematic and Solenoid Cartridge Valve Identification...

Page 58: ...S YES YES Go to Hydraulic System Test Disconnect 12 pin harness connector at front of vehicle Are any coils activated Repair small red wire in plow battery harness or plow harness Corresponding wire or solenoid coil is open Go to Individual Coil Test Repair open wire or replace plow harness Is there 12v at each of pins 1 3 4 7 8 and 12 of the plow harness 12 pin connector NO NO YES The wire betwee...

Page 59: ...pair wire For pins which do not have 12v corresponding wire in vehicle harness is open Repair wire or replace harness Disconnect the Faston spade connector which connects the vehicle harness red wire to the small red wire in the vehicle battery cable Is there 12v at the vehicle harness female side 10 amp fuse is blown or red wire in vehicle harness is open Replace fuse repair wire or replace harne...

Page 60: ...on is not listed in the table there may be relief or p o check valves which are stuck open or contaminated missing or damaged o rings or backing rings on solenoid relief or p o check valves or there may be two or more malfunctioning components In this case use the specific function hydraulic schematic and carefully inspect each component in the flow circuit If contamination is evident in more than...

Page 61: ...ck shifted Right Extend Left Retract S2 stuck shifted Right Extend and Left Retract wings not locked S3 stuck shifted None Check valve B closed Right Retract S6 not shifted Left Retract Right Retract S2 not shifted Raise S3 stuck shifted None Check valve A closed Check valve C closed Left Extend S4 stuck shifted Angle Left S5 stuck shifted Left Extend Right Retract S2 not shifted Raise S3 stuck sh...

Page 62: ...2 stuck shifted Right Retract S3 not shifted Check valve A closed Check valve C closed Left Retract Check valve B closed Left Extend and Right Retract wings not locked S4 stuck shifted Left Retract Check valve D closed None S5 stuck shifted Left Retract and Right Extend wings not locked S6 stuck shifted Raise Vee S2 not shifted Left Retract S3 not shifted Raises very slowly S1 stuck shifted Hold R...

Page 63: ... strike it squarely Adjustment 1 Adjust by tightening the relief valve stem as much as possible until spring is fully compressed 2 Back off valve stem rotate counterclockwise the number of turns indicated in the chart Install a tee in line with the lift cylinder hydraulic hose and attach a 3000 psi gauge Read the pressure at pump relief when holding the raise function button Adjust pump relief val...

Page 64: ...semblies have the letter V stamped on the hex Inspect the spool for signs of wear or any damage indicating it is not shifting Look for worn or damaged O rings and repair or replace as necessary 3 Re oil all O rings and reinstall the spool by holding the stem with the miniature needle nosed pliers and carefully inserting it fully into the bore Install the check valve assembly and torque to 120 in l...

Page 65: ... identical to the S2 and S5 SV08 40 cartridge valves in physical appearance These two valves function differently internally and cannot be interchanged The only way to tell them apart is by looking for the stamping SV08 43 or SV08 40 on the side of the hex 1 Remove coils from the solenoid cartridge valves and remove the valves from manifold Look for visible contamination or damaged seals Check for...

Page 66: ...ug plug in harness connectors at each vehicle headlamp Is there 12v at the red wire high beam and orange wire low beam Red or orange wires open in plug in harness Repair wire or replace harness YES NO NO Check vehicle output from headlight connector to plug in harness Repair vehicle system or open wires in plug in harness Remove 12v jumper from terminal 87a Disconnect the black orange wire from te...

Page 67: ...ange Yellow Purple Existing Driver Side Headlamp Connector Existing Vehicle Wire Harness Plug In Harness Existing Passenger Side Headlamp Connector Plug In Harness Male Plug Purple Driver Side Turn Signal Purple Alternate Right Turn Signal Connection Behind Driver Side Headlamp Purple Headlamp Relay Wiring Diagram Black Yellow Orange Brown Black Orange 85 86 87 87a 30 Green White 30 87a 87 Red Bro...

Page 68: ... there 12v at terminal 6 high beam white wire or terminal 2 low beam black wire on vehicle side Corresponding wire is open in vehicle harness Repair wire or replace harness Corresponding wire is open in plow harness Repair wire or replace harness Attach a ground jumper wire to relay terminal 85 with black orange wire Do plow lights come on Replace headlamp relay Remove jumper wire from relay Disco...

Page 69: ... open in plow harness Repair wire or replace harness Do vehicle turn signals work Disconnect 12 pin connector Is there 12v at terminals 10 for right turn and 9 for left turn Reconnect 12 pin connector Remove p t bulbs from plow lights Is there 12v at each red wire terminal in the sockets The purple and gray wires are spliced to red wires in the p t sockets Black orange ground wire is open in plow ...

Page 70: ...ing bar is raised enough to insert the pin through the pin hole Center the pin within the hole CAUTION Servicing the trip springs without special tools and knowledge could result in personal injury See your authorized Western Products outlet for service Channel Rod 1 2 x 1 1 2 Cap Screw Gr 5 1 2 Coupling Nut 1 2 Flat Washer Gr 8 1 4 x 1 1 4 Pin 4 Loosen the nut to lower the spring bar Remove the s...

Page 71: ... illustrated 2 Push it in until it bottoms out in the housing 3 Gently pull the wire that corresponds with the socket compartment out of the housing 4 Continue until the desired number of wires have been removed from the housing 5 To reinsert the terminal simply gently push the terminal into its proper compartment until it locks into place 1 Remove the damaged or faulty terminal from the end of th...

Page 72: ...arranty on all snowplows and accessories See separately printed page for this important information The following are registered and unregistered trademarks of Douglas Dynamics L L C FloStat MVP UniMount WESTERN WESTERN PRODUCTS P O BOX 245038 MILWAUKEE WI 53224 9538 A DIVISION OF DOUGLAS DYNAMICS L L C Copyright 2003 Douglas Dynamics L L C All rights reserved This material may not be reproduced o...

Reviews: