background image


Safety Notes 

a) 

This electric tool can be used as a grinder, and angle grinder. Please not all safety 
advice, descriptions and data supplied with the unit. Disregarding these notes may lead 
to electric shock, fire and/or serious injury. 

b) 

This electric tool is not suitable for use as sander, with a wire brush, or as polisher. 
Using the tool in ways not intended by the manufacturer is dangerous and can cause 
injury. 

c) 

Do not use attachments not especially designed for this device and recommended for 
this device by the manufacturer. The fact that an attachment can be physically attached 
to the tool does not ensure safe operation. 

d) 

The maximum allowed speed for an attachment must be at least as high as the no load 
speed noted on the electric tool. Attachments spinning faster than allowed may be 
destroyed. 

e) 

Outside diameter and thickness of the tool bit must correspond to the dimensions stated 
on your electric tool. Attachments of the wrong size cannot be shielded and controlled 
properly. 

f) 

Discs, flanges, and other attachments must precisely fit the spindle of your electric tool. 
Tool bits which do not precisely fit the spindle turn irregularly, vibrate and can cause 
loss of control. 

g) 

Do not use attachments which have been damaged in any way. Check attachments such 
as grinding discs for missing bits and cracks. If the tool or the attachment has been 
dropped, check it for damage or use an undamaged item. After the attachment has been 
checked and attached, please keep yourself and other persons out of the rotating plane of 
the attachment and let the machine run at full speed for one minute. Most damaged 
attachments and tools will fail within that time. 

h) 

Wear personal protective equipment. Wear full face protection, eye protection, or safety 
goggles as required. If necessary, wear a dust mask, ear protection, safety gloves or a 
safety apron which protect you from flying fragments. The eyes must be protected from 
flying debris, which are generated by many operations. Dust must be filtered out by the 
dust mask or breath protection. If you are exposed to high levels of noise for extended 
amounts of time, your hearing may be damaged. 

i) 

Keep other persons at a safe distance from your working area. Persons entering your 
working area must wear personal protective equipment. Fragments of the work piece or 
the attachment may be thrown away and cause injuries outside the immediate working 
area. 

j) 

Hold the unit only by the isolated handles while undertaking work during which the tool 
or the attachment can touch hidden life wires or its own power cable. Contact with life 
wires can cause metal parts of the housing to become life and can cause electric shock. 

Summary of Contents for 76 60 06

Page 1: ...Westfalia Bedienungsanleitung Nr 106751...

Page 2: ...Winkelschleifer S1M KR7 125B Artikel Nr 76 60 06 Angle Grinder S1M KR7 125B Article No 76 60 06 Bedienungsanleitung Instruction Manual...

Page 3: ...ne Der Winkelschleifer S1M KR7 125B zeichnet sich durch seine schlanke Bauform bei gleichzeitig hoher Leistung aus Der Winkelschleifer ist zum Trennen und Schleifen von Metall und Gestein bestimmt Ver...

Page 4: ...III 1 2 3 4 5 1 10 9 7 8 6 Abb Fig 1 Abb Fig 2 Abb Fig 3 Abb Fig 4 Abb Fig 5 11...

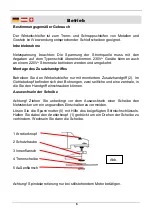
Page 5: ...rung 7 Stirnlochschl ssel 8 Maulschl sselaussparung 9 Oberer Flansch 10 Unterer Flansch 11 Schutzhaubenfixierung 1 Safety Hood 2 Accessory Handle 3 ON OFF Switch 4 Locking Button 5 Mounting holes for...

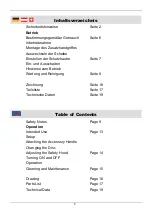
Page 6: ...rawing Page 16 Parts List Page 17 Technical Data Page 19 Sicherheitshinweise Seite 2 Betrieb Bestimmungsgem er Gebrauch Seite 6 Inbetriebnahme Montage des Zusatzhandgriffes Auswechseln der Scheibe Ein...

Page 7: ...ugs passen drehen sich ungleichm ig vibrieren sehr stark und k nnen zum Verlust der Kontrolle f hren g Verwenden Sie keine besch digten Einsatzwerkzeuge Kontrollieren Sie vor jeder Verwendung Einsatzw...

Page 8: ...igen Sie regelm ig die L ftungsschlitze Ihres Elektrowerkzeugs Das Motorgebl se zieht Staub in das Geh use und eine starke Ansammlung von Metallstaub kann elektrische Gefahren verursachen o Verwenden...

Page 9: ...satzwerkzeug neigt bei Ecken scharfen Kanten oder wenn es abprallt dazu sich zu verklemmen Dies verursacht einen Kontrollverlust oder R ckschlag e Verwenden Sie keine S gebl tter oder Sagevorrichtunge...

Page 10: ...ektrowerkzeug mit der sich drehenden Scheibe direkt auf Sie zugeschleudert werden c Falls die Trennscheibe verklemmt oder Sie die Arbeit unterbrechen schalten Sie das Ger t aus und halten Sie es ruhig...

Page 11: ...mit montiertem Zusatzhandgriff 2 Im Getriebekopf befinden sich drei Bohrungen zwei seitliche und eine zentrale in die Sie den Handgriff einschrauben k nnen Auswechseln der Scheibe Achtung Ziehen Sie...

Page 12: ...L sen oder Anziehen k nnen sie die Aussparung 8 am Stirnlochschl ssel 7 verwenden Ziehen Sie die Mutter fest an l sst sich die Position der Schutzhaube nicht mehr ver ndern Ziehen Sie die Schraube we...

Page 13: ...zugelassen sind Schneiden Sie niemals asbesthaltiges Material mit diesem Winkelschleifer Wartung und Reinigung Ziehen Sie vor allen Wartung und Reinigungsarbeiten immer den Netzstecker Halten Sie das...

Page 14: ...damaged in any way Check attachments such as grinding discs for missing bits and cracks If the tool or the attachment has been dropped check it for damage or use an undamaged item After the attachment...

Page 15: ...rinding or sanding disc or a wire brush etc This causes the spinning attachment to come to a sudden stop which will force the electric tool against the rotating direction of the attachment If for inst...

Page 16: ...for these discs Discs not intended for the unit can not be covered in a suitable way and are unsafe c Use discs only for the purpose they are intended for by the manufacturer Never use the side of a c...

Page 17: ...ach full speed before carefully resuming the cut Otherwise the disc may jam jump out of the cut or kick back e Support sheets or large work pieces to reduce the risk of a kickback caused by the disc b...

Page 18: ...h side and one in the middle to which the handle can be attached Changing the Disc Please Note Always pull the power plug before changing a disc to avoid accidental starting Lossen the retaining nut 5...

Page 19: ...y do not fully tighten the nut This is convenient if you use the machine in differen positions Turning ON and OFF Tu turn the machine on use the main switch 3 With the locking button 4 the main switch...

Page 20: ...ep the machine clean Make sure the ventillation slots are always clean and free from obstructions Clean the unit with a soft cloth which may be slightly moistened at the utmost Do not immerse the mach...

Page 21: ...16 Zeichnung Drawing...

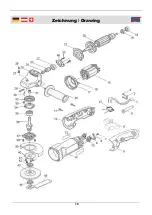
Page 22: ...label 2 14 Motorgeh use housing 1 15 Stator stator 1 16 Gummi rubber 2 17 L fterring draught ring 1 18 Lagerh lse bearing sleeve 1 19 Lagerh lse bearing 607 1 20 Rotor armature 1 21 L fterrad induct...

Page 23: ...Schraube screw 4 39 Schutzhaube grinding guard 1 40 Schutzhaubenbefestigung guard flange 1 41 Schraube screw 1 42 Innenflansch lower flange 1 43 Werkzeug disc 1 44 Au enflansch upper flange 1 45 Stirn...

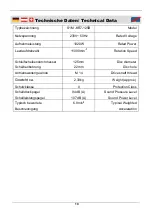
Page 24: ...Rotation Speed Schleifscheibendurchmesser Scheibenbohrung 125mm 22mm Disc diameter Disc hole Antriebswellengewinde M 14 Drive shaft thread Gewicht ca 2 33kg Weight approx Schutzklasse II Protection C...

Page 25: ...20 Raum f r Notizen Space for Notes...

Page 26: ...2000 EN 61000 3 3 1995 A1 Hagen den 09 Januar 2006 Marcus Friedberg Gesch ftsleitung We the Westfalia Werkzeugcompany Werkzeugstra e 1 D 58093 Hagen declare by our own responsibility that the product...

Page 27: ...net www westfalia net Kundenbetreuung Customer Services Werter Kunde bitte helfen Sie mit Abfall zu vermeiden Sollten Sie sich einmal von diesem Artikel trennen wollen so bedenken Sie bitte dass viele...

Reviews: