background image


Operation 

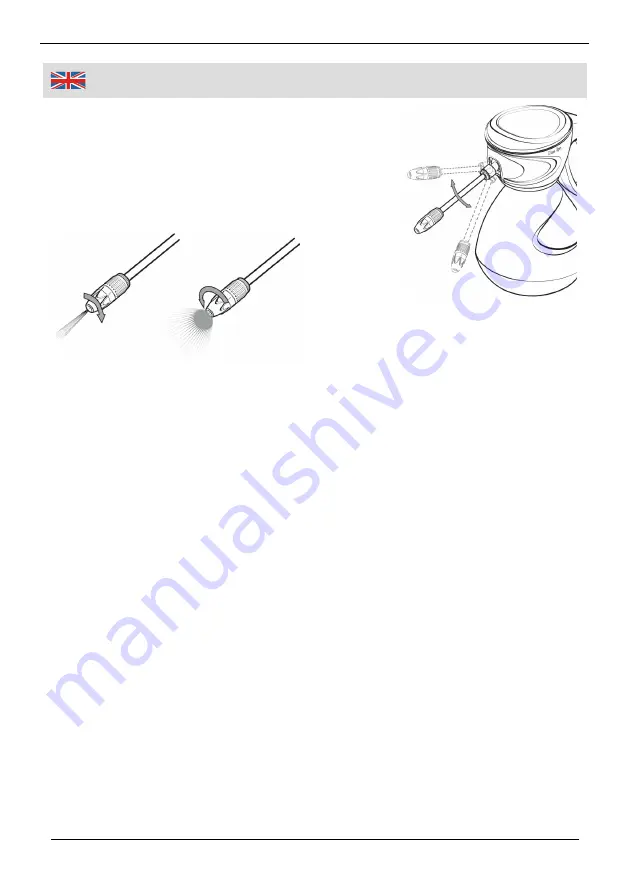
4.  Adjust the spraying direction of the lance (5) 

by moving the lance with the joint (4) up and 
down. 

5.  For adjusting the nozzle (6), turn the nozzle 

clockwise resp. counter clockwise, depending 
on the desired spray pattern.  


6.  Thoroughly clean the sprayer and all components after each use, as 

mentioned in the chapter Cleaning and Storing 

Cleaning and Storing 

ƒ

  After each use clean the sprayer and all components with clear water and 

mild detergent. Fill the tank with clear water and operate the sprayer until 
clear water is coming out from the nozzle. Do not use aggressive chemi-
cals or abrasives to clean the unit and do not immerse the sprayer in 
liquids of any kind. 

ƒ

  Always store the sprayer in a dry and frost-free room. Remaining water in 

the unit can cause damages. 

ƒ

  If you do not plan to use the sprayer for some time or to store it, remove 

the batteries. 

ƒ

  Do not disassemble it and do not attempt to repair it yourself. In case of 

questions or problems, please contact our customer support department. 

Summary of Contents for 80 30 27

Page 1: ...Westfalia Bedienungsanleitung Nr 109172...

Page 2: ...Gartenspr her Artikel Nr 80 30 27 Garden Sprayer Article No 80 30 27 Bedienungsanleitung Instruction Manual...

Page 3: ...ndle the device appropri ately and help prevent misunderstandings and possible damage or injury Dear Customers Diese Bedienungsanleitung geh rt zu diesem Produkt Sie enth lt wichtige Hinweise zur Inbe...

Page 4: ...III bersicht Overview 9 10 11 7 8 6 5 4 3 2 1...

Page 5: ...Cap 2 Batterien Batteries 3 Batteriefach Battery Compartment 4 Gelenk Joint 5 Lanze Lance 6 D se Nozzle 7 Saugschlauch Absorbing Tube 8 Filter Filter 9 EIN Taster ON Button 10 Handgriff Handle 11 Beh...

Page 6: ...eifelsfall an unsere Kundenberatung Verwenden Sie das Ger t nicht bei starkem Wind Das Ger t enth lt keine von Ihnen zu wartenden Teile Zerlegen Sie es nicht und unternehmen Sie keine eigenen Reparatu...

Page 7: ...5 V LR6 AA ein und achten Sie auf die richtige Polarit t Der Pol und der Pol sind im Inneren gekennzeichnet 3 Legen Sie den Batteriefachdeckel auf das Ger t und drehen Sie den Deckel in Rich tung clos...

Page 8: ...lle Bestandteile gr ndlich mit klarem Wasser und evtl mildem Sp lmittel F llen Sie klares Wasser in den Beh lter und spr hen Sie so lange bis aus der D se nur noch klares Wasser austritt Verwenden Sie...

Page 9: ...ische Daten Betriebsspannung 6 V 4 x 1 5 V LR6 AA Beh lterinhalt 1 Liter Spr hdistanz Max 3 5 m Spr hleistung Nebel Ca 280 ml min Spr hleistung Strahl Ca 160 ml min Abmessungen 23 x 13 x 23 cm Gewicht...

Page 10: ...please contact our customer support department Do not use the unit in high winds The unit does not contain parts serviceable by you Do not disassemble it and do not attempt to repair it yourself Store...

Page 11: ...rked inside the compart ment 3 Reattach the battery cap to the unit and close the lid by turning in direction close Operation Before first use test the sprayer with clear water 1 Unscrew the container...

Page 12: ...components with clear water and mild detergent Fill the tank with clear water and operate the sprayer until clear water is coming out from the nozzle Do not use aggressive chemi cals or abrasives to...

Page 13: ...ta Operating Voltage 6 V 4 x 1 5 V LR6 AA Tank Capacity 1 litres Spraying Distance Max 3 5 m Spraying Capacity Mist Approx 280 ml min Spraying Capacity Jet Approx 160 ml min Dimensions 23 x 13 x 23 cm...

Page 14: ...55014 2 1997 A1 A2 Hagen den 4 November 2010 Thomas Klingbeil Qualit tsbeauftragter We the Westfalia Werkzeugcompany Werkzeugstra e 1 D 58093 Hagen declare by our own responsibility that the product...

Page 15: ...h Internet www westfalia net Kundenbetreuung Customer Services Werter Kunde bitte helfen Sie mit Abfall zu vermeiden Sollten Sie sich einmal von diesem Artikel trennen wollen so bedenken Sie bitte das...

Reviews: