background image


Operation 

Speed Adjustment Wheel 

Depending on the pressure applied at the ON/OFF trigger the machine 
operates at a variable rotation speed of between 0 and 3000 rpm’s. Light 
trigger pressure results in a low rotation speed and smooth controlled starting 
of the drill. 
The required rotation speed for drilling depends on the material being drilled. It 
is best selected by a practical test. Always use a speed which is high enough 
to prevent the machine from stopping due to overload. The speed can be 
adjusted with the speed adjustment wheel (7). 

Changing the Rotating Direction 

The switch for clockwise/counter clockwise operation (5) should only be 
operated when the motor is at a complete standstill. When the ON/OFF trigger 
(6) is depressed, the switch for clockwise/counter clockwise operation (5) is 
disengaged. 
Clockwise Rotation for drilling, fastening of screws; 
Counter Clockwise Rotation for removing screws. 

Drilling/Hammer-Drilling 

The drill/hammer-drilling selector (2) should only be operated when the motor 
is at a complete standstill. The selector (2) is located on the top of the 
machine. 
For hammer-drilling push the switch towards the hammer          symbol.  

For drilling push the switch towards the drill               symbol. 

Maintenance and Cleaning 

ƒ

  Always disconnect the drill from power supply before maintaining it. 

ƒ

  Ensure that the ventilation slots are open and clean before each use.  

ƒ

  Never clean the machine with water. Use a soft cloth to clean the housing. 

Do not use aggressive chemicals or solvents to clean the machine as 
these may damage the plastic case. 

ƒ

  Enclosed in delivery you will find a pair of carbon brushes. If the machine 

works powerlessly and sparking occurs at the brushes, it may be a sign 
that the carbon brushes are used up and have to be replaced. Have the 
carbon brushes replaced by a professional only or return the unit to the 
Westfalia customer support department. Do not open the housing. Do not 
try to repair it yourself. 

Summary of Contents for 80 32 99

Page 1: ...Westfalia Bedienungsanleitung Nr 109198 ...

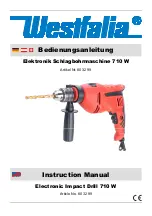
Page 2: ...Elektronik Schlagbohrmaschine 710 W Artikel Nr 80 32 99 Electronic Impact Drill 710 W Article No 80 32 99 Bedienungsanleitung Instruction Manual ...

Page 3: ...y and keep it for future reference Bedienungsanleitungen enthalten wichtige Hinweise für den Umgang mit Ihrem neuen Gerät Sie ermöglichen Ihnen alle Funktionen zu nutzen und sie helfen Ihnen Missverständnisse zu vermeiden und Schäden vorzubeugen Bitte nehmen Sie sich die Zeit diese Bedienungsanleitung in Ruhe durchzule sen und bewahren Sie sie für späteres Nachlesen gut auf Sehr geehrte Damen und ...

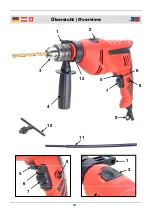
Page 4: ...III Übersicht Overview 3 4 5 6 8 2 1 9 10 5 6 2 7 7 8 11 1 12 ...

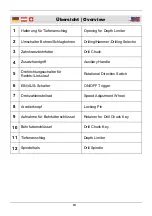
Page 5: ... Auxiliary Handle 5 Drehrichtungsschalter für Rechts Linkslauf Rotational Direction Switch 6 EIN AUS Schalter ON OFF Trigger 7 Drehzahleinstellrad Speed Adjustment Wheel 8 Arretierknopf Locking Pin 9 Aufnahme für Bohrfutterschlüssel Retainer for Drill Chuck Key 10 Bohrfutterschlüssel Drill Chuck Key 11 Tiefenanschlag Depth Limiter 12 Spindelhals Drill Spindle Übersicht Overview ...

Page 6: ...g Hammer Drilling Page 7 Maintenance and Cleaning Page 7 Technical Data Page 8 Sicherheitshinweise Seite 2 Vor der ersten Benutzung Seite 3 Anbau des Zusatzhandgriffes und des Tiefenanschlages Seite 3 Einsetzen der Werkzeuge Seite 3 Ein Ausschalten Seite 3 Drehzahlregler Seite 3 Ändern der Drehrichtung Seite 4 Bohren Schlagbohren Seite 4 Wartung und Reinigung Seite 4 Technische Daten Seite 8 Table...

Page 7: ...nd spannen Sie es nicht um Ecken Knicken Sie das Kabel nicht und halten Sie es von heißen und scharfen Oberflächen fern Verwenden Sie das Gerät nicht wenn es nicht korrekt arbeitet oder durch Herunterfallen beschädigt wurde Zerlegen Sie das Gerät nicht und unternehmen Sie keine eigenen Reparaturversuche Wenden Sie sich an die Kundenbetreuung Tragen Sie Gehörschutz zum Schutz vor Gehörverlust durch...

Page 8: ...ität des Zusatzhand griffes erhöht 4 Drehen Sie nun den Griff gegen den Uhrzeigersinn fest Einsetzen der Werkzeuge 1 Die Schlagbohrmaschine ist mit einem Zahnkranzbohrfutter 3 aus gestattet Setzen Sie das gewünschte Werkzeug ein und spannen Sie das Futter zunächst mit der Hand und anschließend gleichmäßig in allen drei Bohrungen mit dem beiliegenden Bohrfutterschlüssel 10 2 Verwenden Sie Schrauben...

Page 9: ...ollständigem Stillstand des Motors betätigt werden Den Umschalter 2 finden Sie auf der Oberseite der Maschine Für Schlagbohren schieben Sie den Schalter in Richtung Symbol Zum Bohren schieben Sie den Schalter in Richtung Symbol Wartung und Reinigung Ziehen Sie vor allen Arbeiten den Netzstecker Achten Sie vor jedem Einsatz darauf dass die Belüftungsschlitze offen und sauber sind Reinigen Sie das G...

Page 10: ...not in use Do not jam the cord or pull cord around edges Do not pinch the power cord in any way and keep it away from hot surfaces Do not wind the cord around the unit and do not bend it Do not operate the unit if it does not work correctly or has been dropped Do not disassemble the unit and do not try to repair it yourself Contact your customer support Always wear ear protection when working with...

Page 11: ...e flange until the two edges on the drive spindle casing lock firmly into one of the openings of the auxiliary handle clamp ring to increase the transverse stability of the auxiliary handle 4 Finally fasten the handgrip by turning it in an anticlockwise direction Inserting of Tool Bit 1 The impact drill is fitted with a toothed drill chuck 3 Insert the desired tool bit and tighten it manually Then...

Page 12: ...nter Clockwise Rotation for removing screws Drilling Hammer Drilling The drill hammer drilling selector 2 should only be operated when the motor is at a complete standstill The selector 2 is located on the top of the machine For hammer drilling push the switch towards the hammer symbol For drilling push the switch towards the drill symbol Maintenance and Cleaning Always disconnect the drill from p...

Page 13: ...ill Depth in Wood Bohrleistung Beton 13 mm Drill Depth in Concrete Bohrleistung Metall 10 mm Drill Depth in Metal Gewicht ca 1 8 kg Weight approx Schutzklasse II Protection Class Schalldruckpegel LpA 96 dB A Sound Pressure Level Schallleistungspegel LWA 107 dB A Sound Power Level Typisch bewertete Beschleunigung Bohren Schlagbohren Toleranz ah D 5 76 m s ah ID 15 62 m s K 1 5 m s Typical Weighted ...

Page 14: ...61000 3 2 2006 A1 A2 EN 61000 3 3 2008 Hagen den 18 April 2011 Thomas Klingbeil Qualitätsbeauftragter We the Westfalia Werkzeugcompany Werkzeugstraße 1 D 58093 Hagen Declare under our sole responsibility that the product Electronic Impact Drill 710 W Article No 80 32 99 is in compliance with the following European Directives 2004 42 EC Machinery 2004 108 EC Electromagnetic Compatibility EMC and th...

Page 15: ... westfalia net Kundenbetreuung Customer Services Werter Kunde bitte helfen Sie mit Abfall zu vermeiden Sollten Sie sich einmal von diesem Artikel trennen wollen so bedenken Sie bitte dass viele seiner Komponenten aus wertvollen Rohstoffen bestehen und wiederverwertet werden können Entsorgen Sie ihn daher nicht in die Mülltonne sondern führen Sie ihn bitte Ihrer Sammelstelle für Elektroaltgeräte zu...

Reviews: