background image


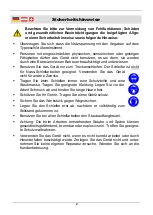
Safety Notes

ƒ

  Make sure the voltage corresponds to the type label on the machine. 

ƒ

  Persons with limited physical, sensorial or mental are not allowed to use 

the machine, unless they are supervised and brief by a qualified person. 

ƒ

  The machine is designed for dry sanding. The machine is not suitable for 

wet sending. Do not modify it for any other purpose.  

ƒ

  When sanding, always wear protection goggles and dust mask. 

Wear suitable clothes. Take off jewellery and tie up long hair. 

ƒ

  Protect your ears. Wear ear protectors.  

ƒ

  Secure the workpieces to avoid slipping. 

ƒ

  Always lay down the belt sander before the moving parts have 

come to complete stop. 

ƒ

  Always attach the dust collection bag while working with the belt 

sander. 

ƒ

  Attention: Dust forming during operation may be hazardous to your 

health, combustible or explosive. Take necessary precautions. 

ƒ

  Do not operate the machine if it does not work correctly or has been 

dropped. Do not disassemble the machine and do not try to repair it 
yourself. Contact your customer support. 


Please note the included General Safety Notes and the following 
safety notes to avoid malfunctions, damage or physical injury: 

Summary of Contents for 81 80 46

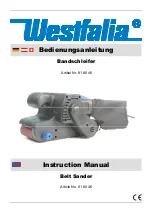
Page 1: ...Westfalia Bedienungsanleitung Nr 109879 ...

Page 2: ...Bandschleifer Artikel Nr 81 80 46 Belt Sander Article No 81 80 46 Bedienungsanleitung Instruction Manual ...

Page 3: ...ke it easier for you to handle the machine appropri ately and help you to prevent misunderstandings and possible damage or injury Mit diesem Bandschleifer können Sie zahlreiche Schleifarbeiten ausführen Er ist für Trockenschleifarbeiten vorgesehen und für das Schleifen von Holz Metall und Farbanstrichen geeignet Bitte lesen Sie diese Bedienungsanleitung komplett und bewahren Sie sie für späteres N...

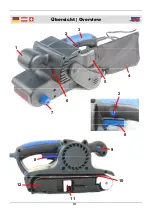
Page 4: ...III Übersicht Overview 2 3 1 5 4 7 2 8 9 8 11 10 12 6 ...

Page 5: ...on Bag 5 Anschluss für Staubauffangbeutel Exhaust Connection for Dust Bag 6 Kohlebürstenkappen Carbon Brush Caps 7 Justierrad der Laufrolle Belt Roller Fine Adjustment Knob 8 EIN AUS Schalter ON OFF Trigger 9 Geschwindigkeitsregler Speed Controller 10 Schleifband 76 x 533 mm Sanding Belt 76 x 533 mm 11 Spannhebel Tension Lever 12 Schleifband Richtungsmarkierung Sanding Belt Direction Indicator ...

Page 6: ...nce Changing the Carbon Brushes Page 10 Cleaning Page 10 Technical Data Page 11 Sicherheitshinweise Seite 2 Vor der ersten Benutzung Seite 3 Bestimmungsgemäßer Gebrauch Seite 3 Schleifpapier auswählen Seite 3 Schleifband auflegen Seite 3 Staubfangbeutel montieren abnehmen entleeren Seite 3 Bandschleifer ein und ausschalten Seite 4 Betrieb Seite 4 Drehzahlregler Seite 5 Wartung Kohlebürstenwechsel ...

Page 7: ...Gerät nicht für andere Zwecke Tragen Sie beim Schleifen immer eine Schutzbrille und eine Staubmaske Tragen Sie geeignete Kleidung Legen Sie vor der Arbeit Schmuck ab und binden Sie lange Haare fest Schützen Sie Ihr Gehör Tragen Sie einen Gehörschutz Sichern Sie das Werkstück gegen Wegrutschen Legen Sie den Schleifer erst ab nachdem er vollständig zum Stillstand gekommen ist Benutzen Sie bei allen ...

Page 8: ...ind unterscheidet man gröbere von feineren Körnungen Die Körnung ist durch eine Zahl auf der Rücksei te des Schleifbandes angegeben Je größer die Zahl ist desto feiner ist die Körnung Eine Körnung bis 80 benutzt man für Grobschliffe Bei Weichhölzern wie Lärche Kiefer oder Fichte verwenden Sie am besten 120er bis 150er Schleifband Für feinporiges Laubholz wie Buche oder Ahorn können Sie Schleifbänd...

Page 9: ...den Staubauffangbeutel einfach ab Zum Entleeren öffnen Sie den Reißverschluss am Staubauffangbeutel Bandschleifer ein und ausschalten 1 Zum Einschalten drücken Sie den EIN AUS Schalter 8 nach innen 2 Zum Arretieren des EIN AUS Schalters drücken Sie bei gedrücktem EIN AUS Schalter die Arretierung 2 am Handgriff 3 Zum Ausschalten drücken Sie den EIN AUS Schalter erneut Die Arretie rung springt zurüc...

Page 10: ...unehmen wenn ein unregelmäßiger Motorlauf verbunden mit starkem Bürstenfeuer auftritt 1 Trennen Sie den Bandschleifer vom Stromnetz 2 Schrauben Sie mit einem Schlitzschraubendre her die beiden Kohlenabdeckkappen 6 für die Kohlebürsten heraus und nehmen Sie die ver schlissenen Kohlebürsten heraus 3 Setzen Sie beigefügten Kohlebürsten ein und verschrauben Sie die beiden Haltekappen für die Kohlebürs...

Page 11: ...z 50 Hz Nennleistung 950 W Bandgeschwindigkeit 320 m min 5 3 m s Schleifbandabmessung 76 x 533 mm Gesamtgewicht 3 7 kg Schutzklasse II Schalldruckpegel 94 dB A Schallleistungspegel 105 dB A Typisch bewerteter Effektivbeschleunigungswert 3 15 m s2 ...

Page 12: ...g hair Protect your ears Wear ear protectors Secure the workpieces to avoid slipping Always lay down the belt sander before the moving parts have come to complete stop Always attach the dust collection bag while working with the belt sander Attention Dust forming during operation may be hazardous to your health combustible or explosive Take necessary precautions Do not operate the machine if it do...

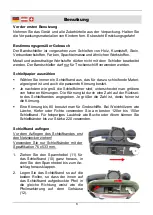
Page 13: ...ecified by a number on the back of the paper A small number means very coarse paper The higher the number is the finer the grain For rough sanding use grain sizes up to 80 for soft wood as larch pine or spruce use papers from 120 to 150 For dense hardwood as beech or maple paper grain sizes up to 220 can be used Attaching the Sanding Belt Always remove the power plug from the mains before removing...

Page 14: ...ng painted surfaces 1 Place the dust collection bag 4 onto the exhaust connection 5 2 To remove the dust collection bag just pull the bag outwards Open the zipper on the dust collection bag to empty Switching the Machine ON and OFF 1 To switch on the machine depress the ON OFF trigger 8 2 If the machine is required to run for an extended period push the lock switch 2 in the handgrip while holding ...

Page 15: ...ushes The carbon brushes should only be changed by an authorized technician An indicator that the carbon brushes need to be changed is when the motor runs irregularly with strong sparks observed as coming from the brush contacts 1 Disconnect the machine from the mains 2 Use a flat screwdriver to open the two carbon brush caps 6 and remove the worn carbon brushes 3 Insert included carbon brushes an...

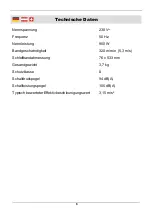
Page 16: ... 230 V Frequency 50 Hz Nominal Power 950 W Belt Speed 320 m min 5 3 m s Belt Dimensions 76 x 533 mm Total Weight 3 7 kg Protection Class II Sound Pressure Level 94 dB A Sound Power Level 105 dB A Typical Weighted Acceleration 3 15 m s2 ...

Page 17: ...12 Notizen Notes ...

Page 18: ...60745 1 2009 A11 EN 60745 2 4 2009 Hagen den 8 November 2011 Thomas Klingbeil Qualitätsbeauftragter We the Westfalia Werkzeugcompany Werkzeugstraße 1 D 58093 Hagen Declare under our sole responsibility that the product Belt Sander Article No 81 80 46 is in compliance with the following European directives 2004 108 EC Electromagnetic Compatibility EMC 2006 42 EC Machinery and their amendments The f...

Page 19: ...westfalia net Werter Kunde bitte helfen Sie mit Abfall zu vermeiden Sollten Sie sich einmal von diesem Artikel trennen wollen so bedenken Sie bitte dass viele seiner Komponenten aus wertvollen Rohstoffen bestehen und wiederverwertet werden können Entsorgen Sie ihn daher nicht in die Mülltonne sondern führen Sie ihn bitte Ihrer Sammelstelle für Elektroaltgeräte zu Dear Customer Please help avoid wa...

Reviews: