9
Operation
3. Adjust the sanding belt so that it sits evenly over both rollers. Ensure it is
correctly centred.
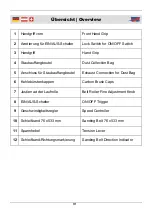
4. To tension the sanding belt for use, push the tension lever (11) back into
place.
5. To switch on the machine, connect the power plug to mains power and
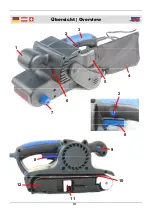
push the ON/OFF trigger (8).
6. If the sanding belt does not run true, use the fine adjustment knob (7) to
adjust the belt, so that it is correctly aligned. The sanding belt must lie
flush with plate and be firmly tensioned across the sanding plate. It should
not hang below it. If this occurs, a belt with the wrong dimensions may
have been used.
Assembling/Disassembling/Emptying the Dust Collection Bag
Always use the dust collection bag (4) and if possible supplementary dust
suction devices, particularly when sanding painted surfaces.
1. Place the dust collection bag (4) onto the exhaust connection (5).
2. To remove the dust collection bag, just pull the bag outwards. Open the
zipper on the dust collection bag to empty.
Switching the Machine ON and OFF
1. To switch on the machine, depress the ON/OFF trigger (8).
2. If the machine is required to run for an extended period, push the lock
switch (2) in the handgrip, while holding the ON/OFF trigger in the “ON”
position.
3. To switch off the machine, press the ON/OFF trigger again. The lock
switch moves back. Now release the ON/OFF trigger.
After switching off and before putting down the machine, allow the motor
come to a complete standstill!
Operation
1. Always hold the machine with both hands, gripping each of the two sepa-
rate handgrips (1 and 3).
2. First switch on the machine and allow the motor to run up to full speed
before placing the sanding belt onto the working surface.
3. Do not apply excessive pressure. Allow the sanding paper to do the job.


