background image

Setting 

item

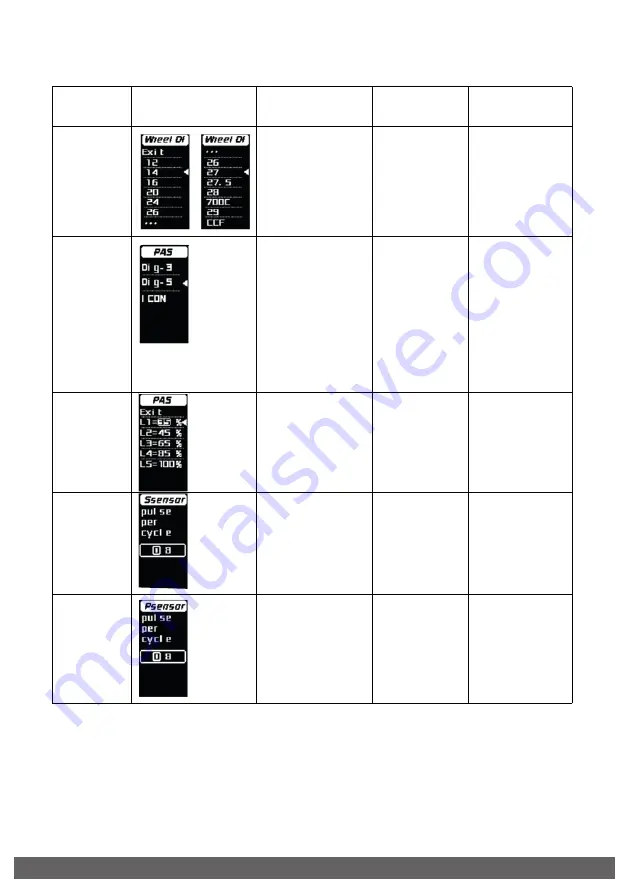
Wheel 

size 

setting

Power 

assist 

display 

setting

Power 

assist 

level 

setting

Speed 

magnet 

numbers

Ssensor: 

Speed sensor

PAS: Pedal 

assistance 

level

PAS: Pedal 

assistance 

mode

WheelDI: 

Wheel 

diameter

Value: 12, 14, 

16, 20, 24, 

26, 27, 27.5, 

700C, 28, 

*29, *CCF 

(* optional)

Value:

Dig-3;

Dig-5;

ICON

Value:

L1 to L5;

0-100%

Value:

1-12

Default 

value: 1,

step: 1;

magnets 

detected 

by motor

L1 - L5

Power assist 

level corre-

sponding to 

each gear

Step: 1%

Dig-3: 

Digital 3 

gear levels,

Dig-5: 

Digital 5 

gear levels,

ICON: Eng. 

version 

gears

Default 

value: 26

Interface

Description

Setting data Remark

Power 

assist 

magnet 

number

Psensor: PAS 

sensor

Value: 1-64

Default 

value: 12

Step: 1 

Power assist 

magnet 

number

ADVANCED SETTING FUNCTIONS DESCRIPTIONS

 fb.com/westhillbikes

 |  

westhillbikes.com

17

Summary of Contents for LINK

Page 1: ...Electric Bike User Manual westhillbikes com HAVE A QUESTION NEED HELP Contact us on Facebook for a quick reply LINK LINK ...

Page 2: ...ou may make 2 3 The following are considered wear parts under the statutory warranty Tyres Rims in combination with rim brakes Spokes Brake pads Chains and toothed belts Chain wheels sprockets bottom brackets and jockey wheels Sliding bearings Lamps for lighting system Handlebar tape handle grips Hydraulic oils and lubricants Gear shift cables and brake cables Batteries depletion of capacity to 60...

Page 3: ...ENT 1 x Westhill Link 1 x Charger 1 x Manual 3 4 4 5 5 6 7 7 8 8 8 9 9 20 21 21 9 8 8 7 5 4 3 1 BOX CONTENT 2 ATTENTION 3 CHECK BEFORE USE 4 MAINTENANCE 5 BIKE DIAGRAM AND PART NAMES 6 SPECIFICATIONS 7 HOW TO UNFOLD YOUR BIKE 8 TURNING ON YOUR BATTERY 9 REMOVING OR INSERTING YOUR BATTERY 10 CHARGING THE BATTERY 11 LIGHTS ON OFF 12 BASIC INFORMATION 13 DISPLAY MANUAL 14 GENERAL INFORMATION 15 SAFET...

Page 4: ...les We advise against performing maintenance operations that involve removing parts or components If this is necessary please contact us for guidance Do not ride through deep puddles Water could enter the hub motor causing short circuits and irreparable damage Do not allow individuals who are unfamiliar with the features and functions of this e bike to operate it without proper instruction Do not ...

Page 5: ...d Motor Frame Grip Shifter Handlebar Seat Clamp Seat Post Rack Mudguard Saddle MAINTENANCE Charge the battery every 2 months even if the bike hasn t been used for this period Keep all working parts lubricated Have the bike serviced regularly with a Westhill dealer Parts that can be lubricated Head set Brake cables Chain Parts that should not be lubricated Rear brake Front brake Rims Tyres 5 ...

Page 6: ... Lithium ion Rated Voltage 36V 36V 36V 36V Motor Make Bafang Bafang Bafang Bafang Type Brushless Brushless Brushless Brushless Rated Power 250W 250W 250W 250W Rated Voltage 36V 36V 36V 36V Rated Output Torque 65nm 65nm 65nm 65nm Charger Current 2 Amps 2 Amps 2 Amps 2 Amps Input 41 9V 41 9V 41 9V 41 9V Type Smart Charger Smart Charger Smart Charger Smart Charger Charge Time 4 6h 4 6h 4 6h 4 6h Larg...

Page 7: ...re folding up TURNING ON YOUR BATTERY Before turning on the display for your Westhill Link you must turn the battery power on The switch is located above the charging port on the side of the battery When charging the battery please make sure the switch is turned OFF HOW TO UNFOLD YOUR BIKE 7 Please visit www westhillbikes com link for a video on how to unfold fold your bike ...

Page 8: ...ttery is fully charged When the battery is fully charged disconnect the charger from the wall outlet before disconnecting the charger from the bike Ensure that the cover over the charging port on the bike is closed and sealed Be sure to use the charger supplied together with the bike use of other chargers will invalidate the warranty LIGHT ON OFF Press the UP arrow on the display for 2s to turn on...

Page 9: ...ORMATION Aluminum Al6061 20 10 2Ah 36V 250W 36V 250W DM03 6V LED TEKTRO Disc Brakes Rear 7 Speeds FRAME MATERIAL FRONT FORK SIZE BATTERY MOTOR CONTROLLER DISPLAY LIGHT BRAKES DERAILLEUR 9 DM03 E BIKE DISPLAY USER MANUAL 23 5mm 1 3 OLED 22 2mm 63 5mm ...

Page 10: ...er assist gear for high visibility Unit km miles Speed Real time speed SPEED maximum speed MAX average speed AVG Battery indicator with percentage display Range Endurance mileage available if BMS provides necessary info Headlight on off status indication and control Mileage Subtotal mileage TRIP total mileage ODO Walk assist function Parameters setting and advanced setting Error code indication IN...

Page 11: ...zation of the loading interface and UI interface Power button M button Basic interface Adjust buttons 5 pin plug fb com westhillbikes westhillbikes com 11 FUNCTION INTERFACE INTRODUCTION Loading interface Basic interface Power assist level Subtotal mileage Bluetooth Speed display Headlight indicator Battery indicator Loading interface and basic functions interface Loading logo interface is display...

Page 12: ...ted by the parameter shown on white background Once the parameter is picked and the M button pressed the options available within that parameter will be displayed to be selected Short press to modify the parameters to edit Hold down the M button to confirm your choice and exit the editing state Hold down the M button again to return to previous page Use buttons to enter into each setting item acco...

Page 13: ...fb com westhillbikes westhillbikes com DEFINITION OF BUTTON OPERATION TURN ON OFF THE DISPLAY To turn on hold down the power button until loading logo interface appears and the display enters the basic interface To turn off hold down the power button when the display is on until the display is turned off If the rider does not perform any operation on the display within set shutdown time while spee...

Page 14: ...in the meantime a light icon on top left corner of screen will appear indicating light on status Hold down the button to turn the lights off SETTING INTERFACES Within 10s of turning on the display hold down M button to enter the setting interface and press buttons to switch between setting interfaces The following table provides a description of the setting options available within each parameter ...

Page 15: ...ht UNIT Unit Value KM H MPH Value I Back light level 60 Value 2 Back Iight level 80 Value 3 Back light level 100 Value OFF 5 30 min Value OFF and ON When ON user is allowed to set 4 digit password Read only Read only According to communication protocol According to communication protocol Default value OFF Default Value 5min Step 5 min OFF means no auto shutdown Default Value 1 Default Value KM H K...

Page 16: ...e password input interface is as follows After the password is typed correctly the screen will display the advanced settings which is divided into two content pages Use to pick the setting you want to enter and short press M to select the setting The triangle cursor on the right indicates the selected object Controller info CTLIFO controller information Read only According to communication protoco...

Page 17: ...g 5 ICON Value L1 to L5 0 100 Value 1 12 Default value 1 step 1 magnets detected by motor L1 L5 Power assist level corre sponding to each gear Step 1 Dig 3 Digital 3 gear levels Dig 5 Digital 5 gear levels ICON Eng version gears Default value 26 Interface Description Setting data Remark Power assist magnet number Psensor PAS sensor Value 1 64 Default value 12 Step 1 Power assist magnet number ADVA...

Page 18: ...orresponding to right or left installation Default value 31 5V Step 0 5V Select the low voltage value for protection Default value 36V Choose system voltage Default value 12 Step 0 5A Controller s current limit setting Default value 2 Step 1 Number of starting magnets Default value 0 ERROR INFORMATION Display can warn bike faults When faults are detected an error code will be shown on the interfac...

Page 19: ...security and do not plug the display in or unplug it when the display has been turned on Try to avoid exposure to harsh environments like heavy rain heavy snow and strong sunlight When the display can t be used normally it should be sent for repair as soon as possible Suggested operation turns fb com westhillbikes westhillbikes com 19 ...

Page 20: ...ury or malfunction of the bicycle Lubricate the chain after every wash if you can to keep it smooth and rust free Suitable products are available via westhillbikes com 15 5mph 120kg 18 9 stone and will void your warranty limit can The range of the battery is up to 40 miles per charge riding of factors Battery size tyre pressure temperature battery age and weather conditions BATTERY RANGE GENERAL I...

Page 21: ...0 PSI depending on which bike you have how firm you want your ride to be tyre TYRE PRESSURE alcohol Consult your doctor if taking prescription medication is Be aware of your surroundings Store the battery indoors in a room temperature environment bike 21 ...

Page 22: ...fb com westhillbikes westhillbikes com the bike any electrical parts without contacting the Customer Service 44 0 1823 672 970 22 ...

Page 23: ...r information page www fb com westhillbikes or scan the QR code below with your mobile phone and message us with this information Your name Your email address Your postal address Bike model colour Purchase date Where you purchased from Be sure to register right away so your bike is covered Don t have Facebook Email the above details to enquiries westhillbikes com to activate your warranty 23 fb co...

Page 24: ...westhillbikes com ...

Reviews: