background image

3

ETL-ES-Wengue-WH10

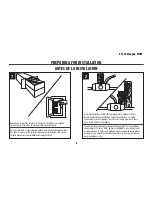
1.  Installation work and electrical wiring must be done by qualified person(s) in accordance with all applicable codes and standards (ANSI/NFPA 70-1999), including fire-rated construction.

2.  Use this unit only in the manner intended by the manufacturer.  If you have  any  questions contact the manufacturer.

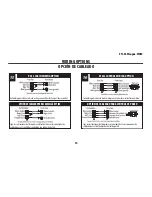
3.  After making the wire connections, gently push connections into outlet box with wire nuts pointing up. The wires should be spread apart with the grounded conductor and the equipment-grounding conductor on 


one side of the outlet box and ungrounded conductor on the other side of the outlet box.

4.  Before you begin installing the fan, switch power off at service panel and lock service disconnecting means to prevent power from being switched on accidentally.  When the service disconnecting means cannot be 


locked, securely fasten a prominent warning device, such  as a tag, to the service panel.

5.  Be cautious! Read all instructions and safety information before installing your new fan. Review the accompanying assembly diagrams.

6.  When cutting or drilling into wall or ceiling, do not damage electrical wiring and other hidden utilities.

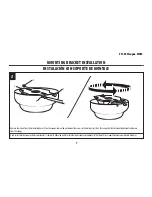
7.  Make sure the installation site you choose allows the fan blades to rotate without any obstructions. Allow a minimum clearance of 7 feet from the floor to the trailing edge of the blade.

8.  To reduce the risk of fire, electric shock, or personal injury, this fan must be mounted to an outlet box marked suitable for fan support, and use the mounting screws provided with the outlet box. (Mounting must 


support at least 35 lbs.)

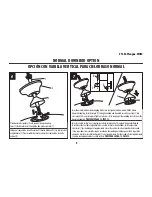
9.  WARNING! Do not bend blade holders during installation to motor, balancing or during cleaning. Do not insert foreign object between rotating blades.

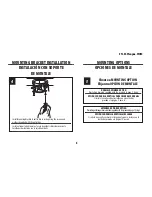
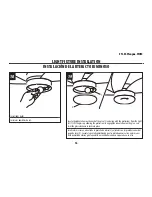
10.  Attach the mounting bracket using only the hardware supplied with the outlet box. Fan is only to be mounted to an outlet box marked “Acceptable for Fan Support”. 

11.  WARNING! To reduce the risk of fire or electric shock, do not use this fan with any solid state fan speed control device, or variable speed control.

12.  If this unit is to be installed over a tub or shower, it must be marked as appropriate for the application.

13.  NEVER place a switch where it can be reached from a tub or shower.

14.  The combustion airflow needed for safe operation of fuel-burning equipment may be affected by this unit’s operation. Follow the heating equipment manufacturer’s guideline safety standards such as those 


published by the National Fire Protection Association (NFPA),  and the American Society for Heating, Refrigeration and Air Conditioning Engineers (ASHRAE) and the local code authorities.

15.  Before servicing or cleaning unit, Switch power off at Service panel and lock service disconnecting means to prevent power from being switched on accidentally.  When the service disconnecting means cannot be 


locked, securely fasten a prominent warning device, such  as a tag, to the service panel.

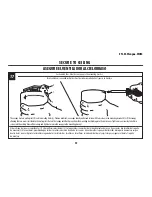
16.  All set screws must be checked and re-tightened where necessary before installation.

OBSERVE THE FOLLOWING: READ AND SAVE THESE INSTRUCTIONS

WARNING: TO REDUCE THE RISK OF FIRE, ELECTRIC SHOCK, OR PERSONAL INJURY, MOUNT TO OUTLET BOX MARKED "ACCEPTABLE FOR FAN SUPPORT", 

AND USE THE OUTLET SCREWS PROVIDED WITH THE OUTLET BOX. MOST OUTLET BOXES COMMONLY USED FOR THE SUPPORT OF LIGHTING FIXTURES 

ARE NOT ACCEPTABLE FOR FAN SUPPORT AND MAY NEED TO BE REPLACED. CONSULT A QUALIFIED ELECTRICIAN IF IN DOUBT.

TOOLS REQUIRED

Phillips Screwdriver         Wire Cutters         Pliers        Step Ladder

SafETy TiPS

Summary of Contents for 7203200

Page 1: ...engue WH10 Owner s Manual Manual del usuario Wengue Please write model number here for future reference Por favor incluya el número del modelo aquí para futura referencia Net Weight 10 27 LBS Peso Neto 4 66 KGS ...

Page 2: ...2 ETL ES Wengue WH10 ...

Page 3: ...ationtomotor balancingorduringcleaning Donotinsertforeignobjectbetweenrotatingblades 10 Attachthemountingbracketusingonlythehardwaresuppliedwiththeoutletbox Fanisonlytobemountedtoanoutletboxmarked AcceptableforFanSupport 11 WARNING Toreducetheriskoffireorelectricshock donotusethisfanwithanysolidstatefanspeedcontroldevice orvariablespeedcontrol 12 Ifthisunitistobeinstalledoveratuborshower itmustbem...

Page 4: ...usandosólolatornilleríasuministradaconlacajadeembutir Elventiladorsólosedebemontarenunacajadeembutirmarcada AcceptableforFanSupport Aceptableparasoportarventiladores 11 ADVERTENCIA Parareducirelriesgodeincendiosochoqueseléctricos nouseesteventiladorconundispositivodecontroldevelocidaddeestadosólidoparaventilador ouncontroldevelocidadvariable 12 Siestaunidadseinstalarásobreunabañeraounaducha debees...

Page 5: ...calidad Invirtiendo lasaspaspuedeUd producirunefectodecorativoadaptadoasuambienteocrearunadecoración completamentenueva Observación lassuperficiesdelasaspasdedoblecarasondistintasenfuncióndelmodelo Features Características DOWNROD INSTALLATION INSTALACIÓN CON VARILLAVERTICAL For normal ceilings Para cielorrasos normales May require a longer downrod sold separately Podría requerir una varilla verti...

Page 6: ...ed Turn off power at fuse box to avoid possible electrical shock Quite el envoltorio e inspeccione detenidamente el ventilador para verificar que todas las piezas estén incluidas Apague la alimentación en la caja de fusibles para evitar la posibilidad de descarga eléctrica Use una caja de embutir de metal adecuada para soportar un ventilador debe soportar 35 libras Antes de fijar el ventilador a l...

Page 7: ...crewsfromthetwomatingholes 1 onthecanopy Loosen donotremove thescrewsinthematingslots 2 onthecanopy Rotatethemountingbracketandremove fromthecanopy Quitelostornillosdelosdosorificioscoincidentes 1 deldosel Afloje noquite lostornillosdelasranurascoincidentes 2 deldosel Gireelsoportedemontajeysepárelodeldosel ...

Page 8: ...CIONES DE MONTAJE Choose a MOUNTING OPTION Elija una OPCIÓN DE MONTAJE NORMAL DOWNROD OPTION If installing downrod supplied with fan proceed to page 9 step 6 OPCIÓN CON VARILLA VERTICAL PARA CIELORRASO NORMAL Si instala la varilla vertical incluida con el ventilador proceda a la página 9 paso 6 EXTENDED DOWNROD OPTION Ifinstallingwithlongerdownrodthansuppliedwithfan proceedtopage10 step8 OPCIÓN CO...

Page 9: ...roughcouplinganddownrod Insertkeeperpin 2 into crosspinuntilitsnapsintoplace Tightensetscrews 3 incoupling Slidecouplingcover 4 overthe downrodcoupling PROCEEDTOPAGE13 STEP13 Insertelavarillaverticalenelacoplamientodelavarillavertical Asegúresedequeelorificiode lavarillaverticalyeldelacoplamientodelavarillaverticalesténalineados Instaleelpasador transversal 1 pasándoloporelacoplamientoylavarillave...

Page 10: ...MÁS LARGA 9 2 1 Loosendownrodball 1 fromdownrod 2 byremovingsetscrew 3 Aflojelaesferadelavarillavertical 1 delavarillavertical 2 quitandoeltornillo 3 Slidedownrodball 1 offofdownrodandremovepin 2 Deslicelaesferadelavarillavertical 1 hastasepararladela varillaverticalyquiteelpasador 2 ...

Page 11: ...ownrod tightenthesetscrew againstthedownrodtosecurethedownrodball Vuelvaainstalarelpasadorenlavarillaverticalmáslargaydeslicelaesferadelavarillahastaelextremosuperiordelamisma Vuelvaainsertareltornillodefijaciónparaasegurarla esferaalavarillavertical Nota Algunasvarillasverticalesmáslargastienenunagujeropreviamenteperforadoparaeltornillo Silavarillaverticalmáslargatieneunagujeropreviamente perfora...

Page 12: ...or screws provided Tighten screws securely Fije el conjunto de las paletas al motor usando las juntas reductoras de sonido del motor y los tornillos para el motor incluidos Apriete los tornillos asegurándolos Attach blade brackets to blades using the blade bracket screws 1 fabric washers 2 and nuts 3 Fije los soportes para paletas a las paletas con los tornillos 1 las arandelas de tela 2 y las tue...

Page 13: ...sdeacuerdoalassiguientesinstruccionesdecableado Carefullyliftfanassemblyontomountingbracket Rotatefanuntilnotchon downrodball 1 engagestheridgeonthemountingbracket 2 This willallowfor handsfreewiring Levanteconcuidadoelconjuntodelventiladorhastaelsoportedemontaje Gire elventiladorhastaquelamuescadelaboladelavarillavertical 1 calcesobrela salientedelsoportedemontaje 2 Deestemodo tendrálasdosmanosli...

Page 14: ...chain control PULL CHAIN WIRING OPTION WALL CONTROL WIRING OPTION Siga las instrucciones del diagrama anterior para hacer las conexiones de cableado para el ventilador con control de pared Siga las instrucciones del diagrama anterior para hacer las conexiones de cableado para el ventilador controlado con cadenilla de tiro OPCIÓNDECABLEADOPARACADENILLADETIRO OPCIÓN DE CABLEADO PARA CONTROL DE PARED...

Page 15: ...et El dosel tiene dos ranuras coincidentes 1 y dos orificios coincidentes 2 Coloque ambas ranuras del dosel directamente abajo y en línea con los dos tornillos del soporte de montaje 3 Eleve el dosel permitiendo que los dos tornillos se deslicen dentro de las ranuras Gire el dosel hasta que ambos tornillos del soporte de montaje caigan dentro de las ranuras Apriete los tornillos asegurándolos Inst...

Page 16: ... the light kit 1 Lift the glass up allowing the protrusions to engage the indentations on the glass and twist the glass clockwise to lock into place Localice las marcas en el cuello de la pantalla de vidrio 2 y alinéelas con las protuberancias del juego de luces 1 Levante la pantalla permitiendo que las protuberancias calcen en las marcas de la pantalla de vidrio y gire la pantalla en sentido hora...

Page 17: ...upling Confirm chains are held by lightly pulling both chains in coupling Sujetar las cadenas largas de tiro con las piezas finales correspondientes a las cadenas del ventilador introduciendo el extremo de la cadena larga en la pieza de unión Asegúrese de que las cadenas están bien sujetas tirando ligeramente de ambas cadenas en la pieza de unión ...

Page 18: ...n illustration B This allows you to set your heating unit on a lower setting without affecting your comfort Please however refer to point 10 in SafetyTips when operating in this position NOTE Turn off and wait for fan to stop before changing the setting of the forward reverse slide switch Maintenance 1 Because of the fan s natural movement some connections may become loose Check the support connec...

Page 19: ...techo como lo indica la ilustración B Esto le permite ajustar la calefacción a un nivel más bajo sin que afecte su comodidad De todos modos por favor consulte el punto 10 de las Sugerencias de seguridad cuando utilice el ventilador en esta posición NOTA Apague el ventilador y espere a que se detenga antes de cambiar la dirección de adelante atrás con el conmutador de tipo deslizante Mantenimiento ...

Page 20: ...f the wobble Check for wobble after each step 1 Check that all blades are screwed firmly into blade holders 2 Check that all blade holders are tightened securely to motor 3 Make sure that canopy and mounting bracket are tightened securely to ceiling joist 4 If blade wobble is still noticeable interchanging two adjacent side by side blades can redistribute the weight and possibly result in smoother...

Page 21: ...beríaneliminarlamayoríadelosproblemasdeoscilación Verifiquelaoscilacióndespuésdecadapaso 1 Verifique que todas las paletas estén firmemente atornilladas a los soportes de las paletas 2 Verifique que todos los soportes de las paletas estén firmemente aseguradas al motor 3 Asegúrese de que el dosel y el soporte de montaje estén firmemente asegurados a la viga del cielorraso 4 Silaoscilacióndelapalet...

Page 22: ...22 ETL ES Wengue WH10 ...

Page 23: ...23 ETL ES Wengue WH10 ...

Page 24: ...ed trademark of Westinghouse Electric Corporation Made in China 2010Westinghouse Lighting Corporation Westinghouse Lighting Corporation 12401 McNulty Road Philadelphia PA 19154 U S A Westinghouse Lighting Corporation titular de la licencia deWestinghouse Electric Corporation es una marca registrada de Westinghouse Electric Corporation Fabricado en China 2010Westinghouse Lighting Corporation ...

Reviews: