background image

17

UL-ES-PrincessAmbiance-WH04

20

21

22

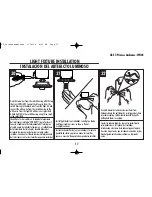
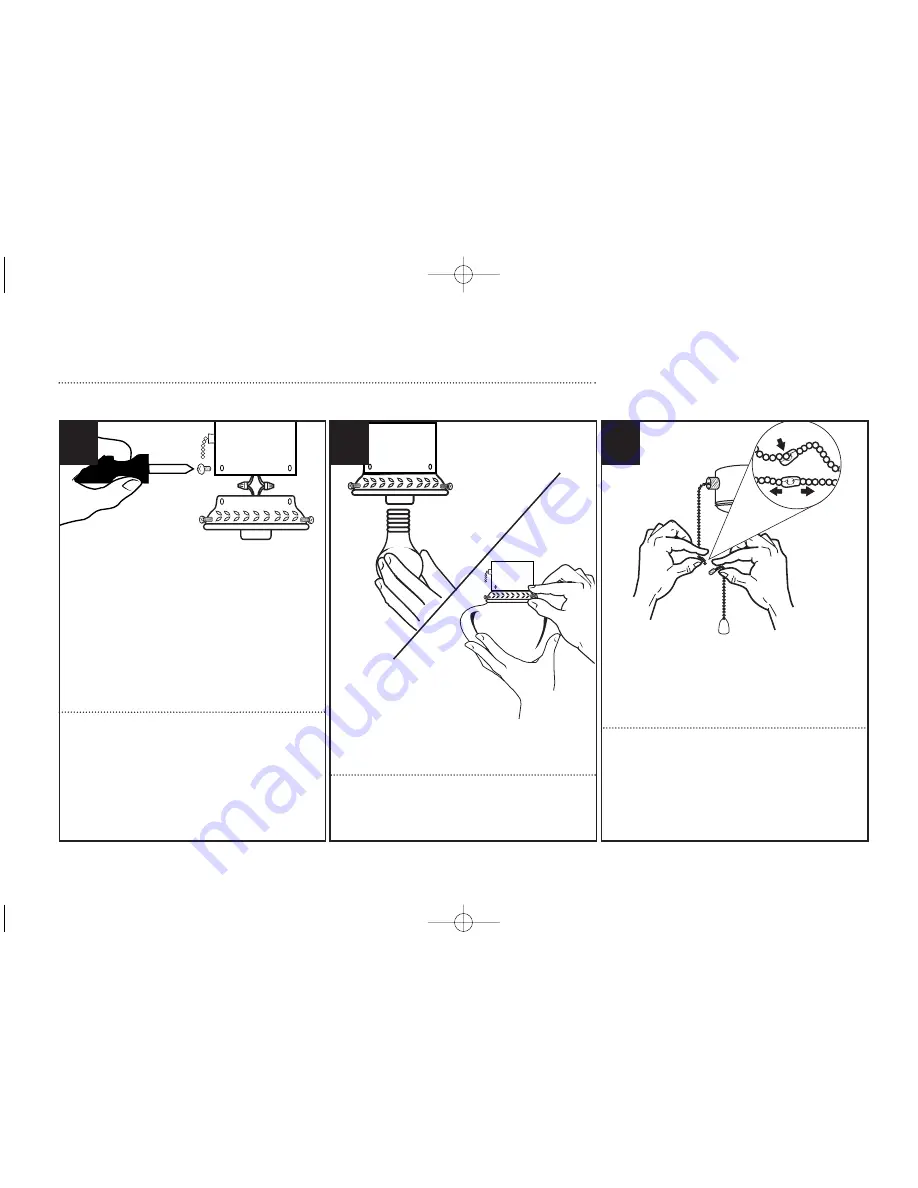
Install light bulbs (not included). Install glass shade
and finger-tighten screws as shown. Do not 
overtighten screws. 
Instale las bombillas de luz (no incluidas). Instale la 
pantalla de vidrio y apriete a mano los tornillos, 
como se muestra. No apriete demasiado los tornillos.

Assemble decorative fob and extension chains from 
hardware bag to fan pull chains by inserting end of chain 
into chain coupling. Confirm chains are held by lightly 
pulling both chains in coupling.

Sujetar las cadenas largas de tiro con las piezas finales 
correspondientes, a las cadenas del ventilador, 
introduciendo el extremo de la cadena larga en la pieza 
de unión. Asegúrese de que las cadenas están bien sujetas, 
tirando ligeramente de ambas cadenas en la pieza de
unión.

LIGHT FIXTURE INSTALLATION

INSTALACIÓN DEL ARTEFACTO LUMINOSO

Find the two wires from the switch housing with the tag

that says FOR LIGHT. Connect the blue wire from the

switch housing to the black wire from the light kit, and

connect the white wire from the switch housing to the

white wire from the light kit with wire nuts provided.

Attach light kit to the switch housing using three small

screws provided.
Identifique los dos cables en la tapa del alojamiento 

del interruptor rotulada “FOR LIGHT” (para las luces). 

Conecte el cable azul del alojamiento del interruptor 

al cable negro del artefacto luminoso y el cable blanco 

del alojamiento del interruptor al cable blanco del 

artefacto luminoso usando las tuercas para cables 

incluidas. Conecte el artefacto luminoso al alojamiento 

del interruptor con los tres tornillos pequeños incluidos.

UL_PrincessAmbiance  2/16/04  4:15 PM  Page 17

Summary of Contents for 78133

Page 1: ...UL ES PrincessAmbiance WH04 MR OWNER S MANUAL MANUAL DEL USUARIO N W 5 9 KGS G W 6 4 KGS Princess AmbianceTM Item tem No Finish Acabado 78133 White Blanco UL_PrincessAmbiance 2 16 04 4 15 PM Page 1...

Page 2: ...cing or during cleaning Do not insert foreign object between rotating blades 10 Attach the mounting bracket using only the hardware supplied with the outlet box Fan is only to be mounted to an outlet...

Page 3: ...ando s lo la torniller a suministrada con la caja de embutir El ventilador s lo se debe montar en una caja de embutir marcada Acceptable for Fan Support Aceptable para soportar ventiladores 11 Para re...

Page 4: ...a cielorrasos normales VAULTED CEILING INSTALLATION INSTALACI N PARA CIELORRASOS ABOVEDADOS May require a longer downrod sold separately Podr a requerir una varilla vertical m s larga se vende por sep...

Page 5: ...vary depending upon model ASPAS DE DOBLE CARA Las aspas del rotor de doble cara presentan dos superficies con un acabado de alta calidad Invirtiendo las aspas puede Ud producir un efecto decorativo a...

Page 6: ...PARING FOR INSTALLATION ANTES DE LA INSTALACI N Quite el envoltorio e inspeccione detenidamente el ventilador para verificar que todas las piezas est n incluidas Apague la alimentaci n en la caja de f...

Page 7: ...ating slots 2 on the canopy Rotate the mounting bracket counter clockwise and remove from the canopy Quite los tornillos y las dos arandelas en estrella de los dos orificios coincidentes 1 del dosel A...

Page 8: ...ption is selected proceed to page 9 step 6 OPCI N DE INSTALACI N AL RAS Si elige la opci n de montaje al ras proceda a la p gina 9 paso 6 NORMAL DOWNROD OPTION If installing downrod supplied with fan...

Page 9: ...je al ras y las arandelas de presi n incluidas Apriete los tornillos asegur ndolos 7 For flush mount option raise fan assembly and place onto hook from mounting bracket into a closed hole on the canop...

Page 10: ...o de la varilla vertical y el de la horquilla de la varilla vertical est n alineados Instale el pasador transversal de la horquilla 1 pas ndolo por la horquilla y la varilla vertical Inserte el pasado...

Page 11: ...drilled hole exists in the extended downrod tighten the set screw against the downrod to secure the downrod ball Vuelva a instalar el pasador en la varilla vertical m s larga y deslice la esfera de la...

Page 12: ...rtical conjunto del dosel e inserte la varilla vertical en la horquilla de la misma Aseg rese de que el orificio de la varilla vertical y el de la horquilla de la varilla vertical est n alineados Inst...

Page 13: ...e cableado 13 1 2 Carefully lift fan assembly onto mounting bracket Rotate fan until notch on downrod ball 1 engages the ridge on the mounting bracket 2 This will allow for hands free wiring Levante c...

Page 14: ...com n Negro vivo Azul vivo Principal tierra Blanco com n Interruptor del ventilador vivo Interruptor de la luz vivo Verde de tierra Del Ventilador De La Casa conectar conectar conectar conectar Conect...

Page 15: ...jo y en l nea con los dos tornillos del soporte de montaje 3 Eleve el dosel permitiendo que los dos tornillos y las arandelas en estrella se deslicen dentro de las ranuras Gire el dosel en sentido hor...

Page 16: ...oras de sonido del motor 2 y los tornillos para el motor incluidos Apriete los tornillos asegur ndolos NOTA Algunos modelos no utilizan juntas para el motor arandelas o leng etas de embalaje 19 1 2 2...

Page 17: ...ligeramente de ambas cadenas en la pieza de uni n LIGHT FIXTURE INSTALLATION INSTALACI N DEL ARTEFACTO LUMINOSO Find the two wires from the switch housing with the tag that says FOR LIGHT Connect the...

Page 18: ...is allows you to set your heating unit on a lower setting without affecting your comfort Please however refer to point 10 in Safety Tips when operating in this position NOTE Turn off and wait for fan...

Page 19: ...a la ilustraci n B Esto le permite ajustar la calefacci n a un nivel m s bajo sin que afecte su comodidad De todos modos por favor consulte el punto 10 de las Sugerencias de seguri dad cuando utilice...

Page 20: ...peed controls DO NOT USE a Solid State variable speed control 5 Allow break in period of 24 hours Most noises associated with a new fan will disappear after this period All blades are weighed and grou...

Page 21: ...de estado s lido 5 Permita el rodaje del ventilador durante un per odo de 24 horas La mayor a de los ruidos asociados con el ventilador nuevo desaparecer n despu s de este per odo Todas las paletas se...

Page 22: ...22 UL ES PrincessAmbiance WH04 UL_PrincessAmbiance 2 16 04 4 15 PM Page 22...

Page 23: ...n Speed Switch 6 Light Control Switch 7 Capacitor 8 Hardware Pack No Descripci n 1 Soporte de montaje 2 Soporte para paleta 3 Paleta 4 Pantalla de vidrio 5 Interruptor de control de velocidad para ven...

Page 24: ...inghouse Electric Corporation Made in China 2004 Westinghouse Lighting Corporation Westinghouse Lighting Corporation 12401 McNulty Road Philadelphia PA 19154 U S A Westinghouse Lighting Corporation ti...

Reviews: