background image

19

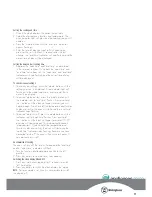
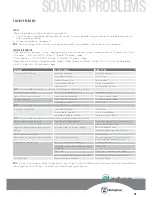
SOLvING pRObLEMS

FAULTS

If there is a problem with the oven and/or grill, please:

•   Check the points listed below before calling for service. It may be possible to avoid a call by fixing the problem yourself – 

and so continue cooking.

•  For cooking problems, see page 15.

NOTE:

 We may charge for service even in the guarantee period if your problem is due to the causes listed below.

FURTHER INFORMATION

If you need more information, service, replacement parts or have a warranty enquiry, please contact the Customer Care Centre:

• Australia – 1300 363 640, 8.00am - 5.00pm EST Monday - Friday

• New Zealand – 09 573 2384, 8.00am - 5.00pm EST Monday - Friday

Please have the following information ready: Model, Model Number and Serial Number. This is shown on the data plate 

which is visible when the oven door is open.

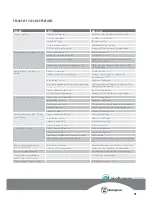
pRObLEM

pOSSIbLE CAUSES

wHAT TO DO

Oven or grill not working

Power not turned on

Switch on electricity

Household fuse blown

Check fuses

Controls incorrectly set

Reset controls

Circuit breaker tripped

Check circuit breaker

Clock not set

Set time of day on timer

NOTE:

 If the household fuse continues to blow, call the Electrolux Customer Care Centre.

Oven not heating enough

Foil or trays on bottom of oven

Remove foil or trays

Light and fans on continuously

Timer not in manual mode

Set timer to manual mode

Oven not working

Timer not in manual mode

Set timer to manual mode

Household fuse blown

Check fuses

NOTE:

 If the household fuse continues to blow, call the Electrolux Customer Care Centre.

Oven light not working

Household fuse blown

Check fuses

Circuit breaker tripped

Check circuit breaker

Lamp blown or loose in socket

Replace or tighten lamp

NOTE:

 If the household fuse continues to blow, call the Electrolux Customer Care Centre.

Cooker smoking when first used

Protective oils being removed

Turn grill on high for 30 mins and then the 

oven on 220°C for 1 hour

Too much condensation building up when 

baking

Too much water used when cooking

Reduce amount of water
Leave oven door open after cooking

Smells when first using oven

This is normal

60 minute or 2 hour timer ring not audible 

Timer not wound sufficiently

Turn timer knob past 20 minutes then turn 

back to required number of minutes

Gas hotplates not working

Power not turned on at appliance

Switch on electricity

Household fuse has blown or power supply 

is turned off

Check fuses

Gas is off

Check gas is supplied to the cooker

Burner parts or spark plugs are wet or dirty

Clean and dry burners or spark plugs

Timer flashing

Power failure or interruption

Reset time of day

NOTE:

 In the event of a power failure the gas burners may still be lit with a handheld igniter and used. Take care to avoid letting 

unburnt gas flow for more than 5 seconds when attempting to light the burner.

SOLvING pRObLEMS

Summary of Contents for DSP635

Page 1: ...600mm SLOT IN FREESTANDING COOKER USER MANUAL PSP632 DSP635 GSP625 GSP627 ...

Page 2: ...nual are shown below This symbol indicates never to do this This symbol indicates always do this Congratulations and thank you for choosing our Product We are sure you will find your new appliance a pleasure to use and a great asset to your cooking Before you use the appliance we recommend that you read through the whole user manual which provides a description of the product and its functions To ...

Page 3: ... qualified person in order to avoid a hazard General warnings This appliance is not intended for use by persons including children with reduced physical sensory or mental capabilities or lack of experience and knowledge unless they have been given supervision or instruction concerning use of the appliance by a person responsible for their safety Children should be supervised to ensure that they do...

Page 4: ...lector Grill temperature selector Grill temperature selector Grill temperature selector Oven temperature selector Oven temperature selector Oven temperature selector Oven temperature selector 2 hour Auto Off timer 2 hour Auto Off timer 2 hour Auto Off timer Electronic clock and timer Grill indicator lamp Grill indicator lamp Grill indicator lamp Grill indicator lamp Oven indicator lamp Oven indica...

Page 5: ...ed and the clock indicator will flash To set the time of day press the or buttons 5 seconds after the last change the clock indicator will disappear confirming the time has been set Note The clock has a 24 hour display Preparing your appliance for the first time Please remove all internal boxes and bags from the oven before operation Please wipe out the oven interior prior to operation with warm s...

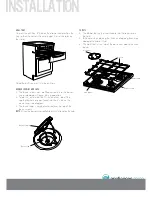
Page 6: ...s on either side of the spark plug hole are positioned into the 2 slots on the burner cup see diagram The burner cap is simply positioned over the top of the burner crown NOTE When the burner is correctly fitted it will sit level on the hob Trivets The rubber feet on the trivets locate into the recesses on the hob Take care when placing the trivets as dropping them may damage the hob or trivet The...

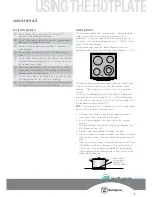
Page 7: ...duct heat well Stainless steel or enamelled saucepans are best Do not use pans with copper or aluminium bottoms because they can leave traces which are difficult to remove from the glass If buying new utensils select enamelled steel pans with 2 3mm thick bottoms or stainless steel pans with sandwich bottoms 4 6mm thick The pan bottom should be flat or preferably slightly concave at room temperatur...

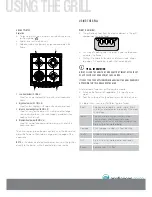
Page 8: ...n the grill compartment onto the food This way of cooking traps the juices inside the food and increases the flavour Grilling is suitable for tender cuts of meat steak chops sausages fish and other foods which cook quickly TIPS INFORMATION Always clean the grill tray and grill tray insert after every use Excessive fat build up may cause a fire It is best for your appliance when grilling if the gri...

Page 9: ...n taste and the size of the food These times should only be used as a guide and remember to turn the food over half way through the cooking process Steak 15 20 minutes Chops 20 30 minutes Fish 8 10 minutes Bacon 4 5 minutes For better grilling results follow these easy instructions 1 Preheat the grill for at least 3 minutes to obtain best results This will help to seal the natural juices 2 Choose ...

Page 10: ...unt down the preset cooking time beep when the time has elapsed and turn the oven off End cooking time you can set a cooking finish time A timer will count down the preset cooking time beep when the finish time has been reached and turn the oven off Delayed start cooking time You can combine the cooking time and stop cooking time to switch the oven on and off at a specific time during the day Note...

Page 11: ...utton until the indicator next to end time flashes Press and hold the button until the clock no longer reverses you will hear a beep If you have left the temperature and function knobs at a setting the oven will start once the end time indicator stops flashing 3 To cancel auto shut off press the mode button until the indicator next to cook time flashes Press and hold the button until the clock no ...

Page 12: ...ll tray can be used in the oven as a baking dish Make sure dishes will fit into the oven and remove unnecessary trays or dishes before you switch it on Keep edges of baking dishes at least 40mm from the side of the oven This allows free circulation of heat and ensures even cooking Do not open the oven door more than necessary Do not place foods with a lot of liquid into the oven with other foods T...

Page 13: ...0 Rich fruit cake 130 Any 180 Pastry shortcrust Cornish pasties 180 Any 40 45 Custard tart 190 170 Any 20 30 Pastry choux Cream puffs 200 Any 25 30 Yeast goods Bread 200 Any 25 30 Gas Oven Food Temperature in o C Oven shelf position Time in minutes Scones Plain or fruit 210 Any 10 15 Biscuits Rolled 170 3 5 10 15 Spooned 180 3 5 12 15 Shortbread biscuits 150 3 5 30 35 Meringues Hard individual 100...

Page 14: ...s and cooking times for different kinds of meat These may vary depending on the thickness or bone content of the meat Meat Recommended temperature Minutes per kG Beef 200 C Rare 35 40 Medium 45 50 Well done 55 60 Lamb 200 C Medium 40 Well done 60 Veal 180 C Well done 60 Pork 200 C Well done 60 Roasting poultry and fish Place the poultry or fish in an oven set at a moderate temperature of 180 C Pla...

Page 15: ...ve grill tray from oven on bake modes Cakes have a cracked thick crust Baking temperature too high Lower the temperature Food too low in oven Cook one shelf higher Cake batter over mixed Mix just long enough to combine the ingredients Baking tin too deep Check size of tin and use recommended size Baking tins dark Change to shiny light tins Baked products are pale flat and undercooked Baking temper...

Page 16: ...ill include up to 3 attempts to re light the burner stopping if a flame is detected by the controller If by the end of the re lighting sequence a flame is not detected then the burner and ignition will be turned off and a delay of 90 seconds will be observed During this delay the controller will not respond to the Function and Thermostat controls At the end of this delay switch the Thermostat or F...

Page 17: ...roasting bag to minimise cleaning Any polyunsaturated fats can leave a varnish like residue which is very difficult to remove Grill Always keep the grill tray and grill tray insert clean as any fat deposits may catch fire CAUTION Always make sure that the oven is electrically isolated before cleaning This can be done via the functional switch located nearby Do not use steam cleaners Do not line th...

Page 18: ...leaning your oven accessories Removing the shelves and grill tray from the oven Slide the shelves grill tray towards you until they reach the front stop Tilt them up at the front taking care not to spill any contents Lift them clear Wash the shelves grill tray and grill tray insert in hot soapy water Reverse the above steps to put the grill dish and shelves back again See page 5 for more details R...

Page 19: ...mer to manual mode Oven not working Timer not in manual mode Set timer to manual mode Household fuse blown Check fuses Note If the household fuse continues to blow call the Electrolux Customer Care Centre Oven light not working Household fuse blown Check fuses Circuit breaker tripped Check circuit breaker Lamp blown or loose in socket Replace or tighten lamp Note If the household fuse continues to...

Page 20: ...alian Standards It is designed to cook food it will get hot Cabinet materials must be capable of withstanding 85o C Installation into lower temperature tolerant cabinetry eg vinyl coated may result in deterioration of the low temperature coating by discolour or bubbling Electrolux Home Products cannot accept responsibility for damage caused by installation into low temperature tolerant cabinets in...

Page 21: ...n check the height and level of the cooker If required pull the cooker back out and adjust the levelling feet as required 4 Fasten the stability bolt bracket to the front frame with the 2 screws supplied 5 Reposition the cooker back into the anti tilt plate and then mark the position of the stability bolt hole 6 Pull the cooker back out and drill the bolt location hole Use a 6 5mm masonry or wood ...

Page 22: ...e piece MUST be removed from between the active connections TIPS INFORMATION IMPORTANT Before you cook in your new oven it is important that the protective oils used in the manufacture of the product be removed Make sure that the room is well ventilated to allow smoke to escape Run the grill on high for 30 minutes without grill dish Then run the oven on 220 C for 1 hour CONNECTING TO SERVICES AND ...

Page 23: ... the cooker is suitable for the gas supply To do this check the gas type on the carton sticker or on the data plate behind the bottom of the oven door The following table shows the supply and operating pressures for various gas supplies GAS TYPE NATURAL GAS UNIVERSAL LPG SUPPLY PRESSURE at inlet to appliance regulator if fitted 1 13 kPa Minimum 2 75 kPa OPERATING PRESSURE at appliance test point 1...

Page 24: ...n one at a time and the injector hole blanked off for several seconds 7 The operation of the regulator can be confirmed by connecting a manometer to the pressure test point located on the side of the regulator body adjacent to the outlet With the appliance operating check the outlet pressure when all burners of the appliance are operating at maximum when the smallest burner of the appliance is ope...

Page 25: ...hen the inlet pressure may be too low and adjustment of an upstream regulator may be needed or an upstream regulator or valve with insufficient flow capacity may be present in the gas supply line If this is suspected then it may be necessary to repeat the checks whilst measuring both the inlet and outlet pressure to determine if the inlet pressure is in the range 1 13 5kPa 2 Check that the regulat...

Page 26: ...notes ...

Page 27: ...ect or vermin infestation b The Appliance is modified without authority from Electrolux in writing c The Appliance s serial number or warranty seal has been removed or defaced d The Appliance was serviced or repaired by anyone other than Electrolux or its Authorised Service Centres 9 This warranty the contract to which it relates and the relationship between you and Electrolux are governed by the ...

Page 28: ...nd installation information call into your retailer phone or email our customer care team or visit our website TOP SERVICE Top Service encompasses the after sales service provided by The Electrolux Group to consumers including delivery home service and spare parts Westinghouse We are part of the Electrolux family Share more of our thinking at www electrolux com 2009 Electrolux Home Products Pty Lt...

Reviews: