background image

 38

4-1  Rating Locks

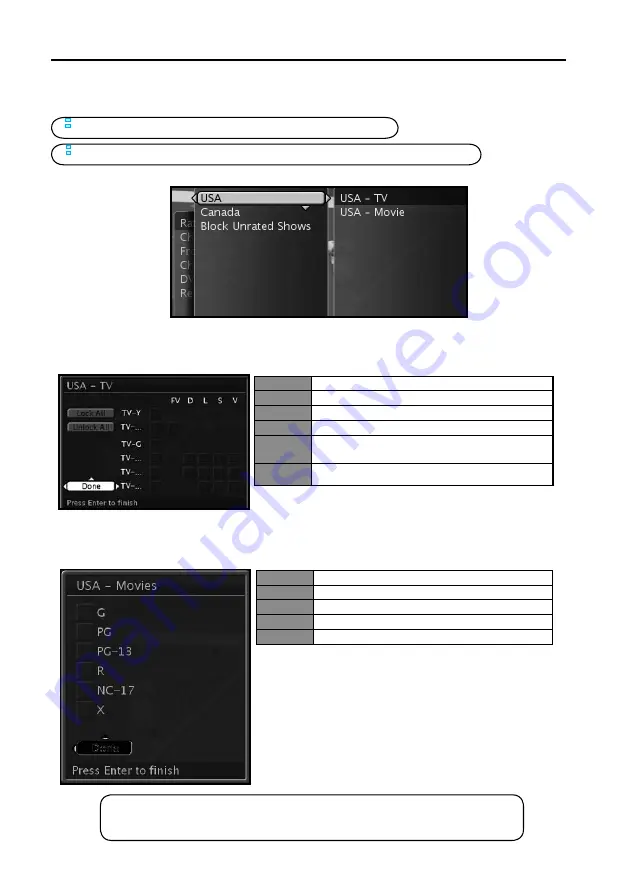
The Ratings Locks sub-menu blocks programming based upon the TV or Movie rating for the country speci

fi

 ed.


Note: The Ratings Locks are only valid for the North American market.


Note: The Ratings Locks menu is only applicable when the input source is the TV tuner.


USA TV Ratings as determined by the FCC.

TV-Y

Suitable for young children

TV-Y7

May not be suitable for children under 7

TV-G

Suitable for all audiences

TV-PG

Parental guidance suggested

TV-14

Parental guidance suggested for children under 
age 14

TV-MA

Suitable for mature audiences or adults only

USA Movie Ratings as determined by the MPAA 
(Motion Picture Association of America)

G

General audience

PG

Parental guidance suggested

PG-13

Parents strongly cautioned

R

Restricted

NC 17

No one 17 and under admitted

MENU OPERATION

Note:

        •Choosing a lower age-based rating blocks the higher age-based ratings regarless of 
         content rating settings.
 

Summary of Contents for DVD Combo

Page 1: ......

Page 2: ...ECTIONS 16 4 POWER CONNECTION 18 5 INITIAL SETUP 18 BASIC OPERATION 21 1 TURNING ON AND OFF THE POWER 21 2 SOUND VOLUME 21 3 CHANGING CHANNELS 22 4 INPUT SELECTION 22 5 SELECTING MENU ITEMS 23 MENU OPERATION 24 1 VIDEO 25 2 AUDIO 29 3 CHANNELS 33 4 LOCKS 37 5 SETTINGS 42 6 ADVANCED 52 7 GUIDE 55 PLAY DISC 56 1 PLAYBACK PROCEDURE 56 2 SPECIAL PLAYBACK 57 3 DVD SETTINGS 58 MP3 WMA JPEG CD Playback 5...

Page 3: ...e user to the presence of uninsulated dangerous voltage within the product s enclosure that may be of sufficient magnitude to constitute a risk of electric shock to persons The exclamation point within a triangle is intended to alert the user to the presence of important operating and maintenance servicing instructions in the literature accompanying the product WARNING TO REDUCE THE RISK OF FIRE O...

Page 4: ...or a Class B digital device pursuant to part 15 of the FCC Rules These limits are designed to provide reasonable protection against harmful interference in a residential installation This equipment generates uses and can radiate radio frequency energy and may cause harmful interference to radio communications if not installed and used in accordance with the instructions However there is no guarant...

Page 5: ...orms or when it is not being used for a long period of time 14 Refer all servicing to qualified service personnel Servicing is required when the LCD TV has been damaged in any way such as the power supply cord or plug is damaged liquid has been spilled or objects have fallen into the LCD TV it has been exposed to rain or moisture it does not operate normally or the TV has been dropped 15 DISC SLOT...

Page 6: ... TV in a well ventilated area don t place the LCD TV in airtight compartments Do not place anything on your LCD TV that prevents heat dissipation Ensure that the area around the LCD TV is clean and free of moisture Do not place heavy objects on the LCD TV audio video cables or power cord If the LCD TV emits smoke abnormal noise or a strange odor immediately turn it off and contact the Vivitek Serv...

Page 7: ...eriods of time unplug it from the wall outlet and disconnect the antenna or cable system This will prevent damage to the LCD TV due to lightning and power line surges MAKE SURE THE LCD TV IS TURNED OFF AND POWER CORD IS REMOVED NEVER SPRAY OR POUR ANY LIQUID DIRECTLY ONTO THE SCREEN OR CASE IMPORTANT INFORMATION 5 CLEANING THE LCD TV 4 ANTENNA INSTALLATION SAFETY Antenna Grounding According to the...

Page 8: ...exposed to direct sunlight or in hot or humid places 6 4 Playable discs In this unit use only discs that meet the standard such as DVD Video DVD R RW Video format only Audio CD CD R CD RW CD DA MP3 WMA or jpeg format If you use a non standard disc we cannot guarantee playback Even if such a disc can be played back we cannot guarantee the image or sound quality Playback side This unit is designed t...

Page 9: ...are divided into titles and the titles are sub divided into chapters Video CDs and Audio CDs are divided into tracks Each title chapter or track is assigned a number which is called title number chapter number or track number respectively 6 7 Notes on copyright The unauthorized recording use distribution or revision of copyrighted materials including without limitation television programs videotap...

Page 10: ...ACKAGE CONTENTS 26 32 LCD TV DVD COMBINATION Remote Control x1 with 2 pcs AAA batteries User manual x1 Power cord x1 Quick Connect Guide x1 Warranty card x1 User manual PREPARATION Quick Connect Guide Warranty card ...

Page 11: ...e in the MENU 5 Play Pause button to play or pause 6 Backward Press once for fast backward Press and hold for Chapterbackward 7 Forward Press once for fast forward Press and hold for Chapterforward 8 Stop button Press once to stop and remember last position Press twice or more to stop and return to top menu after re playing Press and hold for 2 sec to eject the disc 9 Power ON OFF 10 AC Reset When...

Page 12: ...nal video device such as DVD players Game System Cable or Satellite boxes 8 HDMI Audio Input Right Lift Connect external analog audio to this jack 10 Video Input Connect the Composite Video to an external video device such as VCR DVD or video game system 11 S Video Input Connect to an external video device such as a digital cable satellite receiver VCR DVD or video game system 12 Video S Video Aud...

Page 13: ... Select TV NTSC ATSC source input 7 HDMI Select HDMI 1 HDMI 2 source input 8 VIDEO Select Video S video input 9 YPbPr Select YPbPr1 YPbPr2 source input 10 Favorite Select remove or add your favorite channel Press Favorite A B C key to access favorite list Use arrow keys and enter key to select add the channel from favorite list See more detail on page 35 11 Channel number keys Select specific chan...

Page 14: ...up Press when there is a disc in the player button to open or close the setup screen 24 Stop Press to stop playback 25 Play Pause Play Press to start or resume playback Pause Press during playback to pause Press again to resume playback 26 DVD Menu Use to display or close the DVD menu screen 27 SkipForward Skip to the next chapter or tracks 28 Fast Forward Press to perform fast forward button scan...

Page 15: ...not mix new and old batteries This may result in cracking or leakage which may pose a fire risk or lead to personal injury 3 Insert batteries according to and markings Inserting the batteries incorrectly may result in cracking or leakage which may pose a fire risk or lead to personal injury 4 Dispose of used batteries in accordance with local laws and regulations 5 Keep batteries away from childre...

Page 16: ...r by the cable TV company This converter descrambler is necessary for normal viewing of the scrambled channels Set your TV on channel 3 or 4 Typically one of these channels is used If channel is unknown consult your cable TV company For more specific instructions on installing cable TV consult your cable TV company One possible method of utilizing the converter descrambler provided by your cable T...

Page 17: ...mage Note 100 130 VAC IMPORTANT Before connect make sure all devices are turned off PC RGB cable VGA Audio ø 3 5 mm stereo mini jack cable DVI HDMI conversion cable DVD Player with DVI terminal HDMI DVI DVD Player with HDMI terminal HDMI HDMI Audio cable DVD player If your external device has a component terminal COMPONENT connection is recommended you can view high quality pictures Digital TV tun...

Page 18: ... VIDEO and S VIDEO terminals If your external device has an S VIDEO terminal S VIDEO connection is recommended S Video provides a finer more detailed picture If both terminals are connected S VIDEO terminal takes a priority Component Input YPbPr Picture can be displayed only when 480I 480P 720P or 1080I signal is received HDMI Input Picture can be displayed only when 640 480 480P 720P or 1080I sig...

Page 19: ...WER CONNECTION INSTALLATION Power 5 INITIAL SETUP When you setup the LCD TV for the first time or Reset all on OSD menu is pressed the Setup Wizard will be initialized The Setup Wizard provides guided assistance in configuring the LCD TV to your preference language Time Zone Daylight Saving RF Input Source and Scanning Channel by sequence You can select your favorite settings step by step ...

Page 20: ...nd message showing on your TV press Enter key to exit Setup Wizard menu 2 Press ENTER to access Time Zone settings Press to select on your time zone 3 Press ENTER to access Daylight Saving screen Press to select Yes or No when you observe daylight saving Setup Wizard ...

Page 21: ...r your TV signal Note Select STD Standard for majority of cable systems 5 Press ENTER to start the Channel Scan Scanning channel searches available digital HDTV and analog SDTV channels of selected TV source the numbers of available channels will show on the OSD menu It may take a few minutes ...

Page 22: ...The POWER indicator on the TV turns off Note If you are not going to use this TV for a long time be sure to remove the AC power cord from the wall outlet Small amount of electric power is still consumed even when the power is turned off 2 SOUND VOLUME To adjust the volume To mute the sound Press MUTE to turn off the sound Press MUTE or VOL to turn the sound back to the previous level Press VOL to ...

Page 23: ... procedure within 4 seconds 1 Press the button 2 Press the button 3 Press the button 4 Press the button To select a digit channel number e g Channel 5 1 Complete the following procedure within 4 seconds 1 Press the button 2 Press the button 3 Press the button 4 Press the button Using LAST Press to switch the currently tuned channel to the previously tuned channel Press again to switch back to the ...

Page 24: ... differ depending on the setting conditions The item selected is displayed in blue Last setting will be saved in memory Using the remote control Using the control panel of the main unit You can also operate the menu with the control panel of the main unit Button operations on the control panel correspond to the ones on the remote control as shown below Control panel of the main unit VOL Cursor on ...

Page 25: ... Name 36 Page Bass Treble Balance 29 Optical Out SPDIF 30 Analog Preference 30 Digital Preference 31 TV Speaker 31 Audio Only 32 Reset Audio 32 Page Preset Mode 26 Video Settings 26 Screen Size 27 Color Temp 27 VGA Settings 28 Video Reset 29 Page Guide 55 NOTE The illustrations and on screen displays in this manual are for explanation purposes and may vary slightly from the actual appearance Depen...

Page 26: ...MENU on the remote control to display the menu screen 2 Press to select the Video menu 3 Press Enter to enter the Video meun list 4 Press to select the desired menu item 5 Press Enter to select the menu item 6 Press EXIT to exit after finish adjustment 1 6 Menu Exit 2 4 Up Exit to previous menu 2 Right 2 4 Down 3 5 Enter ...

Page 27: ...ect an appropriate video setting with the preset mode Selected Item Description Movie Controlling the contrast to enable easier viewing of dark images Sports For a clear cut image emphasizing high contrast for sports viewing Game Controlling the brightness of video games and other images for easier viewing Enhanced Increased color and sharpness for vibrant out of box performance User Allows the us...

Page 28: ...ch source signal formats are displayed on the screen You can also use on your remote control for this function MENU OPERATION 1 4 Color Temp Selected Item Description Cool White with bluish tone Neutral Neutral white Warm White with reddish tone User Adjust the color to your preference ...

Page 29: ...tion up Phase Adjust image clarity Selected Item Description Auto Sync Automatically adjust the settings for the current input signal Note VGA Setting is only available when selecting the VGA Input PC Compatibility Chart PC MAC Resolution Horizontal Frequency kHz Vertical Frequency Hz PC VGA 720 x 400 31 5 70 640 x 480 31 5 60 37 9 72 37 5 75 SVGA 800 x 600 35 1 56 37 9 60 48 1 72 46 9 75 XGA 1024...

Page 30: ...29 English MENU OPERATION 1 6 Video Reset Reset all Video sub menu options to the factory defaults 2 AUDIO 2 1 Bass Treble Balance Use to select or adjust your favorite bass treble and balance settings ...

Page 31: ... Stereo left and right stream and SAP Secondary Audio Programming such as a foreign language track MENU OPERATION 2 2 Optical out SPDIF Select the audio format for Optical Out AC3 PCM Selected Item Description AC3 Select surround audio format PCM Select stereo audio format Note Optical Out SPDIF is only available for DVD or when receiving digital broadcasting ...

Page 32: ...t Digital Broadcasting preferred language to Spanish Note Digital Preference is only available when receiving digital broadcasting 2 5 TV Speaker The TV Speaker sub menu sets the speaker output preference The available settings are as follows Selected Item Description Internal Audio from internal speakers only External Audio from external speakers such as if the TV was connected to a stereo receiv...

Page 33: ...ume level as a normal operation Cancel disable Audio Only mode Audio Only model could be disabled via below a Select Cancel on Audio Only sub menu b Single button push on the remote control or side control keys excluding Volume Volume Right Arrow Left Arrow and Mute These buttons function as normal audio adjustment c No Signal Detected If a source is powered off or video cable is unplugged Audio O...

Page 34: ... utilizing the analog digital tuner Selected Item Description Check All Select all channels from Master Channel List Uncheck All Unselect all channels from Master Channel List Analog Only Select all analog channels from Master Channel List Digital Only Select all digital channels from Master Channel List MENU OPERATION ...

Page 35: ...for modification of the favorite channel lists Use the arrow buttons on the remote control to scroll through the available channels then use the ENTER button on the remote control to add remove the selected channel Selected Item Description Select List Select the favorite channels list to be edited Uncheck All Remove all of channels from the current favorite channel list Rename List Rename the fav...

Page 36: ...ing for Cable channels select Cable as the input source After selecting the input source activate the Scan button to initiate scanning or cancel the scan function by selecting Stop Scan When selecting Cable as the scan input source a sub menu will appear for selecting a cable TV signal type The signal type is determined by the cable provider If unsure about the proper signal type use the Automatic...

Page 37: ...of the friendly name of any channel within the channels list To modify a channel name select the Channel Name Edit sub menu scroll through the list of available channels and press the ENTER button to modify the desired channel name Enter the new channel name using the on screen characters Select the Done button to save the new name and return to the channel list MENU OPERATION ...

Page 38: ...ication number PIN will need to be created the first time the Locks menu is accessed Enter the new PIN using the remote control then confirm the new PIN to save it Once the PIN has been created the PIN Entry box will appear whenever attempting to modify the Locks menu Once the PIN has been configured the user has access to 6 sub menu items Ratings Locks Channel Locks Front Panel Lock Change PIN DV...

Page 39: ... May not be suitable for children under 7 TV G Suitable for all audiences TV PG Parental guidance suggested TV 14 Parental guidance suggested for children under age 14 TV MA Suitable for mature audiences or adults only USA Movie Ratings as determined by the MPAA Motion Picture Association of America G General audience PG Parental guidance suggested PG 13 Parents strongly cautioned R Restricted NC ...

Page 40: ...wers 16 years and older 18 ans Adult programming Canadian English ratings as defined by the Regie du Cinema C Children C8 Children eight years and older G General programming suitable for all audiences PG Parental guidance 14 Viewers 14 years and older 18 Adult programming Block Unrated Shows Selected Item Description ON Block all unrated TV programs OFF No TV program will be blocked MENU OPERATIO...

Page 41: ...4 Change PIN The Change PIN sub menu allows the user to set up a new PIN The original PIN is required to make any change MENU OPERATION 4 3 Front Panel Lock This important feature is for use in an environment where the display s owner does not want the conditions of the display changed You can enable or disable it from OSD menu ...

Page 42: ... factory defaults unlocked MENU OPERATION 4 5 DVD Locks Set restriction of DVD programs with Rating Locks Selected Item Description View All No Lock Kid Safe Just release the content appropriate for children under 12 No Adult Just lock the content appropriate for adult ...

Page 43: ...ATION 5 SETTINGS 5 1 Menu Language The Menu Language sub menu toggles the default language for the on screen display menus 5 2 Date Time Set the current time and date 1 Press to set the current time and date on TV ...

Page 44: ...ay s Date 6 Press or number key 0 9 until the correct Month appears 7 Press to select Date 8 Repeat item 6 and 7 to adjust Date Year 9 Press ENTER to exit after finishing adjustment 10 Press to select Current Time 11 Press ENTER to adjust the Current Time 12 Press or number key 0 9 until the correct Hour appears 13 Press to select Min 14 Repeat item 12 and 13 to adjust Minutes AM PM 15 Press ENTER...

Page 45: ...d 21 Press ENTER to check it if your time zone observes the daylight saving 22 Press to select Done 23 Press ENTER or to exit after finishing adjustment Note After finishing adjustment please don t check the Auto Update Time If you check the Auto Update Time Time will update by Antenna source If you don t check the Auto Update Time you should reset it after blackout or you unplug AC power cord ...

Page 46: ...NU OPERATION 1 Press to choose Timer 2 Press ENTER to select Timer 1 or Timer 2 3 Press and ENTER to check the days you desired 4 Press to set the Start Time 5 Press ENTER to adjust the Start Time 6 Press or number key 0 9 to set the Duration 7 Have a check on Timer is on 8 Press to select Done 9 Press ENTER or to exit after finish setting ...

Page 47: ...ogram for those who are deaf or hard of hearing 5 4 Sleep Timer This function allows you to set the sleep time to automatically turn off the TV Selected item Description OFF Set Sleep Time to off 15 minutes Automatically turn off the TV after 15 miuntes 30 minutes Automatically turn off the TV after 30 miuntes 45 minutes Automatically turn off the TV after 45 miuntes 60 minutes Automatically turn ...

Page 48: ...found within CC1 5 5 3 Advanced Selection The Advanced Selection sub menu provides enhanced closed caption options for the CC experience 5 5 4 Advanced Appearance The Advanced Appearance sub menu provides customization of the CC text through font size color and display options MENU OPERATION Note Advanced Selection is only available when receiving digital broadcasting ...

Page 49: ...e friendly name for the input port list To modify an input port label select the Input Labels sub menu scroll through the list of available inputs choose one of the pre selected input port descriptions or create a custom label 5 5 5 Caption preference The Caption Preference sub menu sets the default caption If Automatic the caption is determined by the broadcast ...

Page 50: ...s off all power And the TV must be fully booted each time MENU OPERATION 5 7 Autosource If the Autosource is ON once you plug in or power on a new source the TV will detect it and automatically switch to the new input 5 9 Power On plug Memorize the DC power status while AC power off Selected Item Description ON If last DC power status is on TV will power on automatically when power is disconnected...

Page 51: ...toration Mode is a functional setting that restores the anamorphic DVD to its original intended viewing mode This is done by determining the flag setting and adjusting Standard Aspect Mode accordingly When the flag is set and the current mode is on standard then the system will follow the DVD Restoration mode settings Note This only effects 4 3 Video with Standard aspect setting ...

Page 52: ...ided includes the system firmware version as well as the current input source and signal types being decoded 5 13 Reset All Reset all settings back to factory defaults Reset All will delete all settings you have made including language time zone channel list etc You must run Setup Winzard after a reset please refer to page 18 MENU OPERATION ...

Page 53: ...erence with the following settings 6 1 Cinemotion Detect a film based source originally encoded at 24 frames second and then recreate each still film frame to cinematic picture quality ON OFF Selected Item Description ON Set Cinemotion to ON OFF Set Cinemotion to OFF ...

Page 54: ...D Comb Filter to High level 6 3 Deinterlaced Select image display to Progressive or Interlace ON OFF Selected Item Description ON Display image in Progressive scan OFF Display image Interlace 6 4 Noise Reduction Reduce noise from TV screen Off Low Medium High Selected Item Description Off Set Noise Reduction to Off Low Set Noise Reduction to Low level Medium Set Noise Reduction to Medium level Hig...

Page 55: ...ss color intensity For more color intensity 6 8 Hue Selected Item button button Hue Skin tones become purplish Skin tones become greenish 6 9 Sharpness Selected Item button button Sharpness For less sharpness For more sharpness 6 10 Backlight Selected Item button button Backlight The screen dims The screen brightens 6 11 User Color Temp Selected Item button button Red Weaker red Stronger red Green...

Page 56: ...al strength audio video signal type channel number V Chip support closed captioning status and program title Note The Guide menu is only applicable when viewing digital television through the TV tuner 7 GUIDE 6 12 Reset Advanced Reset Advanced Settings to factory preset values MENU OPERATION ...

Page 57: ...s ENTER Title is selected and play commences 5 Press STOP to end playback The unit records the stopped point depending on the disc appears on the screen Press PLAY to resume playback from the scene point If you press STOP again appears on the screen the unit will clear the stopped point 6 Press EJECT to remove the disc DVD EJECT Note If a non compatible disc is loaded READ changes to will appear o...

Page 58: ...k Each press of will increase the speed of the search x 2 x 4 x 8 x 20 To resume normal playback press to play 3 Still Playback Press during normal playback to pause playback To resume normal playback press again to play 4 Locating a chapter or track Press Skip Forward or Skip Reverse during playback to locate a chapter that you want to watch Each time you press the button a chapter or track is sk...

Page 59: ... automatically after two seconds OFF Turn off Demo Mode function Subtitle 1 Press ENTER during playback The current language will appear 2 Press ENTER repeatedly until your desired language appears Autowake ON When the TV is off if you load a disc TV will power on and play the disc automatically OFF Turn off Auto Wake function Audio Select 1 Press ENTER during playback The current soundtrack langu...

Page 60: ...WMA JPEG CD must be correspond to the ISO standardized files This TV DVD can read 600 files per disc If one directory has more that 600 files the remaining files will be omitted The unit is able to recognize up to a maximum of 50 directories per disc MP3 WMA JPEG CDs cannot be used for the purpose of recording If the CD has both audio tracks and MP3 WMA JPEG files only audio tracks are played It m...

Page 61: ...NTER to select the desired folder And then playback will begin automatically starting from the first file 5 Press STOP to end playback The unit records the stopped point depending on the disc appears on the screen Press PLAY to resume playback from the scene point If you press STOP again appears on the screen the unit will clear the stopped point 6 Press EJECT to remove the disc 3 JPEG CD playback...

Page 62: ...14496 2 MPEG 4 Video Sources 3 Support Dolby Digital MPEG I II Layer 1 2 PCM LPCM WMA Audio Formats 4 Playback discs DVD Video DVD Audio DVD RW DVD R DVD RW DVD R CD DA VCD SVCD ISO9600 MP3 JPEG WMA MPEG4 CD R CD RW 5 Disc Diameter 12cm can t support 8cm DISC Speaker Output 9w x 2 Channels Power Voltage 120 VAC 60 Hz 2 0A Temperature Note A Operating 0 to 35 C Hum 90 Storage 20 to 60 o C Hum 35 Hu...

Page 63: ...ideo Sources 3 Support Dolby Digital MPEG I II Layer 1 2 PCM LPCM WMA Audio Formats 4 Playback discs DVD Video DVD Audio DVD RW DVD R DVD RW DVD R CD DA VCD SVCD ISO9600 MP3 JPEG WMA MPEG4 CD R CD RW 5 Disc Diameter 12cm can t support 8cm DISC Speaker Output 9w x 2 Channels Power Voltage 120 VAC 60 Hz 2 5A Temperature Note A Operating 0 to 35 C Hum 90 Storage 20 to 60 o C Hum 35 Humidity Relative ...

Page 64: ...uttons Do Not Work Press only one button at a time Replace batteries Snow Appears on Screen Check your antenna connection Check the TV CATV selection No Sound Check the audio connection Press MUTE on the remote control so that MUTE disappears from the screen Check the audio settings The LCD TV audio may be set to SAP or minimum Press the Volume Up key on the remote control Make sure that headphone...

Page 65: ...as shown in thefollowing illustration Step 3 Remove the base from LCD TV Note Be sure to turn off the LCD TV and disconnect all cables before detaching the base The LCD TV has VESAÒ FPMPMIä compliant 100x100mm and 75x75mm mounting holes Be sure to follow the operating instructions supplied with the wall mount bracket when installing the unit Be sure to use qualified contractors when installing or ...

Page 66: ......

Reviews: