20 | Westinghouse Outdoor Power Equipment, LLC
Westinghouse Outdoor Power Equipment, LLC | 21
MAINTENANCE
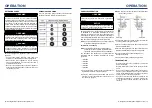
SPARK ARRESTOR SERVICE
Check and clean the spark arrestor after every 100 hours
of use or six months. Failure to clean the spark arrestor will
result in degraded engine performance.
1.
Place the generator on a level surface and allow the
muffler to cool before servicing the spark arrestor.
2.
Remove the cover screws and the muffler cover. Use a
screw driver to remove the spark arrestor.
3.
Carefully remove the carbon deposits from the spark
arrestor screen with a wire brush. The spark arrestor
must be free of breaks and tears. Replace the spark
arrestor if damaged.
Spark Arrestor, iGen2200/2500: Part# 6789
4.
Reinstall the spark arrestor and muffler cover.
STORAGE
Proper storage preparation is required for trouble-free
operation and generator longevity.
NOTICE
Gasoline stored for as little as 30 days can deteriorate,
causing gum, varnish, and corrosive buildup in fuel lines,
fuel passages and the engine. This corrosive buildup
restricts the flow of fuel, which can prevent the engine
from starting after a prolonged storage period. The use
of fuel stabilizer significantly increases the storage life of
gasoline. Full-time use of fuel stabilizer is recommended.
Follow the manufacturer’s instructions for use.
STORAGE TIME
RECOMMENDED PROCEDURE
Less than 1 month
No service required.
2 to 6 months
Fill with fresh gasoline and add
gasoline stabilizer. Drain the
carburetor float bowl.
6 months or longer
Drain the fuel tank and carburetor
float bowl.
SHORT TERM STORAGE
• Allow the generator to cool a minimum of 30 minutes
before storage.
• Replace all protective covers on the generator control
panel.
• Wipe the generator with a moist cloth. Clean any debris
from the air inlets on the front of the unit and muffler
cooling vents.
• Store the generator in a well-ventilated, dry location
away from sparks, open flames, pilot lights, heat, and
other sources of ignition such as areas with a spark-
producing electric motor or where power tools are
operated.
• Do not store the generator or gasoline near furnaces,
water heaters, or any other appliances that produce
heat or have automatic ignitions.
• With the engine and exhaust system cool and all
surfaces dry, cover the generator to keep out dust. Do
not use a plastic sheet as a dust cover. Non-porous
materials trap moisture and promote rust and corrosion.
LONG TERM STORAGE
Even properly stabilized fuel can leave residue and cause
corrosion if left long term. If storing the generator for two to
six months, drain the float bowl to prevent gum and varnish
buildup in the carburetor.
MAINTENANCE
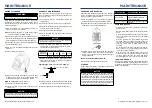
ENGINE OIL CHANGE
WARNING
Accidental start-up. Remove the spark plug boot from
the spark plug when working on the generator.
When using the generator under extreme, dirty, dusty
conditions or in extremely hot weather, change the oil
more frequently. Change the oil while the engine is still
warm from operation.
1.
Place the generator on a level surface and allow the
engine to cool for several minutes.
Note:
Placing the generator on a raised surface slightly
above the oil pan will facilitate draining.
2.
Remove the engine service cover and spark plug cover.
Disconnect the spark plug wire from the spark plug and
place the wire where it cannot contact the spark plug.
3.
With a damp rag, clean around the oil dipstick. Remove
the dipstick and wipe clean.
4.
Place an oil pan (or suitable container) under the oil fill/
drain hole.
5.
Tilt the generator to drain the oil.
6.
Slowly pour oil into the oil fill opening until oil the level
is between the L and H marks on the dipstick. Stop
frequently to check the oil level. DO NOT overfill.
Maximum oil capacity:
0.37 US qt (0.35 L)
7.
Replace the dipstick and hand-tighten.
8.
Connect the spark plug wire and install the engine
service cover.
NOTICE
Do not pollute. Follow the guidelines of the EPA or other
governmental agencies for proper disposal of hazardous
materials. Consult local authorities or reclamation facility.
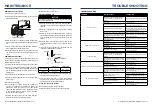
SPARK PLUG MAINTENANCE
Inspect and clean the spark plug after every 100 hours of
use or six months. Replace the spark plug after 300 hours
of use or every year.
1.
Place the generator on a level surface and allow the
engine to cool.
2.
Remove the spark plug cover on top of the generator.
3.
Remove the spark plug boot by firmly pulling the spark
boot directly away from the engine.
4.
Clean the area around the spark plug.
5.
Remove the spark plug with the included spark plug
socket wrench.
NOTICE
Never apply any side load or move the spark plug
laterally when removing the spark plug.
6.
Inspect the spark plug. Replace if electrodes are
pitted, burned, or the insulator is cracked. Only use a
recommended replacement plug.
Recommended Spark Plug Replacement
Westinghouse
Model Number
Torch
NGK
Bosch
Autolite
iGen2200/2500
E6RTC
BPR6HS
WR7BC
284
7.
Measure the spark plug electrode gap with a wire-type
feeler gauge. If necessary, correct the gap by carefully
bending the side electrode.
Spark plug gap:
0.024 - 0.032 in. (0.60 - 0.80 mm)
0.024 - 0.032 in. (0.60 - 0.80 mm)
Insulator
Side
Electrode
8.
Carefully install the spark plug finger tight, then tighten
as additional 3/8 to 1/2 turn with the spark plug wrench.
9.
Install the spark plug boot and engine service cover.


