background image

26

Audio

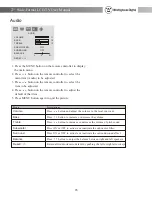
1. Press the MENU button on the remote controller to display 

    the  main menu.

2. Press         button on the remote controller to select the 

    main item (Audio) to be adjusted.

3. Press         button on the remote controller to select the 

    item to be adjusted.

4. Press         button on the remote controller to adjust the 

    default of that item.

5. Press MENU button again to quit the picture.

Volume

Treble

Bass

Balance

Subwoofer

Surround

Reset< / >

Press         button and adjust the volume to the level you want.

Press         button to increase or decrease the volume of pitch sound.

Press         button  to increase  or decrease  the volume.

Press         button to adjust the balance between right and left speakers.

Press ON or OFF to activate or inactivate the subwoofer filter.

Press ON or OFF to activate or inactivate the surround sound effect.

Return all Audio items to default by pushing the left or right arrow keys.

Menu                                                  Descriptions

AUDIO

VOLUME

BASS

TREBLE

SUBWOOFER

BALANCE

RESET < / >

11

12

12

L

0

R

OFF   

SURROUND

OFF   

27" Wide-Format LCD-TV User Manual

Summary of Contents for LCD-TV

Page 1: ...Westinghouse Digital 2004 27 Wide Format LCD TV User s Manual ...

Page 2: ...oprietary information protected by copyright All rights are reserved No part of this manual may be reproduced by any mechanical electronic or other means in any form without prior written permission permission of Westinghouse Digital Electronics Read and follow the Important Safety Instructions and FCC Statement located in the Appendix Copyright 2003 2004 Westinghouse Digital Electronics Viacom In...

Page 3: ... Enjoying Wide Format Movies Reference Guide Connector Descriptions Push Button Control Descriptions Remote Control Description Picture in Picture Description Display Menu Display TV Geometric Audio Miscellaneous Appendices Trouble Shooting Specifications Wall Mounting Important Safety Instructions FCC Statement 2 3 3 4 4 5 6 7 7 8 10 10 11 11 13 13 15 16 20 21 23 24 25 26 27 28 28 30 32 33 35 27 ...

Page 4: ...lt in progressive scan de interlacing 720p 1080i 480p 480i VGA and SVGA compatible PIP a variety of picture in picture and multiple picture arrangements Stereo speakers 8W channel Wireless remote control with direct source buttons Thin timeless style optional wall mount Connectors typical VGA inputs 2 component Video YPbPr HD inputs S Video Video and RF NTSC inputs 5 separate stereo audio inputs 4...

Page 5: ...king Carefully remove the LCD TV and other contents from the box Place the LCD TV in a safe upright position with easy access to the connectors located on the rear of the display Please confirm the following list of items is included LCD TV Remote control 2 AAA batteries AC Power cord VGA cable analog RGB AV cable The Yellow connector is for video the white connector is for left audio channel and ...

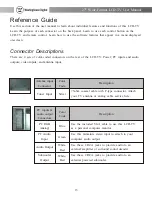
Page 6: ...y Pad Video Connectors PC Connectors 27 Wide Format LCD TV User Manual Function Function Channel Channel Adjust Volume Adjust Volume Menu Source Y Pb Pr R L S Video R L Scart Euro Region Y Pb Pr R L Video R L 1 2 PC RGB Analog PC Audio Input Audio Output L R Subwoofer Output Dust Cover Antenna Dust Cover Power Tuner ...

Page 7: ...ome common configurations that may help you to determine how best to connect your particular devices Better HD Cable or Satellite Receiver Progressive DVD Good LCD TV VGA in YPbPr1 in Best Your devices DVD Game console YPbPr2 in DVD Recorder Game console Surround Sound VCR VCR Antenna Subwoofer S Video in Video in Audio Out Tuner in Subwoofer Out Game console Antenna PC 27 Wide Format LCD TV User ...

Page 8: ...nections There are four types of video inputs YPbPr1 YPbPr2 S Video and Video Each of these video inputs has a corresponding set of stereo left and right audio inputs These connectors are color coded to match the colors of the corresponding connectors on other devices and cables The YPbPr1 and YPbPr2 inputs will only accept 480i 480p 1080i and 720p signals Use this to connect high definition devic...

Page 9: ...sing the included blue color coded VGA cable The PC audio cable is not included and must be purchased separately For the VGA inputs please remember to adjust your computer resolution to match the 1280x720 resolution of the 27 LCD TV for best performance An additional software driver may be required from your PC graphics chip vendor to obtain wide format resolution support Blue Green Red Red White ...

Page 10: ...of the LCD TV When the subwoofer software command is set to On an internal crossover cuts off the low frequency signal to the built in speakers When the subwoofer software command is set to Off the built in speakers will output full range audio 9 PC RGB Analog PC Audio Input Audio Output L R Subwoofer Output IN AUDIO R L IN SW White Red Connection jack for subwoofer with built in amplifier 27 Wide...

Page 11: ...e the battery cover on the remote Turn on the TV by pressing the POWER button Adjust the volume using the volume up and down buttons VOL and VOL Select a video source in two ways You may select a source directly using one of the buttons at the bottom of your remote control TV S VIDEO AV YPbPr1 YPbPr2 and PC Or you may scroll through a list of video sources using the SOURCE button located on top of...

Page 12: ...e the SCALING button on the remote control to switch the aspect ratio as indicated here Use FILL ALL to stretch programs to occupy more of the screen Use FILL ALL to view wide format anamorphic DVD movies In particular look for DVD movies that are labeled Anamorphic Widescreen or Enhanced for 16 9 TV to obtain better performance Use 4 3 MODE to maintain the correct original aspect ratio for most v...

Page 13: ...nces Use WIDE to expand letterbox content to occupy more of the screen Occasionally you may find a TV program or older DVD movie that is actually presented as letterbox format within an NTSC signal Use this mode to zoom the image up to full screen The unused portions on the top and bottom of the screen will appear black Note In WIDE mode non letterbox content will enlarge beyond the boundaries of ...

Page 14: ...antenna input Antenna input Connector Tuner Input Color Code Silver Description 75ohm coaxial cable with F type connector Attach your TV antenna or analog cable service here PC inputs audio output Connectors PC RGB analog PC Audio Input Audio Output Subwoofer Output Color Code Blue Green White Red White Red Description Use the included VGA cable to use this LCD TV as a personal computer monitor Us...

Page 15: ...a high definition HDTV receiver that can output 480p 1080i or 720p format May also be used to attach a progressive scan DVD player 5 RCA jacks Use this set of component video connectors to attach a high definition HDTV receiver that can output 480p 1080i or 720p format May also be used to attach a progressive scan DVD player S Video Input Right audio Left audio Video Input Right audio Left audio B...

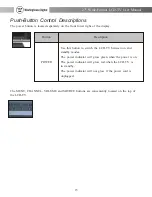
Page 16: ... switch the LCD TV between on and standby modes The power indicator will glow green when the power is on The power indicator will glow red when the LCD TV is in standby The power indicator will not glow if the power cord is unplugged The MENU CHANNEL VOLUME and SOURCE buttons are conveniently located on the top of the LCD TV 27 Wide Format LCD TV User Manual ...

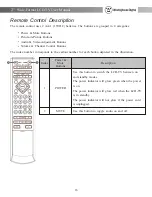
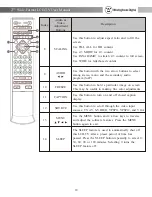
Page 17: ...indicator will not glow if the power cord is unplugged Use this button to toggle audio on and off Remote Control Description The remote control uses 2 AAA 1 5VDC batteries The buttons are grouped in 4 categories Power Mute Buttons Picture in Picture Buttons Audio Video Adjustment Buttons Volume Channel Control Buttons The index number corresponds to the callout number for each button depicted in t...

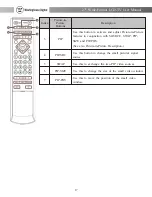
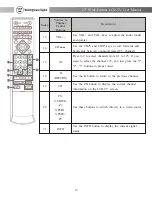
Page 18: ... in conjunction with SOURCE SWAP PIP SIZE and PIP POS See also Picture in Picture Description Use this button to change the small picture s signal source Use this to move the position of the small video window Use this to change the size of the small video window Use this to exchange the two PIP video sources 5 3 17 6 7 4 27 Wide Format LCD TV User Manual ...

Page 19: ...tton to turn on and off closed caption display Use this button to scroll through the video input sources TV AV S VIDEO YPbPr1 YPbPr2 and VGA The SLEEP feature is used to automatically shut off this LCD TV after a preset period of time has passed Press the SLEEP button repeatedly to select 0 30 60 90 or 120 minutes Selecting 0 turns the SLEEP feature off Use the MENU button and 4 arrow keys to trav...

Page 20: ...programmed TV channels Press 0 9 to select channels from 01 to 125 If you want to select the channel 123 you just press the 1 2 3 buttons in proper order Use the R button to return to the previous channel Use the CH button to display the current channel information on the LCD TV screen Use the INFO button to display the current signal status Use these buttons to switch directly to a video source 1...

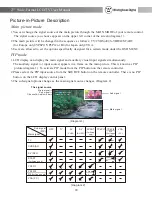
Page 21: ...or D4 for Japan only VGA 3 Users are allowed to set the options specifically designed for a certain mode under the OSD MENU Main picture mode PIP mode 1 LCD display can display the main signal and auxiliary visual input signals simultaneously The auxiliary signal or input source appears in a frame on the main picture This is known as PIP picture diagram 1 To activate PIP mode from the PIP button o...

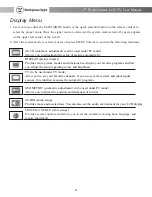
Page 22: ...icture modes and functions based upon your favorite programs and lets you adjust the setup regarding colors and brightness GEOMETRIC geometric adjustment to be used under PC mode Allows you to adjust the position and sharpness of picture AUDIO audio setup Provides more audio selections You can also set the audio environment for your LCD display TV to be used under TV mode Allow you to set your fav...

Page 23: ... 255 0 255 0 50 0 50 0 6 0 255 High Middle Low User 0 50 0 50 PC PC PC TV S VIDEO AV YPbPr1 YPbPr2 SCART D4 PC PC TV S VIDEO AV YPbPr1 YPbPr2 SCART D4 PC TV S VIDEO AV YPbPr1 YPbPr2 SCART D4 PC TV S VIDEO AV YPbPr1 YPbPr2 SCART D4 PC TV S VIDEO AV YPbPr1 YPbPr2 SCART D4 PC TV S VIDEO AV YPbPr1 YPbPr2 SCART D4 PC TV S VIDEO AV YPbPr1 YPbPr2 SCART D4 PC TV S VIDEO AV YPbPr1 YPbPr2 SCART D4 PC TV S V...

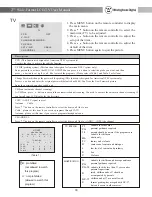
Page 24: ...ITE BALANCE RESET 43 49 128 128 128 USER DISPLAY CONTRAST BRIGHTNESS COLOR HUE SHARPNESS RESET 42 28 25 25 4 For YPbPr1 YPbPr2 D4 Press to increase or decrease the picture contrast Press to make picture brighter or darker Press to select color temps Press to increase or decrease the red of the picture Press to increase or decrease the green of the picture Press to increase or decrease the blue of ...

Page 25: ...gh CA TV Antenna please set this item if you receive programs through antenna 1 Press MENU button on the remote controller to display the main menu 2 Press button on the remote controller to select the main item TV to be adjusted 3 Press button on the remote controller to adjust the setup of that item 4 Press button on the remote controller to adjust the default of that item 5 Press MENU button ag...

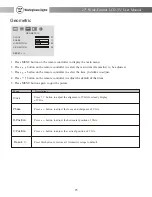
Page 26: ...is button to restore all Geometric setups to default 1 Press MENU button on the remote controller to display the main menu 2 Press button on the remote controller to select the main item Geometric to be adjusted 3 Press button on the remote controller to select the item you d like to adjust 4 Press button on the remote controller to adjust the default of that item 5 Press MENU button again to quit...

Page 27: ...woofer Surround Reset Press button and adjust the volume to the level you want Press button to increase or decrease the volume of pitch sound Press button to increase or decrease the volume Press button to adjust the balance between right and left speakers Press ON or OFF to activate or inactivate the subwoofer filter Press ON or OFF to activate or inactivate the surround sound effect Return all A...

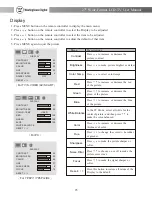
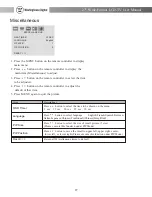
Page 28: ... MENU again to quit the picture Language PIP Position OSD Timer PIP Size Menu Descriptions Press button to select the time to be shown on the menu 5 sec 15 sec 20 sec 25 sec 30 sec Press button to select the size of small picture 5 size Please execute this function under PIP Mode Press button to select language English French Spanish German Italian Japanese Chinese Traditional Chinese Simplified P...

Page 29: ...ront panel and remote For the Samsung model SIR TS160 this switch is on the rear panel Q Will a progressive scan DVD player provide better video A This LCD TV includes a progressive scan converter that is comparable to the scan converter built into progressive scan DVD players Q What are anamorphic widescreen DVD movies A There are two common ways of recording wide format movies on a DVD letterbox...

Page 30: ... on the cable to the connectors Q My cable TV reception is not very clear Why is this A Many homes split a signal from their antenna or cable many times The number of splitters and the quality of the connectors on the 75ohm cable will visibly affect TV reception Computers microwave ovens and other electronic devices emit electronic noise Identify the interfering device by shutting it off and try r...

Page 31: ...0 P P 128 88 40 1056 4 23 1 628 48 077 85 061 50 P P 120 64 56 1040 6 23 37 666 46 875 60 004 49 5 P P 80 160 16 1056 3 21 1 625 53 674 70 069 56 25 P P 64 152 32 1048 3 27 1 631 48 363 75 029 65 N N 136 160 24 1344 6 29 3 806 56 476 75 N N 136 144 24 1328 6 29 3 806 60 023 59 855 60 020 78 75 P P 96 176 16 1312 3 28 1 800 44 772 63 981 70 08 74 5 108 N P P P 128 112 192 248 64 48 1664 1688 5 3 20...

Page 32: ...Million RCA Jack X 1 RGB Audio Composite Audio Europe region Y C X 1 YPbPr USA X 2 EuropeX2 JapanX1 D sub 15 pin 3 row type Mini D 14 pin Japan region NTSC PAL SECAM OPTIONAL PC Audio In X 1 RCA Jack R L X 4 RCA Jack R L X 1 Subwoofer RCA Jack X 1 1 Mode 5 Size 4 3 Mode Panoramic Fill All Wide NTSC PAL SECAM VGA SVGA XGA SXGA 8w 8w Stereo Input 100 240V 1 8A 50 60Hz UL CUL VCCI CB CE FCC Class B U...

Page 33: ...face speakers or enclosure B Remove the TV stand by unscrewing the 6 screws attaching the base from the LCD TV as shown in figure B Save the 6 screws and stand in a safe place C Screw and securely tighten the 4 wall hanging screws into the rear of the LCD TV as shown in figure C D Locate several studs in the wall Attach the mounting bracket securely to multiple studs in the wall Often one or more ...

Page 34: ...cluding amplifiers that produce heat Only use the attachments and accessories that were included with the apparatus Use only with the cart stand tripod bracket or table specified by the manufacturer or sold with the apparatus When a cart is used use caution when moving the cart apparatus combination to avoid injury from tip over Refer all servicing to qualified service personnel If you notice smok...

Page 35: ...njury from tipover 13 Unplug this apparatus during lightning storms or when unused for long periods of time 14 Refer all servicing to qualified service personnel Servicing is required when the apparatus has been damaged in any way such as power supply cord or plug is damaged liquid has been spilled or objects have fallen into the apparatus the apparatus has been exposed to rain or moisture does no...

Page 36: ...mful interference to radio communications However there is no guarantee that interference will not occur in a particular installation If this equipment does cause harmful interference to radio or television reception which can be determined by turning the equipment off and on the user is encouraged to try to correct the interference by one of more of the following measures Reorient or relocate the...

Reviews: