background image

3

Installation

• When unpacking the appliance, check it is not

damaged. If in doubt, do not use the appliance and
contact the Service Centre.

• All internal packaging must be removed before

using the appliance. Serious damage may be
caused to the machine or adjacent furniture if
protective transit devices are not completely
removed. Refer to the relevant paragraph in the
instruction book.

• Any electrical work required to install this appliance

must be carried out by a qualified electrician.

• Any plumbing work required to install this

appliance must be carried out by a qualified
plumber.

• After having installed the machine, check that it is

not standing on its electrical supply cable.

• If the appliance is placed on a carpeted floor,

ensure air can circulate freely between the feet
and floor.

• The appliance incorporates backflow protection

complying with AS/NZS 3500.1.2.
No further backflow protection is required for
connection to the water supply.

Use

• This appliance is designed for domestic use. It

must not be used for purposes other than those for
which it was designed.

• Only wash fabrics which are designed to be

machine washed. Follow the instructions on each
garment label.

• Do not overload the appliance. Follow the

instructions in the instruction book.

• Make sure all pockets are empty. Objects such as

coins, safety pins and screws can cause extensive
damage.

• Do not machine wash garments saturated with

petroleum, methylated spirits, trichlorethylene, etc.
If such fluids have been used to remove stains
prior to washing wait until they have completely
evaporated from the fabric before placing
garments in the washing machine.

Warnings

• Place small items such as socks, belts etc in a

cloth bag or pillowcase to prevent trapping
between the drum and the tub.

• Use only the recommended dosage of fabric

softener. Excessive amounts could damage the
garments.

• Leave the porthole door slightly ajar when the

appliance is not in use. This preserves the door
seal and prevents the formation of musty smells.

• Always check the water has drained before

opening the door. If not, drain the water following
the instructions in the instruction book.

• Always unplug the appliance and turn the water

tap off after use.

General safety

• Repairs to the machine must be carried out by a

qualified technician. Repairs carried out by
inexperience tradesmen, could cause serious
danger. Contact your local Service Centre.

• Never pull the power supply cable when removing

the plug from the socket; always take hold of the
plug.

• During high temperature wash programs the door

glass may get hot. Do not touch it!

Child safety

• This washing machine is not intended for use by

young children or infirm persons without
supervision.

• Young children should be supervised at all times,

ensuring they do not play with the appliance.

• Packaging components (e.g. plastic film,

polystyrene) can cause suffocation, and can be
dangerous to children. Keep them out of children's
reach.

• Keep all detergents in a safe place out of children’s

reach.

• When discarding the appliance, cut the electrical

supply cable and destroy the plug with the
remaining cable. Disable the door catch in order to
prevent young children from becoming trapped
inside the machine while playing.

The following warnings are provides in the interest of your overall safety. You read them carefully before
installing or using the appliance.

Dear customer,

Please read these operating instructions carefully and pay particular attention to the safety notes indicated
below. We recommend that you keep this instruction manual for future reference and pass it on to future
owners.

132990930.qxd  04/06/2004  08:44  Pagina  3    (Nero/Process Black pellicola)

Summary of Contents for LF 651 D

Page 1: ...CO 40 30 60 40 ECO 40 30 40 30 40 30 COLD MINIPROGRAM 30 SPIN DRAIN SOFTENER RINSES DELICATE SPIN PRE WASH MAIN WASH RINSES RINSE HOLDING DRAIN END SPINNING CLEAN FILTER RINSE HOLD QUICK WASH PRE WASH...

Page 2: ...ergent dispenser drawer 7 Use 8 Control panel 8 Controls 8 10 Washing hints 11 Sorting the laundry 11 Temperatures 11 Before loading the laundry 11 Maximum loads 11 Laundry weights 11 Removing stains...

Page 3: ...or pillowcase to prevent trapping between the drum and the tub Use only the recommended dosage of fabric softener Excessive amounts could damage the garments Leave the porthole door slightly ajar whe...

Page 4: ...htly soiled stains can be removed the laundry wash load can then be washed at a lower temperature Measure the detergent according to water hardness the degree of soiling and the quantity of laundry be...

Page 5: ...7 P1126 P1124 2 3 1 P0001 P1129 5 Set the machine upright and remove the remaining rear screw Slide out the relevant pin 6 Plug all the holes with the plugs which you will find in the envelope contain...

Page 6: ...uld be installed where a floor drain or hole is located depending on plumbing regulations A floor drain is required to drain away water which may overflow from the washing machine due to a hose leak o...

Page 7: ...dispenser drawer The detergent dispenser is divided into three compartments fig The table of Washing Programmes shows which compartment to use Compartment This compartment is only used for washing po...

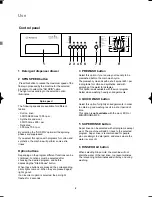
Page 8: ...must be selected after choosing the desired program and before depressing the Start Pause button When these buttons are pressed the corresponding pilots lights come on When they are pressed again lig...

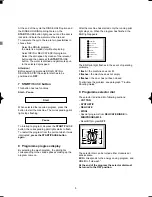
Page 9: ...ted press the START PAUSE button again 8 Programme progress display By selecting the wash program the pilot lights corresponding to the various phases making up the program come on Pause Start After t...

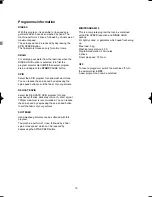
Page 10: ...ric of your garment DELICATE SPIN Select the DELICATE SPIN program for hand washed synthetics delicates or wool A short spin at 700rpm maximum is recommended You can reduce the spin speed by depressin...

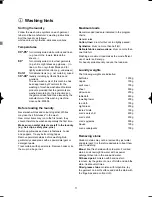
Page 11: ...any belts or long tapes Remove persistent stains before washing Rub particularly soiled areas with a special detergent or detergent paste Treat curtains with special care Remove hooks or tie them up i...

Page 12: ...ds only Ball point pen and glue moisten with acetone lay the garment on a soft cloth and dab the stain Lipstick moisten with acetone as above then treat stains with methylated spirits Remove any resid...

Page 13: ...ent with this appliance except if placed in the dosage ball device at the back of the machine drum 3 Measure out the additive If required pour fabric softener into the compartment marked without excee...

Page 14: ...e bottom edge of the door or the drum is turning If you can not open the machine door but need to switch off the machine and turn the selector dial to OFF After 3 minutes the door can be opened pay at...

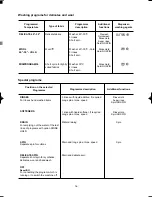
Page 15: ...SPIN COTTON 95 COTTON 60 ECO COTTON 60 COTTON 40 ECO COTTON 40 30 COLD SYNTHETIC 60 40 30 COLD SYNTHETIC 40 ECO Type of fabric Additional functions White cotton Cotton Economy Lightly soiled whites an...

Page 16: ...Hold Spin NO SPIN Spin Spin RINSES For rinses hand washed items SOFTENERS DRAIN For emptying out the water of the last rinse of programs with option RINSE HOLD SPIN Separate spin for cottons DELICATE...

Page 17: ...e 30 C Hand wash Do not wash at all Bleaching Bleach in cold water Do not bleach Ironing Hot iron max 200 C Warm iron max 150 C Lukewarm iron max 110 C Do not iron Dry cleaning Dry cleaning in all sol...

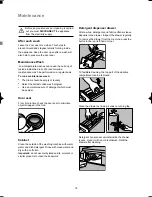
Page 18: ...be powder Door seal From time to time check the door seal to eliminate objects trapped in the fold Cabinet Clean the outside of the washing machine with warm water and dish detergent Rinse with clean...

Page 19: ...pump guard Remove any objects from the pump impeller by rotating it P1097 P1096 P1095 Put the cap back on the emergency emptying hose and place the latter back in its seat Screw the pump guard fully...

Page 20: ...ptying hose in its seat after having plugged it screw the drain filter fully in and close the door The dangers of freezing If the machine is installed in a place where the temperature could drop below...

Page 21: ...hine fills then empties immediately The end of the drain hose is too low Refer to relevant paragraph in water drainage section The machine does not empty and or does not spin The drain hose is squashe...

Page 22: ...s still not evenly distributed in the drum the machine will spin at a lower speed or will not spin If at the end of the program the laundry is not spun enough redistribute the load manually and select...

Page 23: ...responsibility for loss or damage prior to it being received by the Company or its Authorised Service Centre 9 This warranty is the only express warranty given by the Company 10 This Warranty does no...

Page 24: ...s to and from your home 9 If you are required to transport the appliance to the Company or its service agent you must ensure it is securely packed and insured The Company does not accept any responsib...

Reviews: