background image

7

ETL-ES-Panorama-WH08

5

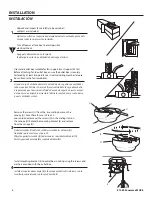
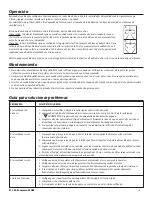
fLUSH MOUNT iNSTaLLaTiON - If flush mount option 

is selected, proceed to step 6.
NORMaL DOWNROD iNSTaLLaTiON - If installing 

downrod supplied with fan, proceed to step 8.

EXTENDED DOWNROD iNSTaLLaTiON - If installing 

with longer downrod than supplied with fan, 

proceed to page 8, step 10.

NORMaL
DOWNROD 
iNSTaLLaTiON

EXTENDED 

DOWNROD 

iNSTaLLaTiON

NorMaL

oPCiÓN CoN 
VariLLa VerTiCaL 
MÁS LarGa

oPCiÓN de 
iNSTaLaCiÓN 
aL raS

oPCiÓN de iNSTaLaCiÓN aL raS - 

Si elige la opción de 

montaje al ras, proceda al paso 6.

NorMaL -

Si instala la varilla vertical incluida con el 

ventilador, proceda al paso 8.

oPCiÓN CoN VariLLa VerTiCaL MÁS LarGa - 

Si 

instala una varilla vertical más larga que la que se incluye 

con el ventilador, proceda a la página 8, paso 10.
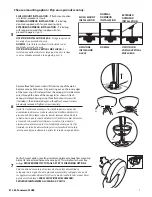
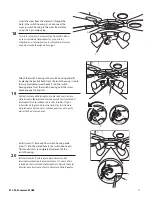
6

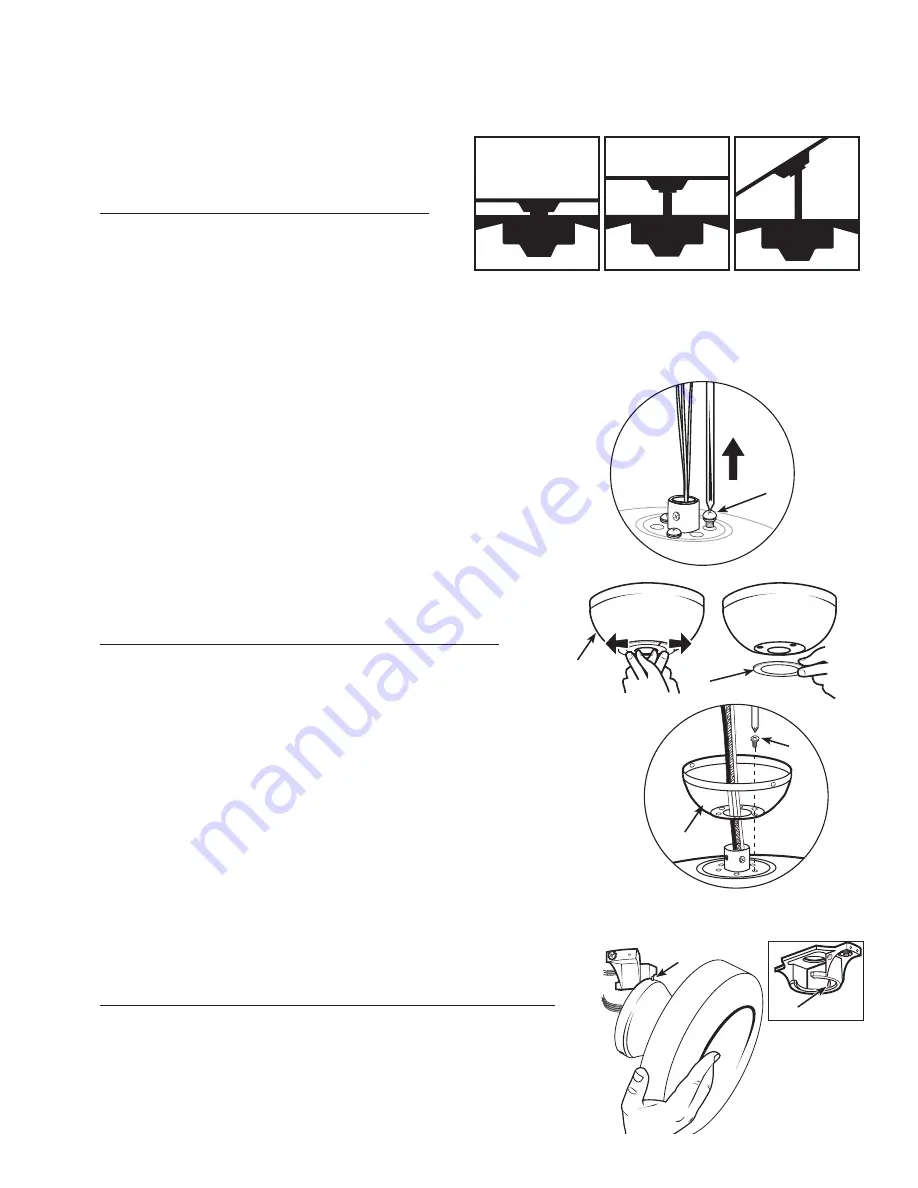
Remove three flush mount screws (R) from the top of the motor. 
Remove canopy hole cover (I) by pressing out on the inner edges 
of the cover ring till it releases from the canopy (H). Guide motor 
wires through the base of the canopy (H) as shown. Attach 
canopy to motor housing using three flush mount screws (R) 
(included in the hardware bag) and three flush mount screws 
previously removed. Tighten screws securely.

Quite tres tornillos de montaje al ras (R) de la parte superior del 
acoplamiento del motor. Quite la cubierta del orificio del dosel (I) 
presionando hacia fuera sobre los bordes internos del anillo de la 
cubierta hasta que se separe del dosel (H). Deslice los cables del motor 
a través de la base del dosel (H) como se indica. Fije el dosel al 
alojamiento del motor con los tres tornillos de montaje al ras (R) 
(incluidas en la bolsa de tornillería) y los tres tornillos de montaje
 al ras que extrajo previamente. Apriete los tornillos asegurándolos.
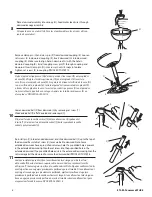
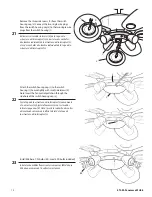
7

Choose a mounting option / 

elija una opción de montaje:

fLUSH MOUNT 
iNSTaLLaTiON

For flush mount option, raise fan assembly and place onto hook from mounting 
bracket (E) into a closed hole on the canopy (H). This will allow for hands free 
wiring.  PROCEED DiRECTLy TO PaGE 9, STEP 13 fOR WiRiNG OPTiONS.

Para la opción de montaje al ras, levante el montaje del ventilador, 
colóquelo sobre el gancho de la placa de montaje (E) y cuélguelo en uno de 
los agujeros cerrados del dosel (H). De este modo, tendrá las dos manos libres 
para hacer el cableado. 

Para LaS oPCioNeS de CaBLeado, 

ProCeda direCTaMeNTe a La PÁGiNa. 9, PaSo 13.

H

R

R

I

H

H

Summary of Contents for Panorama 72559

Page 1: ...le of Contents Índice Safety Information 2 Información de seguridad 2 Preparation 2 Preparación 2 Features 3 Características 3 Parts Reference List 4 Lista de piezas con letras de referencia 4 Installation Instructions 6 Instrucciones de instalación 6 Operation 14 Operación 15 Maintenance 14 Mantenimiento 15 Troubleshooting 14 Solución de problemas 15 ETL ES Panorama WH08 72559 ...

Page 2: ...N SER REEMPLAZADAS SI TIENE PREGUNTAS CONSULTE A UN ELECTRICISTA CERTIFICADO 1 Eltrabajodeinstalaciónyelcableadoeléctricolosdebenefectuarpersonascalificadascumpliendocontodosloscódigosylasnormasaplicables ANSI NFPA70 1999 incluyendo lasdeincendio 2 Useestaunidadsólodelamaneraenqueelfabricantequierequesehaga Sitienedudas llamealfabricante 3 Despuésdehacerlasconexiones empujeconcuidadolasconexionesd...

Page 3: ...r una varilla vertical más larga se vende por separado Combo Blades feature two high quality finishes on one blade Select the one that best complements your decor or change the style with just a flip of the blade NOTE Combo Blade finishes vary depending upon model Lasaspasdelrotordedoblecarapresentandossuperficiesconunacabadodealtacalidad InvirtiendolasaspaspuedeUd producirun efectodecorativoadapt...

Page 4: ... Wood Screw in hardware bag 2 Metal Washer for wood screws 2 Lock Washer for wood screws 2 Blade Balance Kit 1 Bulb 4 Motor estructura del interruptor 1 Placa de la estructura de interruptor fijo al motor 1 Abrazadera para aspa 5 Aspa 5 Abrazadera de montaje fija al dosel 1 Esfera de la vara 1 Vara 1 Dosel 1 Aro de la cubierta del dosel fijo al dosel 1 Juego de luces estructura del interruptor 1 A...

Page 5: ...5 ETL ES Panorama WH08 A C B D E F G H I J K L O U M N P CC R Q V W X AA DD EE Z Y BB S T ...

Page 6: ...r 35 libras Antes de fijar el ventilador a la caja de embutir asegúrese de que la misma esté fijada de manera segura en por lo menos dos puntos a un miembro estructural del cielo raso una caja suelta haría que el ventilador oscile 1 2 4 Install mounting bracket E to outlet box in ceiling using the screws and washers provided with the outlet box Instale el soporte de montaje E a la caja de embutir ...

Page 7: ...ws R included in the hardware bag and three flush mount screws previously removed Tighten screws securely Quite tres tornillos de montaje al ras R de la parte superior del acoplamiento del motor Quite la cubierta del orificio del dosel I presionando hacia fuera sobre los bordes internos del anillo de la cubierta hasta que se separe del dosel H Deslice los cables del motor a través de la base del d...

Page 8: ... clamp pin O and cross pin P from downrod coupling K Loosen set screws S in downrod coupling K Insert downrod G into downrod coupling K Make sure to align hole in downrod G with the hole in downrod coupling K Install coupling cross pin P through coupling and downrod Insert clamp pin O into cross pin until it snaps into place Tighten set screws S in coupling PROCEED TO STEP 12 Quite el pasador tipo...

Page 9: ...l ventilador vivo Interruptor de la luz vivo Verde de tierra Del Ventilador De La Casa conectar conectar conectar conectar Conecte el cable azul sólo si conecta un juego de luces al ventilador Control de pared Siga las instrucciones del diagrama anterior para hacer las conexiones de cableado para el ventilador con control de pared NOTA Se recomienda que use los servicios de un electricista profesi...

Page 10: ...nparaelembalajeyretírelassilashay Retirelos tornillosdelmotor W yguárdelosparausarlosposteriormente Fijeelconjuntodelasaspasalmotorusandolostornillosdel motor W queseincluyen Remove one of the screws Y on the switch housing plate B and loosen do not remove the other two Retireunodelostornillos Y delaplacadelaestructuradel interruptor B yafloje sinretirarlos losotrosdos 15 Attach blade brackets C t...

Page 11: ...ing until the screw heads engage the keyslots Fije la estructura del interruptor a la placa de la estructura del interruptor B insertando las ranuras de la estructura del interruptor J en las cabezas de los dos tornillos Y que sobresalen de la placa de la estructura Gire la estructura del interruptor hasta que las cabezas penetren en la parte más estrecha de las ranuras Install screw Y removed fro...

Page 12: ...uctura del interruptor J Attach the switch housing cap L to the switch housing J Secure tightly with small side screws X Note Insert the fan control pull chain through the side hole of the switch housing cap L Fije la tapa de la estructura del interruptor L nuevamente a la estructura L Ajústela firmemente con los tornillos laterales pequeños X Nota Inserte la cadenilla de control del ventilador a ...

Page 13: ... the glass Secure the glass by tightening the side screw on the socket cup Do not overtighten screws Repeat for each glass Acople el vidrio M al casquillo del portalámpara y gire el vidrio Fije el vidrio apretando el tornillo lateral en la base del portalámparas No apriete demasiado los tornillos Repita esto para cada vidrio N M WARNING Lamps included in this ceiling fan should not be used with an...

Page 14: ...ish The plating is sealed with a lacquer coating to minimize discoloration or tarnishing 4 There is no need to oil your fan The motor has permanently lubricated bearings PROBLEM If fan does not start If fan sounds noisy If fan wobbles If light does not work Suggested Remedy 1 Check main and branch circuit fuses or circuit breakers 2 Check wire connections as performed in step 14 of installation CA...

Page 15: ...ida del brillo 4 No hay necesidad de aceitar el ventilador El motor tiene cojinetes de lubricación permanente Guía para solucionar problemas PROBLEMA Si el ventilador no arranca Si el ventilador es rui doso Si el ventilador oscila Si la luz no funciona SOLUCIÓN SUGERIDA 1 Compruebe los fusibles o disyuntores principales y del circuito derivado 2 Compruebe el cableado del bloque de terminales como ...

Page 16: ...nghouse Electric Corporation Made in China 2008 Westinghouse Lighting Corporation Westinghouse Lighting Corporation titular de la licencia de Westinghouse Electric Corporation es una marca registrada de Westinghouse Electric Corporation Fabricado en China 2008 Westinghouse Lighting Corporation ETL ES Panorama WH08 ...

Reviews: