background image


9 CONGLOMKB .COM

Please contact 

customer.service@conglomkb.com

 or 

1-877-333-0098

 for further assistance .

ENGLISH

Installation (continued)

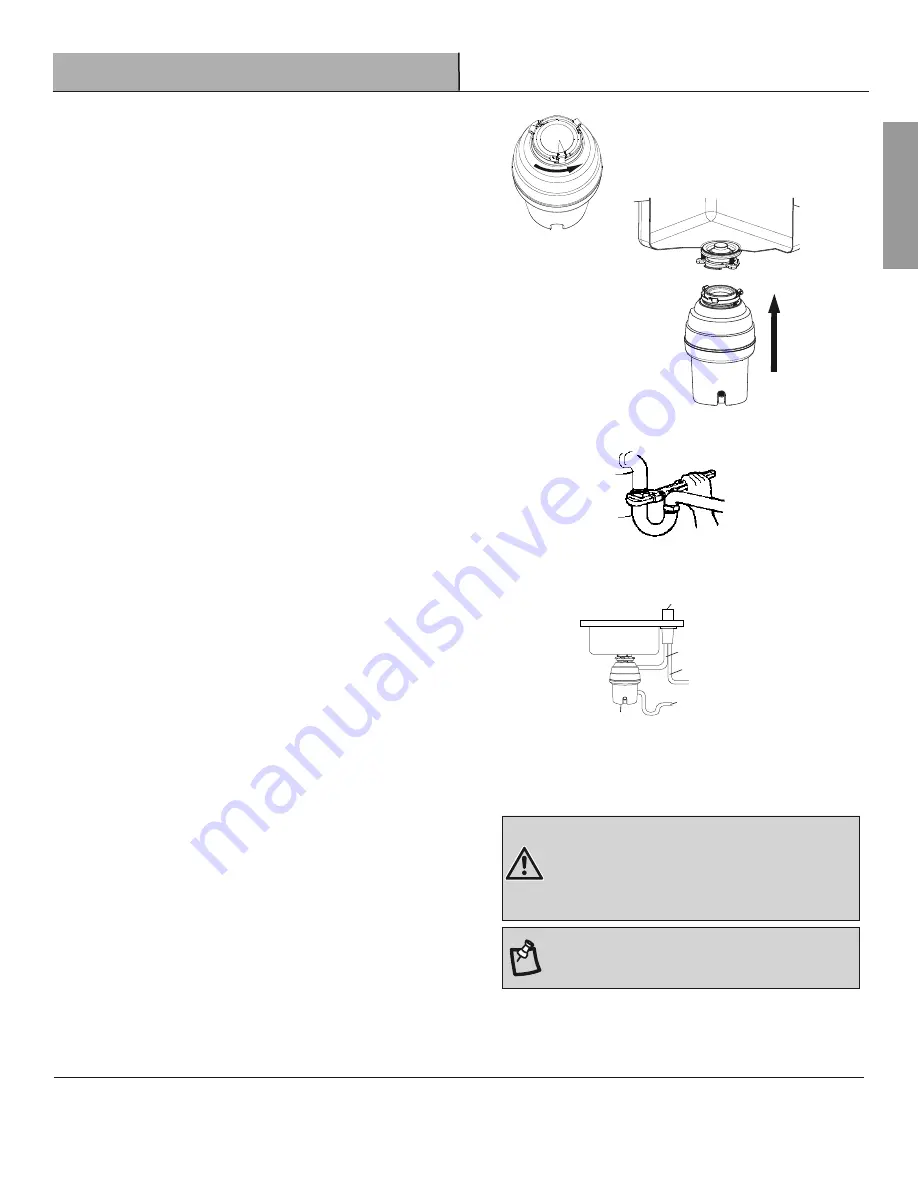
Turn the bottom supporting ring 1/3 of a turn counter-clockwise 

and repeat the mounting procedure described above (see Fig 13c) .

1/3 turn

Fig. 13c


- Connect the bottom of the elbow to the trap by tightening the 

slip nut (Fig . 14) .


- Run water and check all connections for leaks .


Fig . 14

DISHWASHER CONNECTION

Fig . 15

*

Air Gap

Drain

Disposer

Rubber Hose

Dishwasher Hose


- Connect the dishwasher hose (see Fig . 15) using a hose clamp . 

Make sure all plumbing connections are tight . Run water and 
check for leaks . 


*Air Gap may not be required for all installations,  verify your 

local plumbing codes .

ELECTRICAL CONNECTION & GROUNDING


- Connect the disposer to the appropriate household current only .

WARNING:


Improper connection of the equipment-

grounding conductor can result in a risk of electric shock . 

Check with a qualified electrician or serviceman if you 

are not sure . Do not modify the plug provided with the 

appliance if it does not fit the outlet. Have a proper outlet 

installed by a qualified electrician.

NOTE:


The waste disposer plug provided needs to be 

controlled by an on/off switch (usually wall-mounted) .


- This appliance must be grounded . In the event of a malfunction 

or breakdown, grounding provides a path of least resistance 
for electric current to reduce the risk of electric shock . This 
appliance is equipped with a cord having an equipment-
grounding conductor and a grounding plug . The plug, supplied 
with this unit, must be connected to an appropriate outlet that 
is properly installed, switched and grounded in accordance 
with all local codes and ordinances . If the supply cord is 
damaged it must be replaced by the manufacturer or a 

qualified person in order to avoid a hazard.

Summary of Contents for QKG08

Page 1: ...C US UL R 110 120V 60 HZ ITM ART 1314311 QKG08 HIGH TORQUE GARBAGE DISPOSER BROYEUR D CHETS COUPLE LEV 3 4 HP OWNER S MANUAL MANUEL DE L UTILISATEUR...

Page 2: ...you have any questions contact the manufacturer 3 Installation work and plumbing must be done by qualified person s in accordance with all applicable codes and standards 4 When attempting to loosen a...

Page 3: ...tion or use of this product We will not be held liable for inconvenience caused by loss of use of this product costs incurred for labour or materials removal and installation of replacement units or a...

Page 4: ...hion Mount Bottom Supporting Ring F B C E D G Part Description Quantity A Stopper 1 B Removable splash guard 1 C Includes Sink flange Rubber sink flange gasket Flange ring Ring tool 1 1 1 1 D Includes...

Page 5: ...into one tube will provide additional leverage for turning the mounting ring see Fig 2 Some disposers may require the removal or loosening of nuts from the mounting screws see Fig 3 Some disposers may...

Page 6: ...sert the flange into the sink opening press down hard to squeeze out the excess putty Trim off excess putty from the top and bottom of the sink opening see Fig 7b Do not rotate the flange once it is s...

Page 7: ...ce Slot Tab ATTACHING DISCHARGE ELBOW Elbow Gasket Groove Discharge Elbow Fig 9a Fig 9 Make sure the elbow gasket is attached to the discharge elbow correctly see Fig 9a Connect the discharge elbow to...

Page 8: ...n is readily accessible see Fig 12 Make sure the cushion mount is properly in place Line up the disposer under the mounting assembly Lift and guide the disposer so that all three tabs of the bottom su...

Page 9: ...only WARNING Improper connection of the equipment grounding conductor can result in a risk of electric shock Check with a qualified electrician or serviceman if you are not sure Do not modify the plu...

Page 10: ...ding The disposer is actually increasing torque grinding power and is operating under normal conditions Before turning disposer off let water and disposer run for approximately 15 seconds after shredd...

Page 11: ...been tripped The reset button is red and is located on the front end of the disposer Push the button in until it clicks and remains depressed If the reset button has not been tripped check for a shor...

Page 12: ...umber s ready A B E F Sink Flange Gasket Supporting Plate Top Supporting Ring with 3 screws Flange Ring Cushion Mount C D Ring Tool Part Description Code Quantity A Stopper QHG108 1 B Removable splash...

Page 13: ...ns concernant l appareil 3 L installation et le raccordement de la plomberie doivent tre faits par une des personne s qualifi e s conform ment aux codes et normes de construction 4 Lorsque vous tentez...

Page 14: ...aucun autre dommage caus par un incident ou accessoire Les co ts encourus pour obtenir l acc s pour la r paration ou le remplacement sont la responsabilit de l utilisateur Nos obligations se limitent...

Page 15: ...ntage Collier de serrage incluant 3 vis Rondelle Outil joint torique Joint amortisseur Bague de montage F B C E D G Pi ce Description Quantit A Bouchon 1 B cran anti claboussure 1 C Inclus Bride d vie...

Page 16: ...ur faire tourner la bague de montage voir Fig 2 Certains broyeurs n cessiteront que l on enl ve ou que l on desserre les crous des vis de montage voir Fig 3 et pour certains il sera n cessaire d enlev...

Page 17: ...f rieure de la bride de l vier voir Fig 6 Ins rez la bride dans le trou de l vier et et appuyez tr s fort sur la bride pour faire sortir l exc dent de mastic Enlever l exc dent de mastic l aide d un c...

Page 18: ...g 9 Assurez vous que le joint du coude d vacuation est install sur le coude correctement voir Fig 9a Connectez le coude d vacuation au broyeur voir Fig 9 ENLEVER LE BOUCHON D FON ABLE SAUTER CETTE TAP...

Page 19: ...e install de fa on ce que le bouton de r initialisation soit facile d acc s voir fig 12 Assurez vous que le joint amortisseur soit bien en place Alignez le broyeur sous l ensemble de montage Soulevez...

Page 20: ...RTISSEMENT Un raccordement incorrect de l quipement de mise la terre peut entra ner des risques d lectrocution Consultez un lectricien ou un r parateur si vous n tes pas totalement s r que l appareil...

Page 21: ...dures m nag res Il ne faut pas s tonner si le broyeur ralentit alors qu il est en train de broyer Le broyeur ajustera sa puissance tant qu il fonctionnera dans des conditions normales d utilisation Av...

Page 22: ...remise de r initialisation est rouge et situ l avant du broyeur Appuyez sur le bouton jusqu ce qu il s enclenche et qu il reste enclench Si le bouton de r initialisation n a pas t d clench v rifiez qu...

Page 23: ...illez identifier les pi ces n cessaires et ayez les codes port e de main A B E F Bride d vier Joint de la bride Plaque de montage Collier de serrage incluant 3 vis Rondelle Joint amortisseur C D Outil...

Page 24: ...1 877 333 0098 customer service conglomkb com service available in English and French Monday Friday from 8 30am 5pm EST service disponible en anglais et fran ais lundi au vendredi de 8 h 30 17 h HNE...

Reviews: