65
WHL-016 REV. 12.18.14
J. LOCKOUT CONDITION
If any boilers, including the master boiler in the cascade system, are in a lockout condition, the master control will recognize the lockout
condition and skip over the boiler in the firing sequence. Each boiler in the cascade system is responsible for its own safety functions.
So, if any individual boiler control senses an unsafe condition, it will extinguish the burner and, if necessary, go to a lockout condition. In
this way, every boiler in the system has its individual safety controls intact and operational, even if the firing of the boiler is under control
of the master boiler.
PART 10 – START-UP PROCEDURE
FOR YOUR OWN SAFETY READ BEFORE OPERATING
1. This boiler does not have pilot. It is equipped with an ignition device which automatically lights the burner. Do not try to light the
burner by hand.
2. BEFORE OPERATING: smell all around the boiler area for gas. Be sure to smell next to the floor because some gas is heavier than
air and will settle on the floor.
WHAT TO DO IF YOU SMELL GAS
Do not try to light any boiler.
Do not touch any electric switch; do not use any phone in your building.
Immediately call your gas supplier from a neighbor's phone. Follow the gas suppliers' instructions.
If you cannot reach your gas supplier, call the fire department.
Turn off gas shutoff valve (located outside of the boiler) so that the handle is crosswise to the gas pipe. If the handle will not
turn by hand, don't try to force or repair it, call a qualified service technician. Force or attempted repair may result in a fire or
explosion.
4. Do not use this boiler if any part has been under water. Immediately call a qualified service technician to inspect the boiler and to
replace any part of the control system and any gas control that has been damaged.
5. The boiler shall be installed so the gas ignition system components are protected from water (dripping, spraying, rain, etc.) during
boiler operation and service (circulator replacement, condensate trap, control replacement, etc.)
Failure to follow these instructions could result in property damage, serious personal injury, or death.
If you discover any evidence of a gas leak, shut down the boiler at once. Find the leak source with a bubble test and repair immediately.
Do not start the boiler again until the leak is repaired. Failure to comply could result in substantial property damage, severe personal
injury, or death.
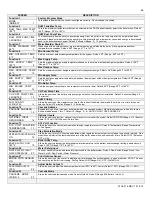
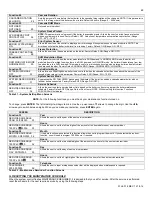
A. CONTROL OVERVIEW
The control is one of the primary safety devices of the boiler. It monitors the safety sensors of the boiler to assure safe and efficient
operation.
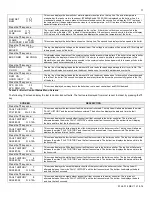
The control has many features associated with system design. This section addresses programming features, including Boiler Settings /
System Settings / Maintenance Settings and System Diagnostics, to help in customizing your control. It is important to fully understand
control capabilities before customization, as its factory defaults may already fit your system design and not require any adjustment at
all.
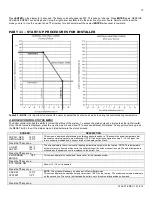
B. NAVIGATION OF THE DISPLAY
The display includes a two-line backlit LCD readout to provide informative messages about the operation of the boiler. Many operating
parameters can be viewed and adjusted by using the six buttons on the display. The function of each button is described below.
RESET
– The RESET button has two functions.
– Resets any lockout error code
– Returns the user to the default display screen.
ENTER
– The ENTER key is used to enter the parameter programming mode. To enter this mode, hold down the ENTER key for more
than 4 seconds. The readout will change to:
One of the zeroes will be blinking. Use the
▲▼
arrow keys to change the blinking digit to the correct value. Use the
arrow keys to
select the next digit to change and again use the
▼▲
keys to change the value. Repeat until the correct code is entered. Press the
ENTER MENU CODE
000
Summary of Contents for WBCNG399W
Page 14: ...14 WHL 016 REV 12 18 14 SPECIFICATIONS AND DIMENSIONS Figure 2 Specifications and Dimensions ...
Page 24: ...24 WHL 016 REV 12 18 14 Figure 8 Piping Symbol Legend ...
Page 59: ...59 WHL 016 REV 12 18 14 Figure 32 Cascade Master and Follower Wiring ...
Page 60: ...60 WHL 016 REV 12 18 14 Figure 33 Internal Connection Diagram LP 293 J ...
Page 83: ...83 WHL 016 REV 12 18 14 055 080 110 PARTS BREAKDOWN Figure 36 Replacement Parts LP 387 J ...
Page 85: ...85 WHL 016 REV 12 18 14 155 199 285 399 PARTS BREAKDOWN ...
Page 86: ...86 WHL 016 REV 12 18 14 Figure 38 Replacement Parts LP 387 KK ...
Page 87: ...87 WHL 016 REV 12 18 14 155 199 285 399 MODEL PARTS BREAKDOWN ...
Page 91: ...91 WHL 016 REV 12 18 14 ...
Page 92: ...92 WHL 016 REV 12 18 14 ...


