74
WHL-016 REV. 12.18.14
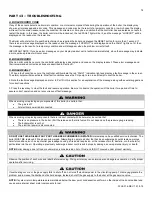
PART 13 – TROUBLESHOOTING
A. BOILER ERROR CODE
If any of the sensors detect an abnormal condition, or an internal component fails during the operation of the boiler, the display may
show an error message and error code. This message and code may be the result of a temporary condition, in which case the display
will revert to its normal readout when the condition is corrected, or it may be a condition that the controller has evaluated as not safe to
restart the boiler. In this case, the boiler control will be locked out, the red FAULT light will be lit, and the mes
sage “LOCKOUT” will be
displayed on the readout on the lower line.
The Boiler will not start until a qualified technician has repaired the boiler and pressed the RESET button for more than 1 second. If
there is an error message displayed on the readout, and the mes
sage “LOCKOUT” is not displayed and the FAULT light is not lit, then
the message is the result of a temporary condition and will disappear when the problem corrects itself.
IMPORTANT NOTE: If you see error messages on your display readout, call a technician immediately, since the message may indicate
a more serious problem will occur soon.
B. BOILER ERROR
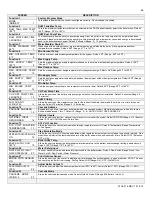
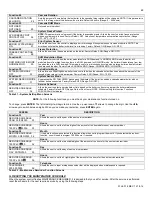
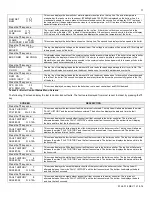
When an error condition occurs, the controller will display a description and code on the display readout. These error messages and
their recommended corrective actions are described in Section D.
C. BOILER FAULT
1.
When a fault condition occurs, the controller will illuminate the red “FAULT” indication light and display a fault message in the screen.
The alarm output will also activate. Most fault conditions cause the CH pump to run in an attempt to cool the boiler.
2. Note the fault message displayed and refer to Part D in this section for an explanation of the message along with several suggestions
for corrective actions.
3. Press the reset key to clear the fault and resume operation. Be sure to observe the operation of the boiler for a period of time to
assure correct operation and no reoccurrence of fault message.
When servicing or replacing any components of this boiler, be certain that:
The gas is off.
All electrical power is disconnected.
When servicing or replacing components that are in direct contact with boiler water, be certain that:
There is no pressure in the boiler. (Pull the release on the relief valve. Do not depend on the pressure gauge reading.
The boiler water is not hot.
The electrical power is disconnected.
DO NOT USE THIS BOILER IF ANY PART HAS BEEN SUBMERGED IN WATER.
Immediately call a qualified service technician. The
boiler MUST BE replaced if it has been submerged. Attempting to operate a boiler that has been submerged could create numerous
harmful conditions, such as a potential gas leakage causing a fire and/or explosion, or the release of mold, bacteria, or other harmful
particulates into the air. Operating a previously submerged boiler could result in property damage, severe personal injury, or death.
NOTE:
Boiler damage due to flood or submersion is considered an Act of God, and IS NOT covered under product warranty.
Observe the position of each wire and label before removing. Wiring errors may cause improper and dangerous operation. Verify proper
operation after servicing.
If overheating occurs, or the gas supply fails to shut off, do not turn off electrical power to the circulating pump. This may aggravate the
problem and increase the likelihood of boiler damage. Instead, shut off the gas supply to the boiler at the gas service valve.
NOTE:
If system return temperatures are maintained below the dew point, condensation will form on the inside of the boiler cabinet and
cause some internal sheet metal components to rust.
Summary of Contents for WBCNG399W
Page 14: ...14 WHL 016 REV 12 18 14 SPECIFICATIONS AND DIMENSIONS Figure 2 Specifications and Dimensions ...
Page 24: ...24 WHL 016 REV 12 18 14 Figure 8 Piping Symbol Legend ...
Page 59: ...59 WHL 016 REV 12 18 14 Figure 32 Cascade Master and Follower Wiring ...
Page 60: ...60 WHL 016 REV 12 18 14 Figure 33 Internal Connection Diagram LP 293 J ...
Page 83: ...83 WHL 016 REV 12 18 14 055 080 110 PARTS BREAKDOWN Figure 36 Replacement Parts LP 387 J ...
Page 85: ...85 WHL 016 REV 12 18 14 155 199 285 399 PARTS BREAKDOWN ...
Page 86: ...86 WHL 016 REV 12 18 14 Figure 38 Replacement Parts LP 387 KK ...
Page 87: ...87 WHL 016 REV 12 18 14 155 199 285 399 MODEL PARTS BREAKDOWN ...
Page 91: ...91 WHL 016 REV 12 18 14 ...
Page 92: ...92 WHL 016 REV 12 18 14 ...


