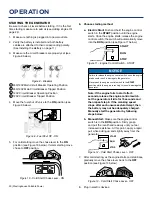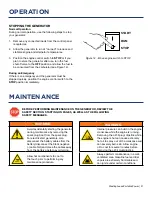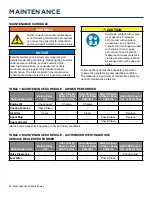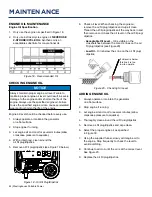
background image

28 | Westinghouse Portable Power

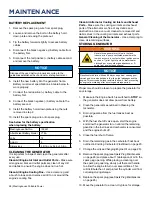
BATTERY REPLACEMENT 

1. 

Remove the spark plug wire from spark plug.

2. 

Loosen and remove the bolt on the battery hold 

down plate and swing the plate out.

3. 

Tip the battery forward slightly to access battery 

cables.

4.  Disconnect the black negative (-) battery cable from 

the battery first.

5.  Disconnect the red positive (+) battery cable second 

and remove the battery.

NOTICE

Dispose of the used battery properly according to the 

guidelines established by your local or state government.

6.  Install the new battery into the generator frame. 

Battery must meet specifications in table below to 

work properly.

7. 

Connect the red positive (+) battery cable to the 

battery first.

8.  Connect the black negative (-) battery cable to the 

battery second.

9. 

Install the battery hold-down plate using the nuts 

removed in step 2.

10. 

Install the spark plug wire onto spark plug.

See below for the battery specification


when replacing the battery. 

Westinghouse Part No.

100557

After Market Battery Model

YT9A

Volts

12

Amp Hr

9

Dimensions

5 5/16in by 3in by 5 3/8in

CLEANING THE GENERATOR

It is important to inspect and clean the generator after 

every use.

Clean All Engine Air Inlet and Outlet Ports

 – Make sure 

all engine air inlet and outlet ports are clean of any dirt 

and debris to ensure the engine does not run hot.

Clean All Engine Cooling Fins 

– Use a damp rag and

a brush to loosen and remove all dirt on or around the 

engine’s cooling fins.

Clean All Alternator Cooling Air Inlets and Exhaust

Ports

 – Make sure the cooling air inlets and exhaust 

ports of the alternator are free of any debris and 

obstructions. Use a vacuum cleaner to remove dirt and 

debris stuck in the cooling air inlets and exhaust ports.

General Cleaning of the Generator

 – Use a damp rag to 

clean all remaining surfaces.

STORING GENERATOR

WARNING

Never store a generator with fuel in the tank 

indoors or in a poorly ventilated area where the 

fumes can come in contact with an ignition source 

such as a: 1) pilot light of a stove, water heater, 

clothes dryer or any other gas appliance; or 2) 

spark from an electric appliance.

NOTICE

Gasoline stored for as little as 60 days can go bad, causing gum, 

varnish and corrosive buildup in fuel lines, fuel passages and the 

engine. This corrosive buildup restricts the flow of fuel, preventing 

an engine from starting after a prolonged storage period.

Proper care should be taken to prepare the generator for 

any storage.

1. 

Make sure the Engine Switch is switched to 

STOP

 so 

the generator does not draw power from battery. 

2. 

Clean the generator as outlined in 

Cleaning the 

Generator

.

3. 

Drain all gasoline from the fuel tank as best as 

possible.

4.  With the fuel shut off valve open, start the engine 

and allow the generator to run until all the remaining 

gasoline in the fuel lines and carburetor is consumed 

and the engine shuts off.

5.  Close the fuel shut off valve.
6.  Drain the remaining gas in the carburetor float bowl 

outlined in 

Draining Carburetor Float Bowl

 on page 23.

7. 

Change the oil (see 

Changing Engine Oil

 on page 25).

8.  Remove the spark plug (see 

Spark Plug Maintenance


on page 26) and place about 1 tablespoon of oil in the 

spark plug opening. While placing a clean rag over 

the spark plug opening, slowly pull there coil handle 

to allow the engine to turn over several times. This 

will distribute the oil and protect the cylinder wall from 

corroding during storage.

9. 

Replace the spark plug (see 

Spark Plug Maintenance


on page 26).

10. 

Move the generator to a clean, dry place for storage.

MAINTENANCE 

Summary of Contents for WGen6000

Page 1: ...USER MANUAL WGen6000 Portable Generator 6000 Running Watts 7500 Peak Watts...

Page 2: ...d others to be seriously hurt or killed Model Number Running Watts Peak Watts Fuel Tank Size L G Rated Speed RPM Ignition Type Spark plug Engine Disp cc Stroke X Bore Oil Capacity L Oil Type WGen6000...

Page 3: ..._____ Model Number ______________________________________ Last Name ________________________________________ Serial Number _______________________________________ Street Address ______________________...

Page 4: ...er Switch Connections 17 How to Float the Neutral 17 Engine Fluids and Fuel 17 Adding Gasoline to the Fuel Tank 18 Power Output and Demand 19 Starting the Generator 20 Stopping the Generator 21 Normal...

Page 5: ...ot avoided could result in death or serious injury CAUTION Indicates a hazardous situation which if not avoided could result in minor or moderate injury NOTICE Indicates a situation which can cause da...

Page 6: ...Never remove the fuel cap with the engine running Never refuel the generator while the engine is running Always turn engine off and allow the generator to cool before refueling Only fill fuel tank wit...

Page 7: ...ELS AND DECALS 4 1 1 3 4 2 Made in China Fabriqu en Chine MWE Investments LLC Columbus Ohio 43228 USA Con u columbus Ohio tats Unis MWE Investments LLC Columbus Ohio 43228 Etats Unis Part N0 Num ro de...

Page 8: ...8 Westinghouse Portable Power SAFETY SAFETY LABELS AND DECALS 8 7 10 8 9 6 6 7 5 10 9...

Page 9: ...ld back top flaps to reveal the manual 3 Remove the Wheel Kit Accessories cardboard box 4 Carefully cut two sides of the carton to remove the generator WHAT COMES IN THE BOX Manual Quick Start Guide M...

Page 10: ...wheel kit is not intended for on road use The wheel kit is designed for use on this generator only INSTALLING FEET TO FRAME 1 Place generator on a flat surface 2 Place a piece of cardboard or other s...

Page 11: ...river remove the screw on the red positive battery lead 2 Securely tighten the positive battery cable red boot to the positive battery post Make sure boot is over battery post ASSEMBLY 3 Locate the bl...

Page 12: ...lets Oil Fill Plug Dipstick Must be removed to add and check oil Oil Drain Plug Must be removed to drain engine oil FEATURES Never Flat Wheels For easy portability Fuel Shut off Valve Controls the flo...

Page 13: ...ngine or the spark plug CARB Canister Required for models sold into and used in California Muffler and Spark Arrester Avoid contact until engine is cooled down Spark arrestor prevents sparks from exit...

Page 14: ...in START position until engine starts Make sure to set choke prior to cold starting Data Center The VFT Meter is 4 state LED display that will rotate through volts frequency and lifetime run hours Th...

Page 15: ...utput will be reduced approximately 3 5 for every 1000ft of increased altitude from sea level This is a natural occurrence and cannot be adjusted by engine Increased exhaust emissions can also result...

Page 16: ...ance on the top line of the chart Then select the rated amperage of the generator on the left side of the chart Where the two meet is the size of the conductor required for the application The WCG25 p...

Page 17: ...intained during the operation of the generator Failure to maintain the proper oil level can result in engine damage OPERATION CONNECTING THE GENERATOR TO A BUILDING ELECTRICAL SYSTEM It is recommended...

Page 18: ...he engine is filled with engine oil See Checking Engine Oil on page 24 The generator is situated in a proper location Location Selection on page 15 The generator is on a dry surface Weather and Dry Su...

Page 19: ...ave a momentary extra power demand when starting which can be up to seven times the running power demand or more Manufacturers of such devices rarely publish this starting power demand and so it s oft...

Page 20: ...ce the engine starts release the engine control switch the switch will automatically move into the RUN position see Figure 11 below START RUN STOP Figure 11 Engine Control Switch START NOTICE Failure...

Page 21: ...il fill plug dipstick while the engine is hot can cause extremely hot oil to spray out of the crankcase and can severely burn skin Allow engine oil to cool for several minutes before removing the oil...

Page 22: ...Year Engine Oil Check Level Change Change Cooling Features Check Clean Air Filter Check Clean Replace Spark Plug Check Clean Replace Spark Arrestor Check Clean Service more frequently if operating in...

Page 23: ...rk arrestor 5 If the spark arrestor screen shows signs of wear rips tears or large openings in the screen replace the spark arrestor screen NOTE Only use Westinghouse spark arrestors as replacements 6...

Page 24: ...Figure 19 below Figure 19 Oil Fill Plug Dipstick 6 Check oil level When checking the engine oil remove the oil fill plug dipstick and wipe it clean Thread the oil fill plug dipstick all the way back i...

Page 25: ...apply slow but firm squeezing action 6 Rinse in clean water by submerging the air filter elements in fresh water and applying a slow squeezing action CHANGING ENGINE OIL 1 Always operate or maintain t...

Page 26: ...t by firmly pulling the plastic spark plug boot handle directly away from the engine see Figure 23 NOTICE Never apply any side load or move the spark plug laterally when removing the spark plug Applyi...

Page 27: ...ery remains charged the generator should be started every 2 to 3 months and run for a minimum of 15 minutes or a charger should be connected to the battery and charged overnight If using a battery cha...

Page 28: ...s stuck in the cooling air inlets and exhaust ports General Cleaning of the Generator Use a damp rag to clean all remaining surfaces STORING GENERATOR WARNING Never store a generator with fuel in the...

Page 29: ...nit is over choked 4 Move the choke lever halfway between the ON and OFF positions 5 Starting battery may have insufficient charge 5 On electric start models only Check battery output and charge batte...

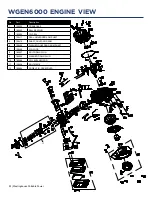
Page 30: ...30 Westinghouse Portable Power WGEN6000 EXPLODED VIEW...

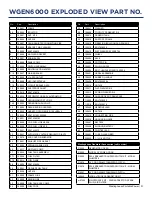
Page 31: ...H ASSEMBLY 11 2 130503 MULTIFUNCTION METER 11 3 130557 MAIN BREAKER 11 4 130505 L14 30R OUTLET 11 5 130506 GFCI RECEPTACLE 11 6 130533 CIRCUIT BREAKER 20A 12 180562 DUSTPROOF SHEET 13 100516 BOLT M8X1...

Page 32: ...ASE 2 180593 BALL BEARING 3 180504 OIL SEAL 4 190411 SEAL GOVERNOR ARM SHAFT 5 190410 SHAFT GOVERNOR ARM 6 190409 WASHER GOVERNOR ARM SHAFT 7 190408 PIN LOCK 8 180507 BOLT DRAIN PLUG 9 180508 WASHER D...

Page 33: ...VALVE 47 180511 CASECOVER GASKET 48 190401 BALANCING SHAFT 49 190400 CAMSHAFT ASSEMBLY 50 180807 BOLT M8X35 51 180808 BOLT M8X40 52 180742 PIN DOWEL 53 180513 CYLINDER HEAD GASKET 54 180523 BOLT M10X8...

Page 34: ...34 Westinghouse Portable Power WGEN6000 SCHEMATIC WH7500v SCHEMATIC...

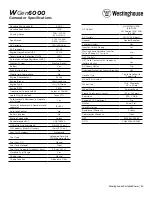
Page 35: ...apacity Quarts Ounces 1 1 qt 37 2 oz Low Oil Shutdown Automatic Fuel Type Unleaded Gasoline 10 Ethanol or less Fuel Shut Off Manual Fuel Tank Material Steel Fuel Tank Capacity Gallons Liters 6 6 gal 2...

Page 36: ...36 Westinghouse Portable Power Version 08 10 18KD...

Reviews: