background image

© 2017 RVM Australia Pty Ltd. All Rights Reserved

7

TROUBLESHOOTING

BEFORE CALLING FOR SERVICE

If the blender fails to operate:

1.  

Check to make sure the blender is plugged in correctly and securely. If it is not, 

remove the plug from the outlet, wait 10 seconds and plug it back in securely.

2.   Check for a blown or tripped circuit breaker in your home. If these seem to be 

working correctly, test another appliance in the same outlet to ensure the outlet 

is working correctly.

IF NONE OF THE ABOVE SOLVES THE PROBLEM, DO NOT TRY TO ADJUST OR

REPAIR THE BLENDER YOURSELF.

CUSTOMER SERVICE

In the event you believe your blender to be defective, please return it along with 

your sales receipt to the place of purchase for resolution.

For any enquiries, please call our service center on: Tel: 1300 883 109
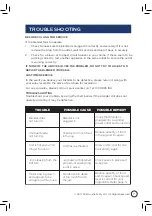
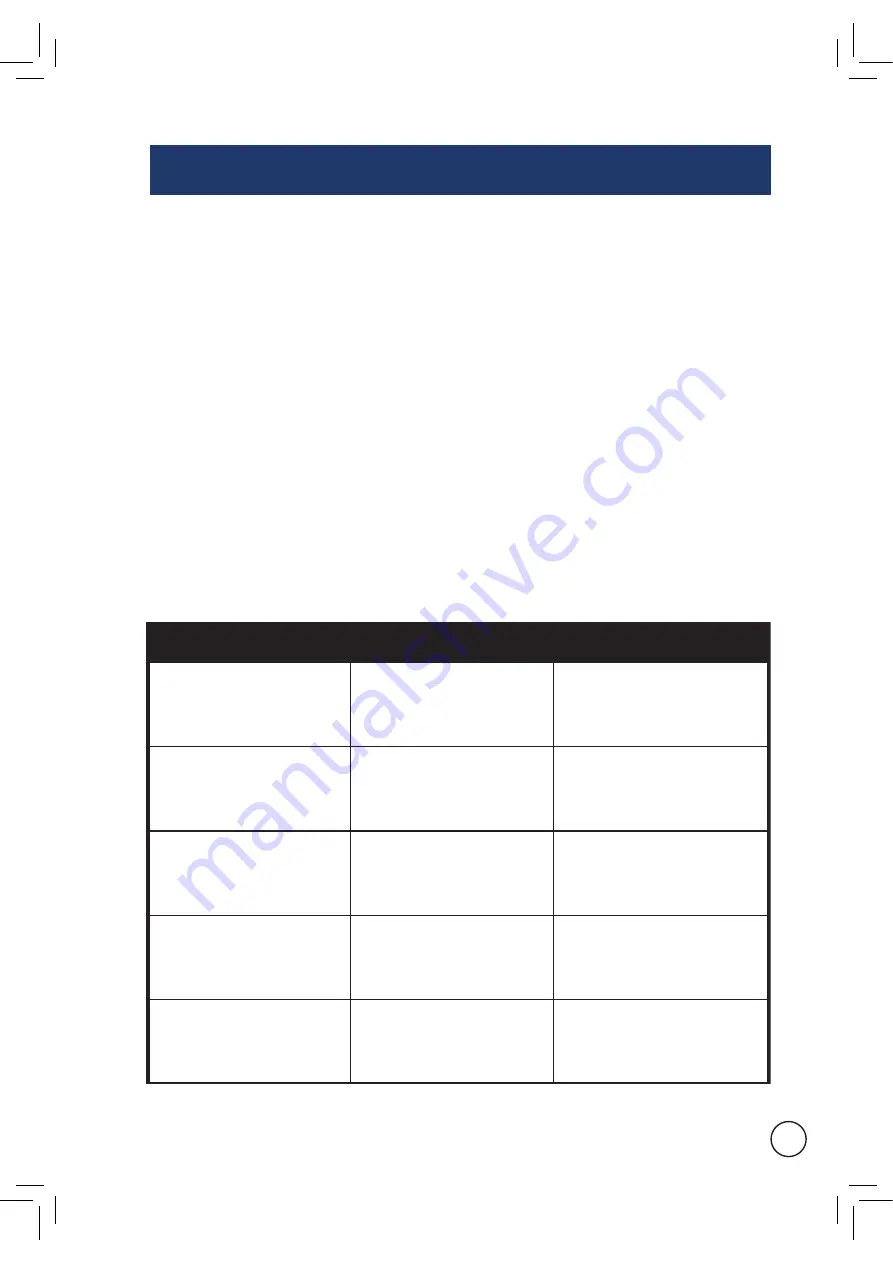
TROUBLESHOOTING

Troubleshoot your problem by using the chart below. If the blender still does not 

operate correctly, it may be defective.

Blender does 
not turn on.

TROUBLE

Blender is not
plugged in.

POSSIBLE CAUSE

Check that blender is
plugged into a working
power outlet and turned on.

POSSIBLE REMEDY

Chopper blade
not turning.

Possibly too much food
in the jug.

Reduce quantity of food 
in the jug and try again.

Unit is hot and will no
longer function. 

Unit has overheated. 


Allow unit to cool for one
hour and try again.

Jug is leaking from the 
bottom. 

Jug base not tightened
properly or sealing ring
is not in place. 

Check seal is in place and
re-tighten.

Motor slowing down
and appears to be 
struggling while in use.

Foods are too dense
or too much food in 
the jug.

Reduce quantity of food
and try again. Check speed
level is correct for your
ingredients. Refer page 5. 

Summary of Contents for WHBL01SS

Page 1: ...1200W WHBL01SS 1200W 220 240V 1200W BLENDER INSTRUCTION MANUAL ...

Page 2: ... Parts and Features 4 Blender assembly and operation 5 Chopping guide 6 CLEANING AND CARE 6 TROUBLESHOOTING 7 WARRANTY 8 9 CONTENTS Figures and illustrations in this User Manual are provided for reference only and may differ from the actual product appearance Product design and ations may be changed without notice ...

Page 3: ...arate remote control system 6 Close supervision is necessary when any appliance is used by or near children 7 Any appliance that has been dropped or damaged should not be used until examined by an authorised service center 8 Do not permit the mains supply cord or plug to touch hot objects or allow the power cord to lay across the blender 9 If the mains supply cord is damaged it must be replaced by...

Page 4: ...t place your blender on or near a hot gas e electric element heated oven or any hot surface 21 Do not place the blender on top of any other appliance 22 Do not allow the power cord of this blender to hang over the edge of a table or bench top 23 K of eep and utensils out of jug while blending to reduce the risk severe injury A scraper may be used but must only be used when the blender is not runni...

Page 5: ...Have a ceman install an outlet near the appliance NOTE Neither Westinghouse nor the retailer can accept any liability for damage to the product or personal injury resulting due to failure to observe the electrical connection procedures INSTALLATION GUIDE 1 Carefully unpack your electric blender 2 Carefully remove packaging around the blender and power cord Do not remove warning labels 3 Wash Jug L...

Page 6: ...4 1 Lid cap 2 Jug lid 3 1 8L Glass jug 4 Sealing ring 5 Chopping blade 6 Jug base 7 Blender body 8 Rotary dial Power switch PARTS AND FEATURES 4 5 2 3 1 6 7 8 DESCRIPTION ...

Page 7: ...p 1 into the hole in the lid and turn clockwise to lock iii Turn A C power on at wall socket iv Place one hand on the lid to keep unit stable and use the rotary dial to select desired setting The blender will now begin the blending process 4 Speed settings 1 4 For light usage with liquids 5 For more solid consistency for mixing liquids and solid foodstuffs 0 Stop operation P PULSE For ice crushing...

Page 8: ...asive cleaning agents The outside surface may be wiped clean with a soft damp cloth and dried thoroughly If necessary a mild dishwashing detergent may be applied to the cloth but not directly applied to the blender 4 Soaking the jug lid jug base and lid cap accessories in water will assist in the removal of sticky or tough to remove substances In most instances running tances 5 When washing non ab...

Page 9: ...r any enquiries please call our service center on Tel 1300 883 109 TROUBLESHOOTING Troubleshoot your problem by using the chart below If the blender still does not operate correctly it may be defective Blender does not turn on TROUBLE Blender is not plugged in POSSIBLE CAUSE Check that blender is plugged into a working power outlet and turned on POSSIBLE REMEDY Chopper blade not turning Possibly t...

Page 10: ...arr P 4 The Warr ommen es on da e pur pr and or Owner or Warr P Warr P a manu de overed Pr or Pr o per orm o Seller s a as a r some de a R or repla e Pr a os Seller ed o labour and ravel os Goods r red or repla ed under Warr warran ed r Warr b R r b onsumer 5 The Warr o Pr a a Has due o ex es ve wear and ear be ond wha red o be reasonable b ed Has been a or b God re and d Has been used or opera ed...

Page 11: ...oods from the seller c Consumer means a Consumer as that term is set out in section 3 of the Australian Consumer Law d Consumer Guarantees means the guarantees under the Australian Consumer Law e Implied terms means any guarantees conditions warranties or other terms implied by any Australian Commonwealth State or Territory laws excluding the Australian Consumer Law or the law of any other jurisdi...

Page 12: ...A PTY LTD 11 Tamara Drive Cockburn Central WA 6164 MADE IN CHINA 2017 RVM AUSTRALIA PTY LTD ALL RIGHTS RESERVED WESTINGHOUSE and INNOVATION YOU CAN BE SURE OF are trademarks of Westinghouse Electric Corporation Used under license by RVM AUSTRALIA PTY LTD ALL RIGHTS RESERVED ...

Reviews: