background image

21

EN

8.

 TROUBLESHOOTING

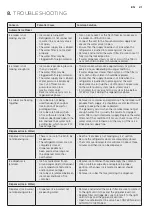
Concern

Potential Cause

Common Solution

Automatic Ice Maker

Ice maker is not 

making any ice. 

• Ice maker is turned off.

• Refrigerator is not connected 

to water line or water valve is 

not open.

• The water supply line is kinked.

• The water filter is not seated 

properly.

• The water filter may be 

clogged with foreign material.

• Turn on ice maker. For the fresh food ice maker, press 

ice maker on-off button once.

• Connect the unit to the household water supply and 

ensure the water valve is open.

• Ensure that the supply line does not kink when the 

refrigerator is pushed into place against the wall.

• Remove and re-install the water filter. Be sure to seat it 

fully into the locked position.

• If water dispenses slowly or not at all, or if the filter is 

six months old or older, it should be replaced.

Ice maker is not 

making enough ice.

• Ice maker is producing less ice 

than you expect.

• The water filter may be 

clogged with foreign material.

• The water supply line is kinked.

• Water pressure is extremely 

low. Cut-off and cut-on 

pressures are too low 

(well systems only).

• Reverse osmosis system is in 

regenerative phase.

• The ice maker will produce approximately 1 kg of ice 

every 24 hours depending on usage conditions.

• If water dispenses slower than normal, or if the filter is 

six months old or older, it should be replaced.

• Ensure that the supply line does not kink when the 

refrigerator is pushed into place against the wall.

• Have someone turn up the cut-off and cut-on pressure 

on the water pump system (well systems only).

• It is normal for a reverse osmosis system to be below 

137 kPa (20 psi) during the regenerative phase.

Ice cubes are freezing 

together. 

• Ice cubes are not being 

used frequently enough or 

interruption of power for 

prolonged time.

• Ice cubes are hollow (shells 

of ice with water inside). The 

hollow cubes break open in the 

bin and leak their water onto 

existing ice, which causes it to 

freeze together.

• Remove ice container and discard ice. The ice maker will 

produce fresh supply. Ice should be used at least twice 

weekly to keep the cubes separated.

• This generally occurs when the ice maker does not get 

enough water. This is usually the result of a clogged 

water filter or restricted water supply. Replace the water 

filter and if the condition still occurs, check to see if the 

water valve is not turned on all the way or if there is a 

kinked water supply line.

Dispenser (Ice & Water)

Dispenser (Ice & water) 

not dispensing ice.

• There is no ice in the bin to be 

dispensed.

• The refrigerator doors are not 

completely closed.

• Dispenser paddle has 

been pressed too long and 

the dispenser motor has 

overheated.

• See the “Ice maker is not making any ice” section.

• Be sure the refrigerator doors are completely closed.

• The motor overload protector will reset in about three 

minutes and then ice can be dispensed.

Ice dispenser is 

jammed.

• Ice has melted and frozen 

around auger due to infrequent 

use, temperature fluctuations, 

and/or power outages.

• Ice cubes are jammed between 

ice maker and back of ice 

container.

• Remove ice container, thaw, and empty the contents. 

Clean container, wipe dry, and replace in proper 

position. When new ice is made, dispenser should 

operate.

• Remove ice cubes that are jamming the dispenser.

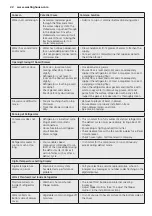
Dispenser (Ice & Water)

Dispenser (Ice & water) 

not dispensing water.

• Dispenser (Ice & water) not 

dispensing water.

• Remove and reinstall the water filter. Be sure to rotate it 

to the right until it stops and the grip end is vertical.

• Replace filter cartridge. Be sure to rotate it to the right 

until it stops and the grip end is vertical.

• Open household water line valve. See CONCERN column 

AUTOMATIC ICE MAKER.

Summary of Contents for WHE6170

Page 1: ...1 EN USER MANUAL WHE6170 WHE6270 REFRIGERATOR ...

Page 2: ... and Original spare parts for your appliance www westinghouse shop CUSTOMER CARE AND SERVICE Always use original spare parts When contacting our Authorised Service Centre ensure that you have the following data available Model PNC Serial Number The information can be found on the rating plate which is located inside the product Warning Caution Safety information General information and tips Enviro...

Page 3: ...r old refrigerators and freezers remove any doors Children can suffocate if they get trapped inside When positioning the appliance ensure the supply cord is not trapped or damaged Do not locate multiple portable socket outlets or portable power supplies at the rear of the appliance WARNING R600a refrigerant warning This appliance contains flammable R600a refrigerant Avoid safety hazards by careful...

Page 4: ...ith a flammable propellant in this appliance Never store fizzy drinks in the freezer compartment Never try to repair the refrigerator yourself only use a qualified or authorised service person for repairs Never use electric heaters or dryers to defrost the freezer because you can receive an electric shock Side View Stabilising foot wound down When transporting and installing the refrigerator care ...

Page 5: ...er Left crisper Right crisper Left Snack Zone compartment Right Snack Zone compartment Egg Tray Upper fixed door bin Left fixed door bin FlexStorTM dairy bin 18 19 20 21 22 23 24 25 26 27 28 29 30 31 32 33 Adjustable Door 1 3 bin Adjustable Door 2 3 bin Adjustable Expandable bin Bottle storage bin Adjustable left hinge Adjustable right hinge Drawer Drawer divider Upper freezer drawer Lower freezer...

Page 6: ... hold for 3 seconds to enable disable While in the locked state you will not be able to change any settings on the display nor dispense ice and water The indicator will flash and an audible warning tone is played 5 Adjusting Temp Press either the or to adjust to desired temperature setting Freezer temp Control temperatures range From 23 C to 15 C Refrigerator temp Control temperatures range From 1...

Page 7: ...ill sound to confirm your choice 1 2 3 4 5 6 BUTTON ICON DESCRIPTION PRIMARY FUNCTION 8 Replace Air Filter Display illuminates every 6 months or when filter needs replacing Press and hold Reset Air Filter for 3 seconds to reset 9 Water Press the water key to select water An indicator light will be illuminated above the active feature 10 Cubed Ice Press the cube key to select cubed ice An indicator...

Page 8: ...he door or pressing any key Control panel will return to normal operation after the door is closed Error Tone An alarm will sound if the user tries to make a selection that is not available Sabbath Mode The Sabbath Mode is a feature that disables portions of the refrigerator and its controls in accordance with observance of the weekly Sabbath and religious holidays within the Orthodox Jewish commu...

Page 9: ...gerator in a dry place avoiding areas of high moisture or humidity Ensure the refrigerator is located on an even surface Adequate ventilation around your refrigerator The diagram below shows the recommened airspace to allow for ventilation of your refrigerator When positioned in a corner area spacing of right side at least 260 mm and left side at least 355 mm on the hinge side will allow the doors...

Page 10: ...raising or lowering the adjustable front rollers To level the cabinet using the front rollers 1 Slightly open freezer drawer if the toe grill is installed Lift the toe grille and gently pull forward 2 Make initial cabinet adjustments by using the front roller height adjusting screws Use a 3 8 inch socket wrench to turn the adjustment screws 1 per side To raise turn adjustment screw clockwise To lo...

Page 11: ... You Will Need Basic Tools adjustable wrench flat blade screwdriver and PhillipsTM screwdriver The water dispenser and automatic ice maker require a drinkable water supply with a pressure range of between 206kPa and 689kPa 30PSI and 100PSI If the water supply is above 100psi a pressure limiting valve should be installed A water supply to suit a tap fitting is required adjacent to the refrigerator ...

Page 12: ...to connect the water supply line to the refrigerator tube 1 Disconnect the refrigerator from the power source 2 Attach the adapter item A above to the water line connect the water supply line item B to the adapter item A while holding the other end of the water supply line in a bucket or sink Turn on the water supply to eliminate air and clean the water supply line Turn off the water supply 3 Remo...

Page 13: ...ker can produce ice within 24 hours The ice maker will fill the ice bin from the rear You must dispense some ice to force the ice forward in the bin This will allow the bin to fill completely Ice Maker and Storage Bin Capacity This ice maker should produce 1 2 to 1 5 Kg of ice per 24 hours The ice bin will hold about 1 8 Kg of ice Turning the ice maker on and off IMPORTANT Your ice maker is turned...

Page 14: ...ls especially prior to vacation or moving 1 Turn off the icemaker 2 Remove the ice bin by pulling straight out 3 Empty and carefully clean the ice bin with mild detergent Do not use harsh or abrasive cleaners Do not place in dishwasher Rinse with clear water 4 Allow the ice bin to dry completely before placing it back into the freezer 5 Place ice bin back into position Turn the ice maker on Remove...

Page 15: ... 2 Lift the right side edge of shelf upwards and push to the left towards ice maker Flip Shelf To adjust the slide under flip shelf 1 Pull front half shelf forward until its back drops down then gently push front half shelf back and under back half shelf Slide Under Flip Shelf 2 With front half fully below back half lift front of shelf to flip it upwards toward the back of the cabinet Slide Under ...

Page 16: ... quick selection of frequently used items Adjustable door bins Some models have adjustable door bins that can be moved to suit individual needs To adjust the collapsible door bin 1 Make sure bin is securely seated on rail in door 2 Grab one side of bin and place other hand on adjustable side 3 Pull on side of bin until the bin is adjusted to desired width Note It can be difficult to pull out the c...

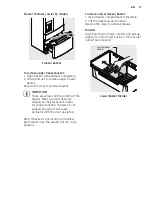
Page 17: ...pective tracks for proper function If drawer is not aligned properly it will cause problems with the door operation Note If basket is not resting on stabilizer bar retainer clips the drawer will not close properly Lower Basket Divider To remove lower freezer basket 1 Open freezer compartment completely 2 Lift the basket up and remove Reverse the steps to reinstall drawer Dividers Grab hand hold on...

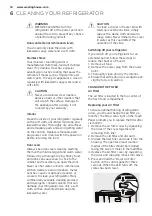
Page 18: ...c or abrasive cleaners or scourers to clean your refrigerator Many commercially available cleaning products and detergents contain solvents that will damage your refrigerator Use only a soft cloth with an unscented mild soap and lukewarm water CAUTION To clean a crisper or freezer bin with telescopic extension slides simply wipe with a damp cloth and warm soapy water Never immerse the cover in wat...

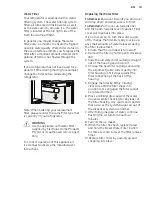
Page 19: ...p down and allow access to filter To Reinstall Push cover up towards liner and then push towards rear of cabinet Filter cover will snap back into place It is not necessary to turn the water supply off to change the filter Be ready to wipe up any small amounts of water released during the filter replacement 1 Ensure that the ice maker is turned off 2 Remove the filter by turning anti clockwise 180 ...

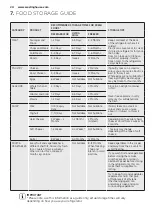
Page 20: ...Prawns 1 2 Days 3 5 Days 2 Months DAIRY Milk Until Expiry Date Not Suitable Not Suitable If dairy takes on a smell or colour and you are unsure about it it is best to throw it out Yoghurt 7 10 Days Not Suitable Not Suitable Hard Cheeses 2 Weeks 2 Months 1 2 Months 2 Months Grated Depending on the variety hard cheese can last from 2 weeks to 2 months Soft Cheeses 1 2 Weeks 2 4 Weeks Not Suitable Te...

Page 21: ...ugh or interruption of power for prolonged time Ice cubes are hollow shells of ice with water inside The hollow cubes break open in the bin and leak their water onto existing ice which causes it to freeze together Remove ice container and discard ice The ice maker will produce fresh supply Ice should be used at least twice weekly to keep the cubes separated This generally occurs when the ice maker...

Page 22: ... are difficult to move Food is touching shelf on top of drawer Track that drawers slide on is dirty Remove top layer of items in drawer Ensure drawer is properly installed on track Clean drawer rollers and track See Care Cleaning Running of Refrigerator Compressor does not run Refrigerator is in defrost cycle Plug at electrical outlet is disconnected House fuse blown or tripped circuit breaker Pow...

Page 23: ...st Outside Refrigerator Moisture collects on outside of refrigerator or between doors Weather is humid This is normal in humid weather When humidity is lower the moisture should disappear Food in Fresh Food Compartment Food is freezing Temperature setting is too low Temperature sensor is covered by food right side of fresh food area Food is covering the air ports Move the setting to a higher degre...

Page 24: ...nces not supplied by Electrolux c cosmetic damage which does not affect the operation of the Appliance d damage to the Appliance caused by i negligence or accident ii misuse or abuse including failure to properly maintain or service iii improper negligent or faulty servicing or repair works done by anyone other than an Electrolux authorised repairer or ASC iv normal wear and tear v power surges el...

Page 25: ...Notes ...

Page 26: ...Notes ...

Page 27: ...Notes ...

Page 28: ...ur customer care team or visit our website AUSTRALIA phone 1300 363 640 fax 1800 350 067 web customercare electrolux co nz westinghouse co nz TOP SERVICE Top Service encompasses the after sales service provided by The Electrolux Group to consumers including delivery home service and spare parts and WESTINGHOUSE are trademarks of Westinghouse Electric Corporation Used under license All Rights Reser...

Reviews: