background image

28


INSTALLATION

INSTALLATION

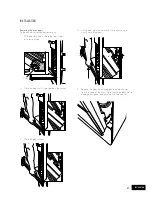
Replacing the oven door

(To be done by qualified personnel only)
1.  Hold door with both hands.

2.   Locate both hinges into the frame slots  

at the same time.

Procedure to assemble the door  

(to be done by 

 personnel only)

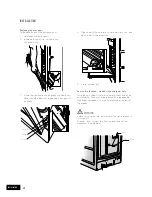
Procedure to assemble the door (to be done by qualified personnel only). 

1. Hold door with both 

hands and locate both 

hinges into the frame slots 

at the same time.

Frame slot

Hinge

Notch

4.  Close the door fully.

2. Ensure that the location notch drops into the 

frame slot.

 Care should be taken not to damage other 

parts of the cooker.

Frame slot

Hinge

Notch

Frame slot

Hinge

Notch

1.  Hold door with both hands.

2.  Locate both hinges into the frame slots at the  
  same time.

4.  Open door fully and rotate stirrups away from    
  you back to their original position.

5.  Close the door fully.

3.   Ensure that the location notch drops into frame slot. 

Care should be taken not to damage other parts of  

the cooker.

Procedure to assemble the door  

(to be done by 

 personnel only)

Procedure to assemble the door (to be done by qualified personnel only). 

1. Hold door with both 

hands and locate both 

hinges into the frame slots 

at the same time.

Frame slot

Hinge

Notch

4.  Close the door fully.

2. Ensure that the location notch drops into the 

frame slot.

 Care should be taken not to damage other 

parts of the cooker.

Frame slot

Hinge

Notch

Frame slot

Hinge

Notch

1.  Hold door with both hands.

2.  Locate both hinges into the frame slots at the  
  same time.

4.  Open door fully and rotate stirrups away from    
  you back to their original position.

5.  Close the door fully.

Hinge

Notch

Frame slot 

4.   Open door fully and rotate stirrups away from you, and 

back to their original position.

Procedure to assemble the door  

(to be done by 

 personnel only)

Procedure to assemble the door (to be done by qualified personnel only). 

1. Hold door with both 

hands and locate both 

hinges into the frame slots 

at the same time.

Frame slot

Hinge

Notch

4.  Close the door fully.

2. Ensure that the location notch drops into the 

frame slot.

 Care should be taken not to damage other 

parts of the cooker.

Frame slot

Hinge

Notch

Frame slot

Hinge

Notch

1.  Hold door with both hands.

2.  Locate both hinges into the frame slots at the  
  same time.

4.  Open door fully and rotate stirrups away from    
  you back to their original position.

5.  Close the door fully.

5.   Close the door fully.

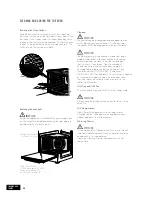
Service fuse location – models with powerpoint only

This product is fitted with a power outlet at each end of the 

control panel. The outlets are protected by a replaceable 

high breaking capacity 15 amp fuse located at the rear of 

the product. 

WARNING

WARNING

Before servicing the fuse, ensure that all power to product is 

switched off.

To access fuse, unscrew fuse housing and remove from 

appliance. (See diagram).

Fuse

Fuse housing

Summary of Contents for WLE620WA

Page 1: ...USER MANUAL 600mm Upright Cooker WLE620WA WLE622WA WLE624WA WLE625WA WLE626WA WLE644WA WLE645WA WLE646WA ...

Page 2: ...ase dispose of those materials by contacting your local authorities and ask for the correct method of disposal Congratulations and thank you for choosing our cooker We are sure you will find your new appliance a pleasure to use Before you use the appliance we recommend that you read through the entire user manual which provides the description of the appliance and its functions To avoid the risks ...

Page 3: ... that oven shelves and fittings are always inserted into the appliance in accordance with the instructions Do not use the oven door as a shelf Do not push down on the open oven door Hotplates Generally Do not allow pots to boil dry as damage to both pan and hotplate may result Do not operate the hotplates for an extended period of time without a utensil on the hotplate Do not allow large cookware ...

Page 4: ...to earth will not be covered by warranty NOTE Where connection is made to a multi phase 220 240V supply the bridge piece must be removed from between the active connections on the main terminal block Fuse for New Zealand only Should the fuse need servicing it is accessible through the fuse opening located in the back cover The Cooking range must be connected to the supply by a supply cord fitted w...

Page 5: ...hat the cooker is located so that the anti tilt bracket is engaged into the cooker Step1 Positioning Choose the most practical bracket mounting option for your cooker The anti tilt bracket can be floor mounted or floor and skirting mounted depending on the location of the range plug socket connection A A Detail A 3 Fasteners Minimum 3 fasteners Step 2 Fixing anti tilt bracket Position the anti til...

Page 6: ...it is pointing to the left like the picture below 6 The stability bolt should now be able to drop to the floor 7 Mark the position for the stability bolt on the floor 8 Pull the cooker out and drill the bolt hole using a 6 5mm masonry or wood drill Minimum 30mm deep for concrete 9 Reposition the cooker back into place then fit the stability bolt into the drilled hole Stability bolt Kick panel ø6 5...

Page 7: ...or shelf withdrawal Assemble grill tray handle Assemble grill tray handle as shown Fitting the grill dish supports Insert the rear hook into the rear hole Align the front peg to the front hole and push in firmly Fitting the grill dish Separate grill Ensure rear of the dish is engaged with the side support before sliding backwards To remove simply pull forwards and upwards Engagement of rear dish G...

Page 8: ...n functions Bake with light Grill with light Light light only WLE620WA Mercury 1 2 3 4 5 6 7 7 WLE622WA Columbo 1 Hotplate Control Knobs Adjusts temperature of hotplate Can be rotated in either direction 2 Hotplate Indicator Lamp Comes on when you turn a hotplate on 3 Temperature Control Knob Sets temperature for baking 4 Oven Indicator Lamp Comes on when you operate the oven temperature control k...

Page 9: ...re grilling 7 Timer Sets reminder time 8 1 4 6 8 7 5 3 2 WLE624WA Neptune 1 Hotplate Control Knobs Adjusts temperature of hotplate Can be rotated in either direction 2 Hotplate Indicator Lamp Comes on when you turn a hotplate on 3 Programmable Clock Sets baking grilling reminder times Sets automatic cooking duration and stop time NOTE Clock time must be set before oven can operate 4 Temperature Co...

Page 10: ...light Light light only 7 General Purpose Outlet Switch WLE644WA Jupiter 8 1 6 4 7 8 5 3 2 WLE626WA Saturn 1 Hotplate Control Knobs Adjusts temperature of hotplate Can be rotated in either direction 2 Hotplate Indicator Lamp Comes on when you turn a hotplate on 3 Programmable Clock Sets baking grilling reminder times Sets automatic cooking duration and stop time NOTE Clock time must be set before o...

Page 11: ...nder time 2 3 5 8 8 7 6 4 1 WLE646WA Apollo 1 Hotplate Control Knobs Adjusts temperature of hotplate Can be rotated in either direction 2 Hotplate Indicator Lamp Comes on when you turn a hotplate on 3 Programmable Clock Sets baking grilling reminder times Sets automatic cooking duration and stop time NOTE Clock time must be set before oven can operate 4 Temperature Control Knob Sets temperature fo...

Page 12: ... THE COOKER Separate grill models Control panel Grill dish and grill rack with removable side support racks where fitted Grill door Removable shelves Oven door Removable inner glass Kick panel Fan Fan forced models only Grill element Hotplate ...

Page 13: ... THE COOKER UNDERSTANDING THE COOKER Grill in oven models Control panel Hotplate Grill dish and rack Oven door Removable inner glass Kick panel Storage or warmer drawer Removable shelves Fan Fan forced models only GPO ...

Page 14: ...Care Centre by calling 1300 363 640 Australia 0800 436 245 New Zealand WARNING WARNING If the ceramic glass is cracked switch off the appliance to avoid the possibility of electric shock Utensils Use pans with flat bottoms Uneven or thin bottoms will waste energy and result in slow cooking Use pans slightly larger than the hotplates Small pans will waste energy Do not use oversize pans More than 5...

Page 15: ...are controlled by the thermostat and will turn on and off to maintain the set temperature You can use the Bake function for single trays of biscuits scones muffins cakes slices casseroles baked puddings roasts delicate egg dishes anything that requires delicate baking Fan Bake Heat comes from the element surrounding the fan This fan circulates the hot air around the oven cavity so that you can put...

Page 16: ...f food being grilled Grilling In Oven The Grill directs radiant heat from the powerful upper element onto the food You can use the Grill function for tender cuts of meat steak chops sausages fish cheese toasties and other quick cooking foods Preheat your grill for 3 minutes to get the best results This will help seal in the natural juices of steak chops etc for a better flavour Grill with the door...

Page 17: ... Recipes Baked Custards R R Pavlova A A Meringues A R Pies Pastry R A A Fish R R Meats Beef Roast A A R Beef Steaks A R R Beef Patties A R R Lamb Roast A A R R Lamb Chops A R Pork Roast A A A R Pork Chops R R Pork Fillets R R A R R Sausages A A R Poultry Chicken Whole A A A R R Chicken Pieces R R A A A R Turkey A A A A R Casseroles A R R A R Complete Oven Meals R A R R A R R R Recommended Method A...

Page 18: ...may be used to warm crockery prior to use Recommend warming times 30 minutes refer to general warnings WARNING WARNING DO NOT use the drawer for heating food DO NOT place flammable material in the drawer DO NOT store aerosols or cleaning products in the drawer DO NOT store plastic items in the drawer DO NOT place more than the maximum weight of 10kg in the drawer UNDERSTANDING THE FUNCTIONS UNDERS...

Page 19: ...heat oven to moderate 180ºC 170ºC fan forced and ensure oven shelf is in the centre position of oven 3 Cream softened butter and sugar until light in colour 4 Add vanilla essence 5 Then eggs one at a time beating well after each addition 6 Sift flour and salt into the mixture and beat until well combined 7 Add milk and beat or stir to combine 8 Spoon mixture equally between prepared cake pans 9 Ba...

Page 20: ...oven door until at least half the cooking time has passed Baking temperature too high Lower the temperature Cakes have a cracked thick crust Baking temperature too high Lower the temperature Food too high in oven Cook one shelf lower Cake batter over mixed Mix just long enough to combine ingredients Pan too deep Check size of pan and use recommended size Baking pans dark Change to shiny pans Baked...

Page 21: ...eper press any button Maximum Countdown Time is 2 hours 30 minutes Setting the cooking duration Select the desired oven function and temperature The oven indicator light will glow and the heating source will come on Press the MODE button until the cook time indicator begins flashing Set the cooking duration you want by using the and buttons Five seconds after the last change the cook time indicato...

Page 22: ...e oven will continue to heat until you manually turn it off On completion of cooking The heat source will turn off the timer will beep and the end time and or cook time indicators will flash Even though the heating element turns off the oven will still retain substantial heat This will continue to cook the food until it is removed or the oven cools down If you do not plan on being present when the...

Page 23: ...f cleaning so any boil over material will burn to ash and may be wiped away when the hotplate is cold The elements are removable so the spillage bowls can be removed for cleaning WARNING WARNING Always make sure that the appliance is turned off before removing the hotplates Ensure elements are cold to touch Lift front of element to clear spillage bowl and pull towards you Remove spillage bowl Wash...

Page 24: ... the anti tilt bracket WARNING WARNING The door glass on this appliance is made from tough durable material that withstands heating and cooling without breaking However it must be remembered that it is glass it may break Treat it accordingly Should you have any questions about the glass in your appliance please contact the Customer Care Centre by calling 1300 363 640 Australia or 0800 436 245 New ...

Page 25: ...h hinges fully towards the door Stirrup Slowly close the door until it stops against the stirrups 45 To remove the top trim press the ribbed release clips at each end and lift top trim away from the door Using both hands gently remove the inner glass by sliding out and lifting away from the door Top trim Inner glass The circle to be located on the lower right hand corner where applicable Hand wash...

Page 26: ...r glass fitted DO NOT use harsh abrasives on glass as this may damage the glass DO NOT place glass in dishwasher Safety warnings about cleaning WARNING WARNING ALWAYS make sure that the cooker is turned off before cleaning WARNING CAUTION ALWAYS clean cooker immediately after use DO NOT use steam cleaners These may cause moisture build up especially in the glass door DO NOT use caustic based clean...

Page 27: ... to its rest position Stirrup 2 Close the door until it stops against the stirrups 3 Close the door further 4 Lift the door slightly and evenly while continuing to slowly close the door 5 Remove the door by lowering gently and pull away from the frame of the oven Care should be taken not to damage kick panel and other parts of the cooker ...

Page 28: ...en not to damage other parts of the cooker Frame slot Hinge Notch Frame slot Hinge Notch 1 Hold door with both hands 2 Locate both hinges into the frame slots at the same time 4 Open door fully and rotate stirrups away from you back to their original position 5 Close the door fully Hinge Notch Frame slot 4 Open door fully and rotate stirrups away from you and back to their original position Proced...

Page 29: ... are incorrectly set Household fuse has blown or power supply is off NOTE If the household fuse continues to blow call the Service Centre Oven light not working Lamp blown or loose in socket Household fuse has blown or power supply is off NOTE If the household fuse continues to blow call the Service Centre Oven not heating enough Foil or trays on bottom of oven REMOVE IMMEDIATELY Oven not working ...

Page 30: ...correct power supply v incomplete or improper installation vi incorrect improper or inappropriate operation vii insect or vermin infestation viii failure to comply with any additional instructions supplied with the Appliance b the Appliance is modified without authority from Electrolux in writing c the Appliance s serial number or warranty seal has been removed or defaced d the Appliance was servi...

Page 31: ...31 NOTES NOTES ...
Page 32: ...nsion and installation information call into your retailer phone or email our customer care team or visit our website TOP SERVICE Top Service encompasses the after sales service provided by The Electrolux Group to consumers including delivery home service and spare parts Westinghouse We are part of the Electrolux family Share more of our thinking at www electrolux com Part No 0342 001 617 Rev A an...

Reviews: