background image


35

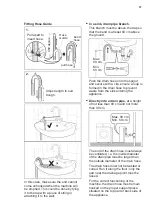
Use a spirit level on the top and side of 

the machine to check the levels.

If you do not have a spirit level, as a 

guide use the edge of a door frame, 

cupboard or bench to check that the 

machine is leveled. 

It is important that your machine stands 

firm and leveled on the floor to ensure 

correct operation. The appliance must 

not be installed behind a lockable door, a 

sliding door or a door with a hinge on the 

opposite side to avoid restricting the 

machine door.

10.
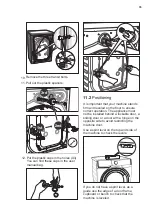
11. Pull out the plastic spacers.

12. Put the plastic caps in the holes (X3).

You can find these caps in the user

manual bag.

Remove the three transit bolts.

A

1st

2nd

3rd

11.2

 Positioning

Summary of Contents for WWF1044M7SA

Page 1: ...Washing Machine WWF1044M7WA WWF1044M7SA User Manual 2...

Page 2: ...Westinghouse manufacturer s warranty in the event that your product fault is due to failure to adhere to this manual IMPORTANT INFORMATION THAT MAY IMPACT YOUR MANUFACTURER S WARRANTY Thank you for pu...

Page 3: ...tergent 6 WASHING HINTS 21 21 21 21 21 22 8 1 External Cleaning 8 2 Descaling 8 3 After Each Wash 8 4 Maintenance Wash With Tub Clean Program 8 5 Cleaning The Dispenser Drawer 8 6 Cleaning The Drawer...

Page 4: ...ughly familiar with its operation and safety features Save these instructions and make sure that they remain with the appliance if it is moved or sold so that everyone using it through its life will b...

Page 5: ...nce The packaging components e g plastic film polystyrene can be dangerous to children danger of suffocation Keep them out of children s reach Keep all detergents in a safe place out of children s rea...

Page 6: ...ance is heavy Care should be taken when moving it When unpacking the appliance check that it is not damaged If in doubt do not use it and contact the Service Centre All packing and transit bolts must...

Page 7: ...user manual Before washing ensure that all pockets are empty and buttons and zips are fastened Avoid washing frayed or torn articles and treat stains such as paint ink rust and grass before washing G...

Page 8: ...Dispenser see page 17 Cabinet Front Panel Door Drain Pump Filter see page 25 Level Adjustment Feet Front Level Adjustment Feet Back Water Inlet Hose see page 36 Transit Bolts Hose Support Transit Bolt...

Page 9: ...c Caps Plastic Hose Guide Softener Prewash Main Wash Stainless Steel Washing Drum Drain Pump Filter Detergent Softener Dispenser For more informations see page 17 24 Door when open for more informatio...

Page 10: ...xtra Rinse Touchpad 9 10 11 12 Start Pause and Add Clothes Touchpad Display Display Delay End Touchpad Time Saver Touchpad 13 14 Save Favourite Program Option Child Lock Option 3 1 Control Panel Descr...

Page 11: ...Fast 15 Extra Dirty Machine Clean For cleaning the tub White and coloured cotton Adjust wash time according to soil level See Time Saver table on page 13 Synthetic or mixed fabric items Adjust wash t...

Page 12: ...wool wash cycle of this machine has been approved by The Woolmark Company for the washing of wool garments labelled as hand wash provided that the garments are washed according to the instructions is...

Page 13: ...start the program this option makes it possible to define the end of the washing program from minimum of 1 hour to maximum of 20 hours If program duration is longer than 3 hours minimum Delay End opti...

Page 14: ...m the drum If Vapour option is selected rinse temperatures will be elevated During a vapour cycle you may notice vapour exiting from the drain hose of the washing machine this is normal and there is n...

Page 15: ...aults are not disabled Enabling Disabling End Of Wash Buzzer To disable the buzzer sound press Spin and Plus Hygiene touchpads at the same time about 3 seconds the icon will show on display along with...

Page 16: ...2 functions Start Pause 1 To interrupt a program which is running press this touchpad to pause the machine the Start Pause pilot light flashes After you have selected the desired program and options p...

Page 17: ...ASHING HINTS 5 Close the door 6 4 Make sure that no laundry remains between the seal and the door Detergent Dispenser Drawer 1 The detergent dispenser is divided into three compartments Please read De...

Page 18: ...residue The softener amount used must not exceed the MAX mark in the drawer If you use thick softeners it is recommended to dilute with water If you want your laundry to be spun or use temperature dif...

Page 19: ...lashing 1 If available change the options that you wish 2 Press Start Pause again The program will continue 3 While a program or the Delay End is operating the appliance door is locked and the display...

Page 20: ...performance 5 11 AUTO Off Mode The AUTO Off mode automatically deactivates the appliance to decrease the energy consumption when You do not press any buttons for 5 minutes before you press Start Pause...

Page 21: ...Remove persistent stains before washing Rub particularly soiled areas with a special detergent or detergent paste Treat curtains with special care Remove hooks or tie them up in a bag or a net Make su...

Page 22: ...aste do not use acetone on artificial silk Low sudsing detergent is required for this washing machine to prevent oversudsing problems unsatisfactory washing result and harm to the machine 6 6 Detergen...

Page 23: ...y to treat your laundry Bleach in cold water DO NOT bleach Bleaching Hand wash Max wash temperature 95 C Hot iron max 200 C Dry cleaning in all solvents Dry cleaning in perchlorethylene petrol pure al...

Page 24: ...Cleaning Leave the door open for a while This helps to prevent mould and stagnant smells forming inside the appliance Keeping the door open after a wash will also help to preserve the door seal 8 3 A...

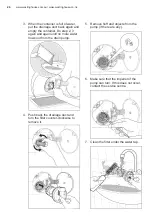
Page 25: ...cause of the blockage of the drain pump The display shows an alarm code because of the problem with water drain Regularly examine the drain pump and make sure that it is clean Clean the pump if 1 Disc...

Page 26: ...ainer Do step 2 3 again and again until no more water flows out from the drain pump 5 Remove fluff and objects from the pump if there are any 6 Make sure that the impeller of the pump can turn If this...

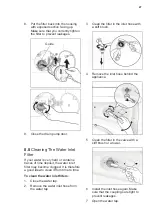
Page 27: ...If your water is very hard or contains traces of lime deposit the water inlet filter may become clogged It is therefore a good idea to clean it from time to time 8 8 Cleaning The Water Inlet Filter To...

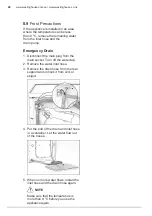
Page 28: ...Precautions Disconnect the main plug from the main socket Turn off the water tap 1 2 Remove the water inlet hose 3 Remove the drain hose from the rear support and unhook it from sink or spigot Put th...

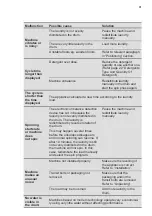
Page 29: ...e water inlet hose filter The door is not properly closed Error code Close the door firmly The water tap is closed Error code Open the water tap Certain problems are due to lack of simple maintenance...

Page 30: ...o open the door please read carefully Emergency door opening on page 32 Stubborn stains have not been treated prior to washing Use commercial products to treat the stubborn stains The correct temperat...

Page 31: ...um This may happen several times before the unbalance disappears and normal spinning can resume If after 10 minutes the laundry is still not evenly distributed in the drum the machine will not spin In...

Page 32: ...necessary perform an Emergency Drain see page 28 To open the door proceed as follows If you are unable to identify or solve the problem contact our service centre Before calling service centre make a...

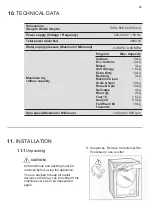
Page 33: ...e removed before using the appliance CAUTION Cottons Eco Cottons Mixed Anti Allergy Extra Dirty Bedding Machine Clean Drain Spin Rinse Spin Delicates Wool Fast 15 Daily 39 Full Wash 60 Favourite 10 kg...

Page 34: ...nce with the rear side on it Make sure not to damage the hoses Pull up the appliance in vertical position Open the door Remove all the items from the drum 5 9 Remove the power supply cable and the dra...

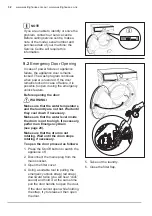
Page 35: ...that your machine stands firm and leveled on the floor to ensure correct operation The appliance must not be installed behind a lockable door a sliding door or a door with a hinge on the opposite side...

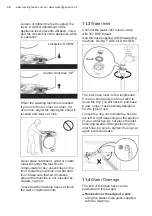
Page 36: ...ck Check that the machine does not touch the wall or cupboard units clockwise DOWN counter clockwise UP Connect the water inlet hose to a tap with 3 4 BSP thread Use the hose supplied with the washing...

Page 37: ...iameter of the drain pipe must be larger than the outside diameter of the drain hose The drain hose must not be twisted or curled Run it along the floor only the part near the drainage point must be r...

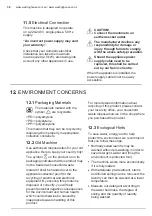
Page 38: ...the recycling of electrical and electronic equipment By ensuring this product is disposed of correctly you will help prevent potential negative consequences for the environment and human health which...

Page 39: ...roperty of Electrolux 5 Travel and transportation costs Subject to clause 7 Electrolux will bear the reasonable cost of transportation travel and delivery of the Appliance to and from Electrolux or it...

Page 40: ...G0037801 001 A20692026 www westinghouse com au www westinghouse co nz...

Reviews: