background image

4        

Any plumbing work required to 
install this appliance should be 
carried out by a qualified plumber.
Any electrical work required to 
install this appliance should be 
carried out by a qualified electrician.

This appliance is designed for 
domestic use. It must not be used 
for purposes other than those for 
which it was designed.
Only wash fabrics which are 
designed to be machine washed. 
Follow the instructions on each 
garment label.
Do not overload the appliance. See 
the relevant section in the user 
manual.
Before washing, ensure that all 
pockets are empty and buttons and 
zips are fastened. Avoid washing 
frayed or torn articles and treat 
stains such as paint, ink, rust, and 
grass before washing.

Garments which have been in 
contact with volatile petroleum 
products should not be machine 
washed. If volatile cleaning fluids are 
used, care should be taken to 
ensure that the fluid is removed from 
the garment before placing in the 
machine. 

Never pull the power supply cable 
to remove the plug from the socket, 
always take hold of the plug itself.

Never use the washing machine if 
the power supply cable, the control 
panel, the working surface or the 
base are damaged so that the 
inside of the washing machine is 
accessible.

This washing machine is not 
intended for use by young children 
or infirm persons without supervi-
sion. 
Children should be supervised to 
ensure that they do not play with 
the appliance.

The packaging components (e.g. 
plastic film, polystyrene) can be 
dangerous to children - danger of 
suffocation! Keep them out of 
children’s reach.
Keep all detergents in a safe place 
out of children’s reach.
Make sure that children or pets do 
not climb into the washbowl.

      USE

      CHILD SAFETY

If this appliance is supplied from a 
cord extension set or electrical 
portable outlet device, the cord 
extension set or electrical portable 
device must be positioned so that it 
is not subject to splashing or 
ingress of moisture.
Water pressures between minimum 
50kPa and maximum 800kPa are 
acceptable.

Connect the machine to an 
earthed socket outlet. 

1.3

1.4

Summary of Contents for WWT1020A

Page 1: ...Model WWT8040 Washing Machine WWT1020A...

Page 2: ...e appliance read this user manual carefully including its hints and warnings This appliance is intended to be used in household and similar applications such as Farm houses By clients in serviced apar...

Page 3: ...ances should you attempt to repair the machine yourself Repairs carried out by inexperienced persons may cause injury or serious malfunctioning Contact your local Service Centre Always insist on genui...

Page 4: ...in the machine Never pull the power supply cable to remove the plug from the socket always take hold of the plug itself Never use the washing machine if the power supply cable the control panel the w...

Page 5: ...Hot Water BLUE fittings Cold Water Mains Cable 8 Outlet Hose Drain Hose See installation instructions to fit position drain hose Back Feet 9 Bleach Dispenser See Page 21 Detergent Dispenser Drawer Se...

Page 6: ...ittings Hot Water BLUE fittings Cold Water Mains Cable 8 Outlet Hose Drain Hose See installation instructions to fit position drain hose Back Feet 9 Bleach Dispenser See Page 21 Detergent Dispenser Dr...

Page 7: ...ds to pause machine This is to confirm that you really want to pause the machine NOTE All functions of the washing machine will stop when the lid is open ActiveMix This product features the new Active...

Page 8: ...You should use Eco Rinse where available instead of Deep Rinse to reduce the amount of water used for rinsing clothes Each time you switch on your washing machine the machine will select most suitable...

Page 9: ...ogram Selection Knob Spin Selection Touchpad Temperature Selection Touchpad Water Level Selection Touchpad Rinse Selection Touchpad LED Display 7 8 9 10 11 Time Adjust Touchpad Child Lock Touchpad Sta...

Page 10: ...tion Touchpad Program Selection Knob Spin Selection Touchpad Child Lock Option 7 Rinse Selection Touchpad 8 9 10 11 12 Start Pause Touchpad LCD Display Save Favourite 1 Program Touchpad Save Favourite...

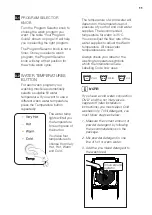
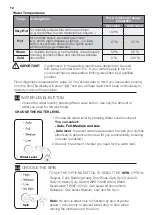
Page 11: ...or warm is 35 C You have four temperatures to choose from Very Hot Hot Warm and Cold The water temp lights will tell you the temperature for each press of the button 3 2 WATER TEMPERATURES BUTTON Alwa...

Page 12: ...g Water Level button Use only the amount of water you need for the wash load WATER LEVEL BUTTON Flood diagnostic is explained on page 32 You should refer to this if you have water pouring onto the flo...

Page 13: ...pin that removes the water from the clothes to complete the full wash program Compare this with Deep rinse where much more water is used Deep rinse water enters the machine filling up to the wash wate...

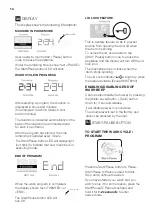
Page 14: ...d the time remaining is updated every minute When the wash program is completed the display shows text FINISHED or END The Start Pause button LED will turn Off The Start Pause button LED will always l...

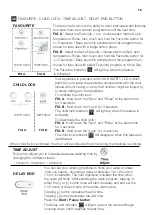
Page 15: ...3 seconds The child lock indicator will light up when this feature is activated Knob Dial The favourite function is the ability to tailor individual wash features and save them as a custom programme...

Page 16: ...a wash tub For very wet clothes to remove the water For a heavily soiled Denim Jeans wash load For a Sport ware fabrics labelled Machine Washable For wool fabric and Hand Wash labelled Machine Washabl...

Page 17: ...levels detergent types and available program settings you may find some combinations of these which do not always result in the perfect wash If for example you see residuals of detergent or soils on...

Page 18: ...amounts to avoid excessive suds Quantity of detergent to be used Good washing results also depend on the choice of detergent and use of the correct quantities to avoid waste and protect the environmen...

Page 19: ...load of all large items 4 DAILY USE 5 Connect the mains plug to the mains socket 2 Turn the water tap on ADD THE DETERGENT When using the washing machine for the first time check that the dispenser is...

Page 20: ...n this machine Use soap based products in your washing machine Before adding softener to the dispenser make sure the siphon cap is pushed firmly down onto the spigot in the drawer The softener will no...

Page 21: ...leach container Chlorine type This type of bleach should NOT be mixed with detergent Mix the bleach with water as per the instructions on the container Turn Program Selector to a Regular Wash position...

Page 22: ...eatedly to choose your machine end time 2 If you want your laundry to be washed with functions different from the one proposed by the machine press Temperature Water Level Spin Time and Rinse Option b...

Page 23: ...the Program Selector Knob the effect will be different depending on the status of the machine at the time you do this as follows CHANGING THE OPTIONS AT THE END OF THE AUTO OFF PROGRAM When the machi...

Page 24: ...ble the filter to the column and place it back in the centre of the agitator WWT8040 5 Turn off the water taps This will extend the life of the inlet hoses 3 Leave lid open for a while This allows tim...

Page 25: ...be cleaned regularly preferably after each wash Inspect the dispenser after each wash to see if there is any residue of detergent To do this proceed as follows CLEANING THE DISPENSER CLEANING YOUR WAS...

Page 26: ...T Never use bleach cleaners or steel wool to clean the stainless steel washbowl IMPORTANT Wipe with a cleaning product which is marked suitable for stainless steel 1 Oily deposits can be removed by wi...

Page 27: ...water will set stains Use light strokes and don t rub the stain remover into the fabric If you use a chlorine bleach follow the instructions on the bottle and dilute it before putting it on clothing T...

Page 28: ...tempera tures ie too hot or too cold 1 Re sort load then re wash using wash program selections suitable for the fabric using hot or warm water 1 If the water is very dirty or very sudsy repeat 1 above...

Page 29: ...aning fluid If spot remains bleach Same as for whites use oxygen type bleach Candle Wax Rub with ice to harden Scrape off excess with blunt knife Sponge with dry cleaning fluid Same as for whites Chew...

Page 30: ...cid and place in sun Apply lemon juice and place in sun Iron Rust Rub with lard and wash using hot water Bleach if necessary Rub with lard and wash using warm water Lipstick Wash using hot water Moist...

Page 31: ...thin items caught between inner and outer washbowls Bowl rotation at start of wash Brake activation when stopping after spin What to do Switch on power point Check power point with another appliance P...

Page 32: ...ding the floor turn Program Selector Knob to Drain Spin position then press Start Hold To Pause Should this make things worse press the power button off some models and call Service Wait this fault ma...

Page 33: ...consequences for the environment and human health which could otherwise be caused by inappropriate waste handling of this product To save water energy and to help protect the environment we recommend...

Page 34: ...NOTE 34...

Page 35: ...35...

Page 36: ...G0013481 004 119730437...

Reviews: