background image


31

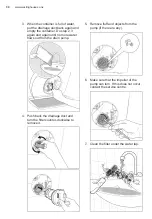
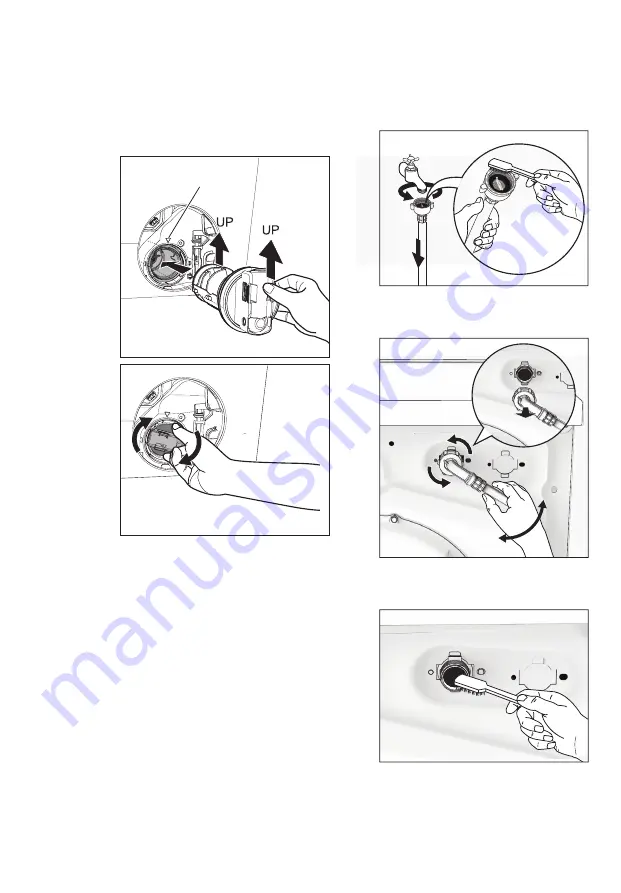
3. When the container is full of water, 

put the drainage duct back again and 

empty the container. Do step 2, 3 

again and again until no more water

flows out from the drain pump.

5. Remove fluff and objects from the 

pump (if there are any).

6. Make sure that the impeller of the 

pump can turn. If this does not occur,

contact the service centre.

7. Clean the filter under the water tap.

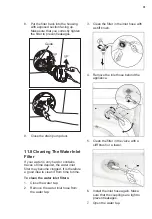
4. Push back the drainage duct and 

turn the filter counter-clockwise to

remove it.

8. Put the filter back into the housing

with exposed section facing up.

Make sure that you correctly tighten

the filter to prevent leakages.

9. Close the drain pump door.

Remove the water inlet hose from 

the water tap. 

Clean the filter in the inlet hose with 

a stiff brush. 

If your water is very hard or contains 

traces of lime deposit, the water inlet 

filter may become clogged. It is therefore 

a good idea to clean it from time to time.

11.8 Cleaning The Water Inlet 

Filter

To clean the water inlet filters:

1. Close the water tap.
2.

3.

4.

5.

6.

7. Open the water tap.

Remove the inlet hose behind the 

appliance. 

Clean the filter in the valve with a 

stiff brush or a towel. 

Install the inlet hose again. Make 

sure that the couplings are tight to 

prevent leakages.  

Guide

Summary of Contents for WWW9024M5WA

Page 1: ...Washing Machine WWW9024M5WA User Manual 2...

Page 2: ...safe in the knowledge that you ll get great results every time Welcome to Westinghouse We recommend the use of original spare parts When contacting Service ensure that you have the following data avai...

Page 3: ...27 13 TECHNICAL DATA 38 14 1 14 2 14 3 14 4 14 5 Unpacking Positioning Water Inlet Water Drainage Electrical Connection 14 INSTALLATION 15 1 15 2 15 3 Packaging Materials Old Machine Ecological Hints...

Page 4: ...s important to ensure that all people using the appliance are thoroughly familiar with its operation and safety features Save these instructions and make sure that they remain with the appliance if it...

Page 5: ...mage and must not be placed into the machine Only use manufacturer s recommended quantities of fabric softener and detergent Damage to the fabric or appliance can occur if you exceed the recommended a...

Page 6: ...r the installation Any plumbing work required to install this appliance should be carried out by a qualified plumber Any electrical work required to install this appliance should be carried out by a q...

Page 7: ...an prevent heat from escaping and so create a fire hazard Items containing foam rubber also known as latex foam or similarly textured rubber like materials should not be dried in a washer dryer on a h...

Page 8: ...binet Front Panel Door Drain Pump Filter see page 29 Level Adjustment Feet Front Level Adjustment Feet Back Water Inlet Hose see page 41 Transit Bolts Hose Support Transit Bolts Hose Support Mains Cab...

Page 9: ...ainless Steel Washing Drum Detergent Softener Dispenser For more informations see page 18 28 Door when open for more informations see page 18 Transit Bolt when remove Transit bolts must be removed bef...

Page 10: ...ase Icon I Program Time A I H G E F B D C Extra dry Cupboard dry Iron dry A C D B E N O F G H I J K L M A Program knob I Display B Mode Selection touchpad J Time Dry touchpad C On Off button K Dryness...

Page 11: ...rain Spin To spin the laundry and drain the water in the drum Eco Cotton 1 White and colourfast cotton Set this program to have a good washing results and decrease the energy consumption The time of t...

Page 12: ...r normal level of soil Wash Dry 1 Eco Cotton Program with 40degC option selected is recommended for a full load of normally soiled cotton and is the Energy and Water rating label program Woolmark Appa...

Page 13: ...40 C to 90 C only 2 Do not select a spin speed LOWER than that proposed by the appliance to avoid a too long drying time so saving energy In any case the reduction of the spin speed is only possible...

Page 14: ...cycle Vapour function is more effective with half load NOTE When you set this function put the detergent into the compartment This function increases the program duration If you wish to add laundry in...

Page 15: ...w the selected option Level of dryness Type of fabric Load Extra Dry Ideal for towels or similar Suitable for items to put away without ironing Cotton and linen bathrobes bath towels etc up to Max 1 k...

Page 16: ...dryer cycle occurs without heat cool down cycle This ensures the laundry will be left at a low temperature Child Safety Lock Option Your appliance is provided with CHILD SAFETY LOCK which permits you...

Page 17: ...SE 4 Ensure that the electrical and water connections comply with the installation instructions Put 2 litres of water in the detergent compartment for washing phase This activates the drain system 1 2...

Page 18: ...page 24 WASHING HINTS 5 Close the door 6 4 Make sure that no laundry remains between the seal and the door Detergent Dispenser Drawer 1 The detergent dispenser is divided into three compartments Plea...

Page 19: ...it is recommended to dilute with water If you want your laundry to be spun or use temperature different from the one proposed by the Washer Dryer press Spin and Temp touchpads repeatedly to change th...

Page 20: ...t flashing 1 If available change the options that you wish 2 Press Start Pause again The program will continue 3 While a program or the Delay Start is operating the appliance door is locked and the di...

Page 21: ...AUTO Off mode automatically deactivates the appliance to decrease the energy consumption when You do not press any buttons for 5 minutes before you press Start Pause Press the On Off button to activat...

Page 22: ...to open the door during the anti crease phase or interrupt it press Start Pause touchpad The acoustic signal will operate At the end of the program 7 Press On Off button to switch the machine off 8 9...

Page 23: ...some programs If you set only 10 minutes of drying the appliance performs only a Cooling phase When Iron Dry option is selected the display time will be adjusted after approximately 15 minutes from t...

Page 24: ...tapes Remove persistent stains before washing Rub particularly soiled areas with a special detergent or detergent paste Treat curtains with special care Remove hooks or tie them up in a bag or a net M...

Page 25: ...cial silk Low sudsing detergent is required for this Washer Dryer to prevent oversudsing problems unsatisfactory washing result and harm to the machine 8 6 Detergents Type And Quantity Of Detergent Do...

Page 26: ...compartments of the dispenser drawer before starting the wash program If using liquid detergents a program without prewash must be selected Particularly delicate items such as synthetic curtains wooll...

Page 27: ...re alcohol and R 113 DO NOT dry clean Warm iron max 150 C Lukewarm iron max 110 C DO NOT iron Max wash temperature 60 C Max wash temperature 40 C Max wash temperature 30 C DO NOT wash at all Ironing D...

Page 28: ...ve the door open for a while This helps to prevent mould and stagnant smells forming inside the appliance Keeping the door open after a wash will also help to preserve the door seal 11 3 After Each Wa...

Page 29: ...e of the blockage of the drain pump The display shows an alarm code because of the problem with water drain Regularly examine the drain pump and make sure that it is clean Clean the pump if 1 Disconne...

Page 30: ...water flows out from the drain pump 5 Remove fluff and objects from the pump if there are any 6 Make sure that the impeller of the pump can turn If this does not occur contact the service centre 7 Cl...

Page 31: ...r water is very hard or contains traces of lime deposit the water inlet filter may become clogged It is therefore a good idea to clean it from time to time 11 8 Cleaning The Water Inlet Filter To clea...

Page 32: ...the main plug from the main socket Turn off the water tap 1 2 Remove the water inlet hose 3 Remove the drain hose from the rear support and unhook it from sink or spigot Put the end of the drain and i...

Page 33: ...ror code Close the door firmly The plug is not properly inserted into the power socket Insert the plug into the power socket There is no power at the socket Please check your domestic electrical insta...

Page 34: ...ead carefully Emergency door opening on page 37 Stubborn stains have not been treated prior to washing Use commercial products to treat the stubborn stains The correct temperature was not selected Che...

Page 35: ...s may happen several times before the unbalance disappears and normal spinning can resume If after 10 minutes the laundry is still not evenly distributed in the drum the machine will not spin In this...

Page 36: ...ess level for the laundry Machine does not dry or does not dry properly Machine is optimizing the drying cycle according to the laundry type and load size It will vary for each kind of fabric as the w...

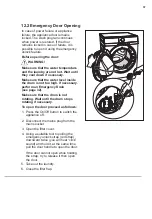
Page 37: ...ng Wait until the drum stops rotating if necessary Make sure that the water level inside the drum is not too high If necessary perform an Emergency Drain see page 32 To open the door proceed as follow...

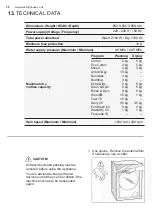
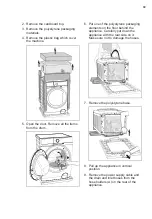
Page 38: ...Dry 1100 W You are advised to keep all transit devices so that they can be refitted if the machine ever has to be transported again All transit bolts and packing must be removed before using the appl...

Page 39: ...on it Make sure not to damage the hoses Pull up the appliance in vertical position Open the door Remove all the items from the drum 5 9 Remove the power supply cable and the drain and inlet hoses from...

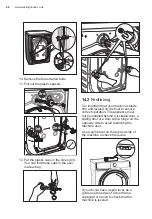
Page 40: ...important that your machine stands firm and leveled on the floor to ensure correct operation The appliance must not be installed behind a lockable door a sliding door or a door with a hinge on the op...

Page 41: ...ouch the wall or cupboard units Connect the water inlet hose to a tap with 3 4 BSP thread Use the hose supplied with the Washer Dryer DO NOT USE OLD HOSES 14 3 Water Inlet The inlet hose must not be l...

Page 42: ...nside diameter of the drain pipe must be larger than the outside diameter of the drain hose The drain hose must not be twisted or curled Run it along the floor only the part near the drainage point mu...

Page 43: ...the product 15 1 Packaging Materials 15 3 Ecological Hints 15 2 Old Machine ENVIRONMENT CONCERNS 15 Normally soiled laundry may be washed without prewashing in order to save detergent water and time t...

Page 44: ...ectly you will help prevent potential negative consequences for the environment and human health which could otherwise be caused by inappropriate waste handling of this product For more detailed infor...

Page 45: ...45 NOTE...

Page 46: ...46 www westinghouse co nz NOTE...

Page 47: ...47...

Page 48: ...www westinghouse co nz G0034728 003 A20692015...

Reviews: