-5-
-12-
DOUGH MIXER ASSEMBLY
Before using the
Pasta Machine,
clean all parts
as outlined in the “
Cleaning Instructions”
in this
manual.
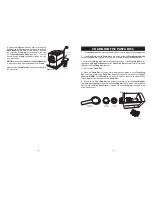
1. Insert the plastic round end of the
Mixing
Paddle
into the top opening of the
Pasta
Machine Body
and slide the metal hexagon
end of the
Mixing Paddle
into the metal
hexagon opening inside the back of the
Pasta
Machine Body
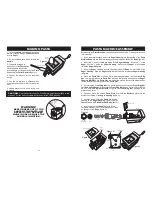
(figure A).
2. Line up the
Front Cap
notches with the
notches in the opening of the
Body
. Place the
round plastic end of the
Mixing Paddle
inside
the notch in the center of the
Front Cap
. Place
the
Ring Nut Wrench
over the end of the
Front
Cap
and turn clockwise a quarter turn to lock
the
Front Cap
into place.
3. Insert the end of the
Handle
into the “Fast”
(for mixing dough) (“Slow” (for pasta making))
drive on the back of the
Body
(figure B).
4. Align the
Enclosed Mixer Lid
with the
arrow at the front to the tracks on the
Body
.
Gently slide the
Mixer Lid
onto the
Pasta
Machine Body
(figure C).
5. Open the
C-Clamp
all the way open by
turning the handle of the
C-Clamp
counter-
clockwise. Attach the
Pasta Machine
to a
table or countertop by inserting the end of the
C-Clamp
into the opening on the side of the
Pasta Machine Body
(figure D.). Turn the
handle of the
C-Clamp
clockwise to tighten the
vice onto the counter.
NOTE:
Make sure the
Handle
of
the
Pasta Machine
is able to turn
freely before tightening the
C-Clamp
.
Make sure the
Pasta Machine
is sturdy
and tight onto the countertop.
Figure B.
Fast Drive
Slow Drive
Handle
Figure A.
Figure C.
Figure D.
Front Cap
Body
Mixing
Paddle
Metal Hex
End
Round
Plastic
End
Mixer Lid
C-Clamp
Housing
C-Clamp
TRADITIONAL PASTA DOUGH
3 cups flour
2 eggs
1 Tbsp olive oil
1/4 tsp salt
1-3 cup water
.
Add all of the pasta dough ingredients to the Body of the Pasta Machine
.
Turn the Handle at a consistent pace to mix the ingredients together
.
Follow the
“Mixing Dough”
instructions as outlined in this manual
FLAVORED PASTA DOUGH
Pureed vegetables can be added to pasta dough to enhance the noodle color. Generally,
the flavor of the vegetable is not very pronounced in the pasta.
LEMON PASTA DOUGH
2 Tbsp lemon juice
3 Tbsp finely grated lemon zest
2 eggs
1 egg yolk
2-1/2 cups all purpose flour
.
Add all of the pasta dough ingredients to the Body of the Pasta Machine
.
Turn the Handle at a consistent pace to mix the ingredients together
.
Follow the
“Mixing Dough”
instructions as outlined in this manual
GARLIC FLAVORED PASTA DOUGH
3 cups flour
2 eggs
1 Tbsp olive oil
1/4 tsp salt
1-3 cup water
6 peeled, finely minced garlic cloves
.
Add all of the pasta dough ingredients to the Body of the Pasta Machine
.
Turn the Handle at a consistent pace to mix the ingredients together
.
Follow the
“Mixing Dough”
instructions as outlined in this manual
RECIPES
Ring Nut
Wrench


