ENGLISH INSTRUCTIONS
4
CLEANING & ASSEMBLY
Before and after each use, disassemble and wash all parts of this product that
come in contact with food. Wash all parts in warm, soapy water. Rinse with clear
water. Dry immediately. This product is NOT dishwasher safe.
DISASSEMBLY INSTRUCTIONS
1. Holding the top of the Burger Press, unscrew the Compacting/Ejector
Button from the Push Rod. This will also free the Spring.
2. Remove the Adjustment Press Plate from the inside of the Main Body.
3. Unscrew the Adjustment Knob until it separates from the Main Body.
4. Clean all pieces in warm, soapy water. Rinse with clear water. Dry
immediately.
NOTE: This product is NOT dishwasher safe.
ASSEMBLY INSTRUCTIONS
1. Screw the Adjustment Knob into the Main Body of the Burger Press until
approximately 1” (2.5 cm) remains visible.
2. Place the Adjustment Press Plate inside of the Main Body chamber guiding
the Push Rod into the Adjustment Knob.
3. Slide the Spring over the exposed portion of the Push Rod, and screw the
Compressing/Ejector Button onto the Push Rod.
MAKING PATTIES
1. Mix meat with your favorite seasonings.
2. Form the meat into 2 ½” (6.4 cm) balls. Size
of the patties will depend on the amount of meat
used for each patty. NOTE: When adjusting
your patty weight, allow for 10% to 20%
shrinkage when fully cooked.
3. Adjust the Thickness Adjustment Knob to the
desired patty thickness.
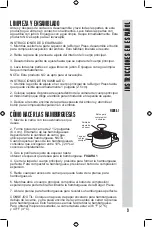
FIGURE 1
4. Close the Main Body lid down and press to form the perfect patty. To compact
the patty, press down the Compacting/Ejector Button.
5. Remove any excess meat from the outside of the Hamburger Press.
6. While opening up the Main Body, compress the Compacting/Ejector Button for
easy patty removal from the Burger Press.
7. Open the Hamburger Press to reveal your perfectly made patty.
HELPFUL TIP: Place a piece of waxed patty paper under the meat and another
on top of the meat before closing the Hamburger Press. This will make it easier
to remove the patty. For best results, meat should be between 36
O
(2
O
C) and
40
O
F (4
O
C).
Thickness
Adjustment
Knob
Main
Body
Lid
Compacting/
Ejector
Button
FIGURE 1


