background image

-10-

-11-

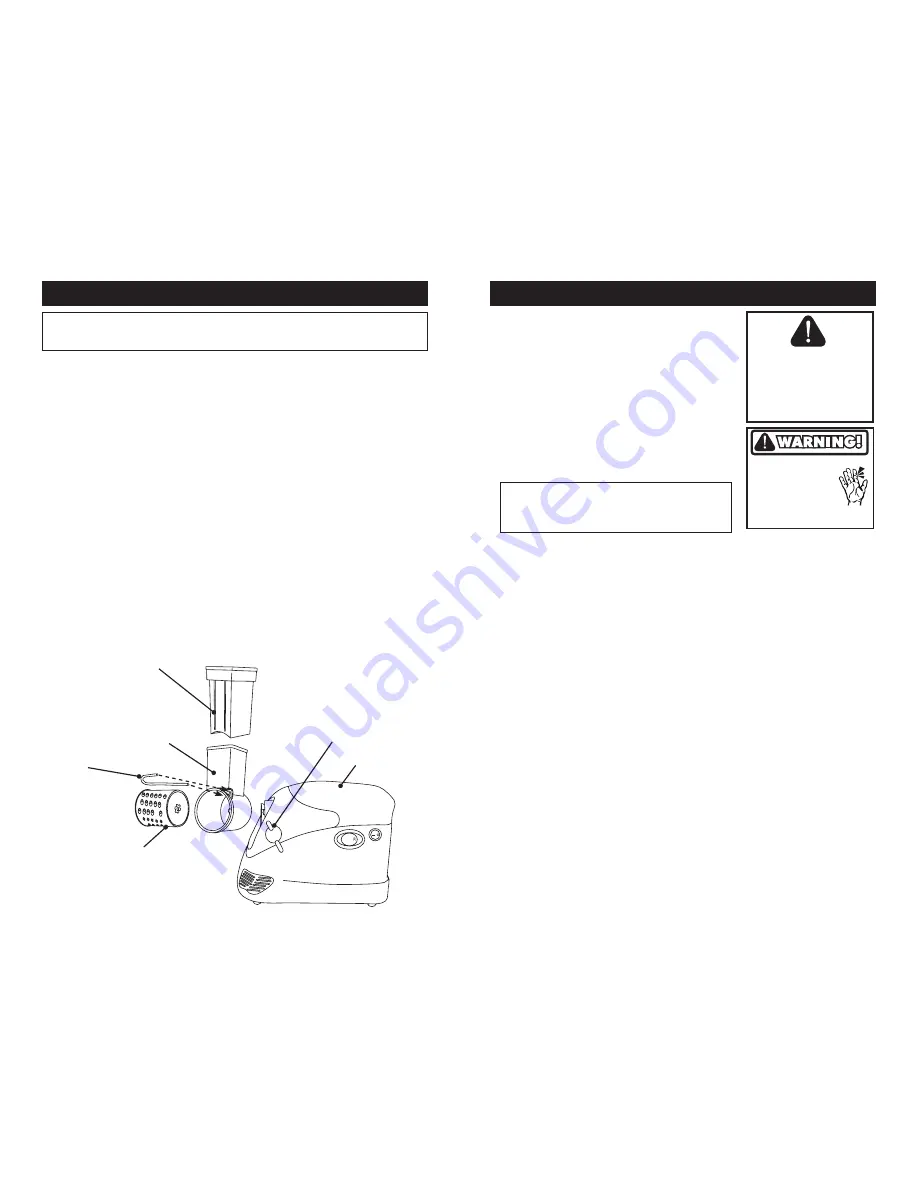
SHREDDER/SLICER ASSEMBLY


Not included with all grinders.

NOTE: 

 The Shredder/Slicer Attachment cannot be used with meat products.

1.  Loosen the 

Head Locking Knob

 on the side of the 

Motor Unit

2.  Install the 

Shredder/Slicer Head 

onto the 

Motor Unit 

(figure 5). 

3.  Tighten the 

Head Locking Knob

 to secure the 

Shredder/Slicer Head

 in place. 

4.  Insert a 

Blade

 into the 

Shredder/Slicer Head 

until it is fully seated.  The open end 

of the

 Blade

 should face outward.  Make sure the notches in the 

Blade 

mesh with the 

splines on the drive shaft within the cavity of the 

Head

5.  Insert the 

Blade Retaining Pin

 into the hole in the front, upper-right corner of the 

Shredder/Slicer Head

.  The longer leg of the 

Retaining Pin 

goes on the inside of the 

Blade

Figure 5

Shredder/Slicer 

Stomper

Blade

Shredder/

Slicer Head

Blade

Retaining 

Pin

Motor 

Unit

Head 

Locking 

Knob

NOTE: 

 The Shredder/Slicer Attachment cannot 

be used with meat products.

NOTE: 

Follow the “Food Safety Guidelines” in this 

manual and as outlined by the U.S. Food and Drug 

Administration (FDA) whenever using this appliance.  

Keep meat/food refrigerated and covered.  Do not 

let meat/food sit out any longer than is necessary for 

processing.

1.  Cut cheese, fruit or vegetables into pieces that 

will easily fit into the 

Shredder/Slicer’s

 feed chute. 

IMPORTANT:  

Remove pits, stems, shells 

and seeds before placing fruits or nuts into the 

Shredder/Slicer

 to avoid damaging the 

Blade

.


2.  Place a bowl or plate under the open end of the 

Shredder/Slicer Head

 to collect 

food as it exits.

3.  Make sure the 

Motor Unit

 is turned “off.”  Connect the 

Motor Unit

 to an electrical outlet.

4.  Turn the 

Motor Unit

 “on.” 

5.  Feed food into the

 Shredder/Slicer Head

.

6.  Use the 

Stomper

 to push food into the 

Shredder/Slicer Head

.  

NEVER use 

your fingers!  NEVER reach into the Blade opening! 

HELPFUL HINT:

  If the 

Blade

 fills with food, turn the 

Motor Unit

 “off” and disconnect 

it from the electrical outlet.  Use a rubber spatula or a wooden spoon to scoop food 

out of the

 Blade 

into the bowl.  

NEVER use your fingers!  NEVER reach into the 

Blade opening! 

USING THE SHREDDER/SLICER 

Not included with all grinders.

WARNING!  

Before cleaning, assembling or disassembling the 

Grinder

, make sure 

it is turned “off” and disconnected from the power source.  Test to make sure there is 

no power to the 

Grinder

 by switching the 

Motor Unit

 “on” and “off.”

Follow all of the Safety Rules 

and Warnings in this manual 

whenever using this appliance.

Never leave this 

appliance unattended. 

Disconnect from power supply 

when not in use.

WARNING!

Keep fingers, hands, 

other body parts and 

foreign objects away 

from the inlet during 

operation!

Only use the provided 

stomper to push food into 

the appliance.

Keep children away!

Summary of Contents for 82-0101-W

Page 1: ...do not operate properly or for product returns please contact Weston Products LLC Phone 1 800 814 4895 Outside the U S 440 638 3131 Mail 20365 Progress Drive Strongsville Ohio 44149 E Mail CustomerService WestonProducts com Web Site WestonProducts com All Trademarks and Registered Trademarks are property of the respective companies SAVE THESE INSTRUCTIONS Refer to them often and use them to instru...

Page 2: ... LIMITATIONS The warranty is void if the product is used for any purpose other than that for which it is designed The product must not have been previously altered repaired or serviced by anyone else other than Weston Products LLC If applicable the serial number must not have been altered or removed The product must not have been subjected to accident in transit or while in the customer s possessi...

Page 3: ...4 Bushing Set 2 pieces 82 0114 5 Plastic Washer 82 0116 6 Auger 82 0112 7 Knife 82 0117 8 Stuffing Funnel 82 0113 9 Stainless Steel 3 mm Fine Grinding Plate 82 0121 10 Stainless Steel 5 mm Medium Grinding Plate 82 0122 11 Stainless Steel 7 mm Coarse Grinding Plate 82 0123 12 Front Ring Nut 82 0118 13 Shredder Slicer Attachment Kit 82 0105 W a Stomper b Shredder Slicer Head c Stainless Steel Fine S...

Page 4: ...u are making at a ratio of 1 pound 0 5 kg of fat for every 4 pounds 1 8 kg of game meat The fat content of your sausage will affect the taste texture cooking characteristics and shelf life of your product Most commercially made sausage has a fat content of about 20 Using less than 12 fat will result in a very dry tasting sausage while using more than 20 may result in a sticky flavorless sausage th...

Page 5: ...EPARATE Foods that will be eaten uncooked and foods that will be cooked before eating MUST ALWAYS be separated Cross contamination occurs when raw meats or eggs come in contact with foods that will be eaten uncooked This is a major source of food poisoning Always double wrap raw meats and place them on the lowest shelf in the refrigerator so there is no way juices can drip onto fresh produce Then ...

Page 6: ...tomatoes cup extra virgin olive oil cup white onions cup finely chopped celery 1 tsp sugar 1 tbsp fine sea salt Core and quarter the tomatoes then run them through the Tomato Fruit Strainer Attachment to yield fresh tomato puree Chop the onion using the Coarse Shredder Blade in the Shredder Slicer Attachment Heat the olive oil over a medium heat in a large pan Add the onions and celery and sauté u...

Page 7: ...ks TRADITIONAL GRILLED BURGER PATTIES 1 lb 0 7 kg beef cup onion 1 tsp salt 1 tsp Worcestershire sauce cup evaporated milk 1 tsp ground pepper Grind the beef through the Coarse Grinder Plate then the Medium Grinder Plate Chop the onion using the Coarse Shredder Blade in the Shredder Slicer Attachment Preheat grill Combine all the ingredients Shape the mixture into patties about 3 4 1 9 cm thick Gr...

Page 8: ...the notches in the Grinder Head 5 Insert the Stuffing Funnel through the Front Ring Nut figure 3 6 Screw the Front Ring Nut Stuffing Funnel assembly onto the Grinder Head until firmly tight DO NOT over tighten the Front Ring Nut to avoid damaging the Grinder during operation 7 Loosen the Head Locking Knob on the side of the Motor Unit 8 Install the Grinder Head onto the Motor Unit figure 3 9 Tight...

Page 9: ... DO NOT operate the Grinder without the Tray in place 2 Twist or tie closed one end of the sausage casing You also can close and secure the end with a hog ring 3 Slide the open end of the casing onto the Stuffing Funnel until the entire casing is on the Funnel 4 Make sure the Motor Unit is turned off Connect the Motor Unit to an electrical outlet 5 Turn the Motor Unit on 6 Feed meat into the Grind...

Page 10: ...ly fit into the Shredder Slicer s feed chute IMPORTANT Remove pits stems shells and seeds before placing fruits or nuts into the Shredder Slicer to avoid damaging the Blade 2 Place a bowl or plate under the open end of the Shredder Slicer Head to collect food as it exits 3 Make sure the Motor Unit is turned off Connect the Motor Unit to an electrical outlet 4 Turn the Motor Unit on 5 Feed food int...

Reviews: