background image


G O -

4   E V   O p e r a t o r ’ s   M a n u a l

| 43 


Contact Westward Industries for Manuals and Documentation. Do not copy.


5.3 Brake Fluid  

 
Under normal circumstances, your vehicle should not 
use brake fluid. However, expect the level of the 
brake fluid to slowly fall as you put more mileage on 
your vehicle and the brake pads wear. Check the 
brake fluid at least once a year. This is done by 
looking at the fluid level in the plastic see-through 
reservoir on the master cylinder. The fluid level 
should be at or slightly below the maximum line. The 
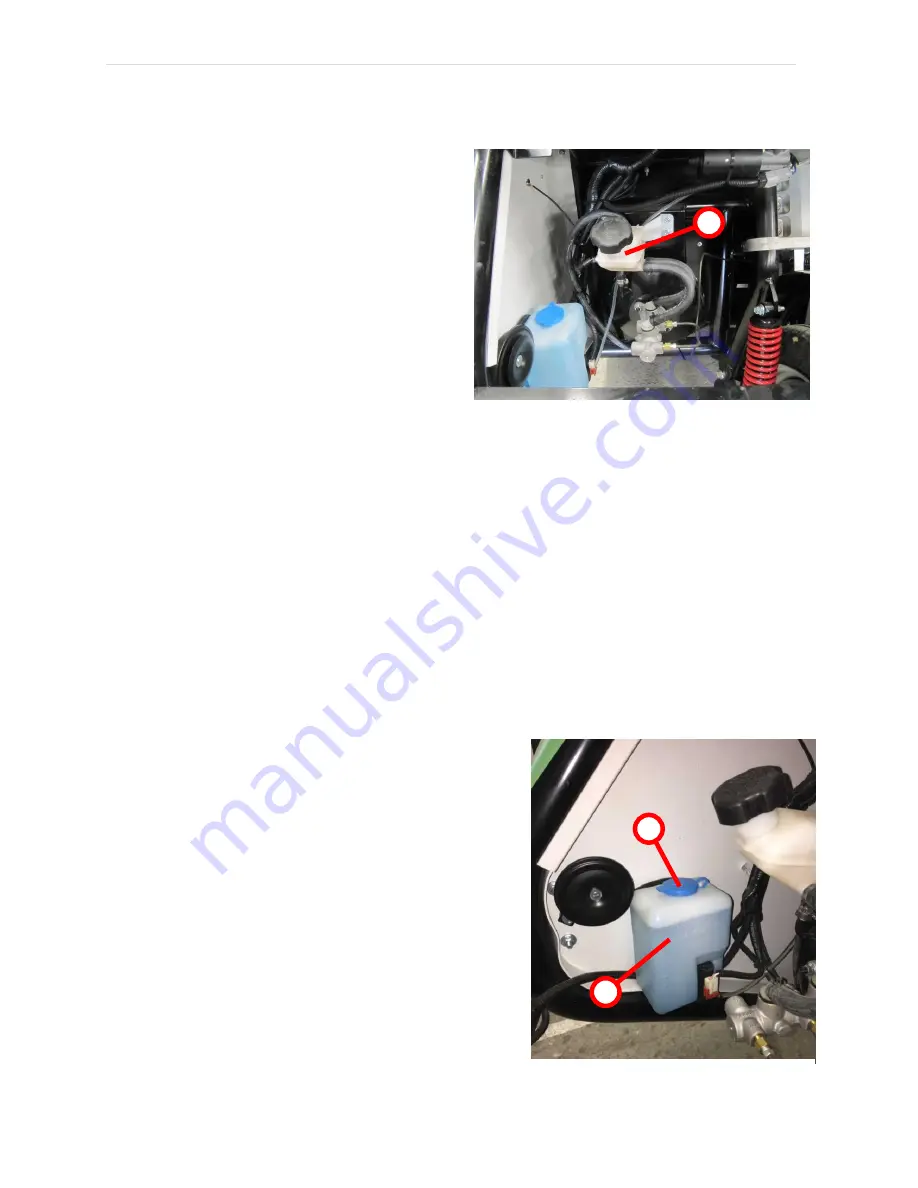
brake fluid reservoir (A) is located under the front 
hood on the right side of the vehicle. 
 

WARNING

:


If you use brake fluid that is not DOT-3 

or DOT-4, you will cause permanent damage to your 
brakes. Never reuse brake fluid that has been 
drained from the system or that has been allowed to 
stand in an open container for an extended period of 
time.  


WARNING:

 Do not let the reservoir for the master cylinder run dry. This may cause the brakes to fail.  


Adding Fluid  

  
If the fluid is low: 
 

1.


Carefully clean and remove the cap from the reservoir.  

2.


Fill the reservoir to the maximum line with a DOT-3 or DOT-4 brake fluid. 


WARNING:


Do not fill the reservoir above the maximum line. 


5.4 Windshield Washer Fluid  

 
The windshield washer fluid reservoir (A) is located under the 
front hood of the vehicle on the right side. To add fluid, 
remove the cap (B) and fill as necessary. 
 

WARNING:


Windshield washer fluid is a poisonous and 

hazardous substance. Read and follow all warnings and 
instructions associated with the product you are using. 
 

WARNING:


Do not use add any substances other than 

windshield washer fluid to the reservoir. Other substances 
could smear on the windshield or freeze, reducing visibility or 
they could damage your vehicle. 
 

WARNING: 

Check that the freezing point of the windshield 

washer fluid being used is adequate for the climate/season.


Figure 37: Brake Fluid Reservoir Location


Figure 38: Windshield Washer Fluid Reservoir


Summary of Contents for GO-4 EV INTERCEPTOR IV

Page 1: ...ved TASK SPECIFIC VEHICLES GO 4 EV INTERCEPTOR IV SPACE SAVING ERGONOMICAL EFFICIENT 100 ELECTRIC TAILOREDDESIGN RETURN ONINVESTMENT DOMESTICALLY BUILT OPERATOR S MANUAL 7 010 002 Rev 03 Westward Indu...

Page 2: ...G O 4 E V O p e r a t o r s M a n u a l 2 Contact Westward Industries for Manuals and Documentation Do not copy...

Page 3: ...thin this manual The content of this manual is protected by copyright No part of this manual may be copied or reproduced in any way without the consent of Westward Industries Ltd IMPORTANT SAFETY NOTI...

Page 4: ...G O 4 E V O p e r a t o r s M a n u a l 4 Contact Westward Industries for Manuals and Documentation Do not copy...

Page 5: ...stem 21 3 3 3 Econo Mode Switch 22 3 3 4 Auxiliary Switches 22 3 3 5 Lateral Thrust Alarm LTA 22 3 4 Steering Column Controls 23 3 4 1 Left Multifunction Steering Column Stalk 23 3 4 2 Right Steering...

Page 6: ...cal Range Scenarios 38 4 8 Tire Pressure 39 5 SERVICE AND MAINTENANCE 40 5 1 Lifting the Vehicle 40 5 1 1 Using a Jack 40 5 1 2 Using a Hoist 41 5 2 Towing 42 5 3 Brake Fluid 43 5 4 Windshield Washer...

Page 7: ...charged by 120 volt Level 1 or 240 volt Level 2 current Electric vehicles have less moving components than traditional gas engines and are overall more reliable Greater care and attention must be paid...

Page 8: ...tions A Operating Speed Warning Decal B Towing Warning Decal C General Vehicle Operation Warnings Decal D Electrocution Shock Hazard Decal E Electrocution Shock Hazard Decal F Electrocution Shock Haza...

Page 9: ...rd Industries for Manuals and Documentation Do not copy 1 3 2 Decal Images and Descriptions A Operating Speed Warning Decal Specifies maximum safe vehicle operating speed B Towing Warning Decal Warns...

Page 10: ...ration and informs the operator of hazards associated with operation of the vehicle D Electrocution Shock Hazard Decal Warns that only trained technicians may service the high voltage control box Warn...

Page 11: ...pack and disconnect the BMS connectors in the high voltage control box F Electrocution Shock Hazard Decal Warns not to open the cover for the charger as the high voltage present in charger may cause...

Page 12: ...ocation of Lateral Thrust Alarm LTA I Jacking Location Decals Indicate locations of jacking points J Air Conditioning System Warning and Information Decal Warns that only trained service technicians a...

Page 13: ...The LTA monitors vehicle stability and will sound a warning buzzer and illuminate a dash mounted indicator light if the vehicle is operating on too much of a slope or if a corner is taken at too high...

Page 14: ...en A High Beam Indicator B Service Required Alert C Drive Locked Alert D Parking Brake Indicator Brake System Warning Light E Voltage Indicator For 12 Volt Auxiliary Battery F Speedometer G Motor temp...

Page 15: ...ked check brake fluid level Check all brake components for leaks 4 If any leaks are found if warning light continues to stay on or the brakes do not operate properly do not drive vehicle Have your veh...

Page 16: ...IMPORTANT You should no longer continue driving at 0 SOC as it will damage the battery If 0 is reached park the vehicle and call a tow truck After a full charge your SOC state of charge should be near...

Page 17: ...down left right and select enter display buttons to navigate view and modify settings The LCD Settings screen sets the display s backlight brightness Setting 1 is the dimmest lighting and 10 is the b...

Page 18: ...ice technicians only If the right button is pressed while the instrumentation screen showing on the digital display diagnostic screens will appear An example is shown to the right To return to the ins...

Page 19: ...llows all accessories and electric motor to engage After releasing forward pressure on the key it will automatically return to the on position 3 2 1 Ignition Procedure As electric motors are very quie...

Page 20: ...ease always use your parking brake when parking the vehicle Relying on the EMB will result in premature wear and replacement Forward Following the ignition procedure forward drive may be selected To d...

Page 21: ...e to indicate the A C is on 3 Turn the temperature control dial B to a cool or cold setting Heater To activate heater 1 Pull the black slider A fully outwards 2 Ensure the A C button C is not depresse...

Page 22: ...right side of the dash operate the roof mounted work lights as well as various customer installed options A 12 volt power socket is located next to the auxiliary switches For connecting the roof light...

Page 23: ...stalk away from you until it latches then release the stalk The blue high beam indicator on the dash will illuminate when the headlamps are on the high beam setting To change your headlamps from high...

Page 24: ...dash and does not permit enough room to loosen pull on the lever away from the column and reposition the lever pointing away from the dash and push back in 3 4 4 Hazard Flasher Button The hazard flas...

Page 25: ...edals 3 7 1 Accelerator Pedal The accelerator pedal is the right pedal Press the pedal to accelerate Idle position is when no force is being applied to the pedal WARNING At idle electric motors are mu...

Page 26: ...de e g to provide ventilation without affecting door operation and safety Door Open door by pulling on lower red handle and sliding the door back on its tracks Close door by pushing on the upper red h...

Page 27: ...he bottom cushion CAUTION Do not put pressure on the seat back while attempting to lift lever as this could bind the system Premium Seat Option Vehicles may be equipped with and air ride air adjustabl...

Page 28: ...support Upper Lumbar Support Adjustment Use the rearmost rocker switch to adjust upper lumbar support Press the top side of the switch to increase upper lumbar support press the bottom side to reduce...

Page 29: ...into the open end of the buckle A noticeable click will indicate the seat belt is securely locked To unfasten seat belt 1 Push button on buckle end to release 2 The tongue end will automatically retur...

Page 30: ...her vehicles will not easily hear the vehicle approach Distracted Driving Distracted driving comes in many forms which can remove your attention from the road Always exercise good judgement and make s...

Page 31: ...ans that the wheels can lock under heavy braking in normal traction conditions or under moderate to light braking if traction is significantly reduced When a wheel locks it stops rotating and skids ac...

Page 32: ...vehicle Do not attempt to drive through deep puddles areas with lots of flowing water or flooded areas You could get stuck The current of the flowing water could carry you or the vehicle away Debris...

Page 33: ...the drive selector switch is in park and the parking brake is set 2 If the vehicle has been charging disconnect the charging cable 3 Do a quick exterior check a Check the overall condition of vehicle...

Page 34: ...ehicle on hills the magnetic brake will engage if it senses the vehicle moving in the opposite direction of your drive selection If for example while driving uphill in forward the vehicle is slowed an...

Page 35: ...rent NEVER attempt to check any connections on the high voltage battery This must be checked by qualified technicians only WARNING The vehicle cannot be moved while charging WARNING Be sure to always...

Page 36: ...dicated circuit Level 2 charging with a charge cord can be used with a dedicated 240V 20 amp AC plug and circuit Level 2 charging with a dedicated hardwired EVSE electric vehicle supply equipment Leve...

Page 37: ...rger towards the end of the charge cycle Typically balancing starts when the main battery pack is about 80 fully charged NOTE Balancing continues until all cells are balanced and may continue after th...

Page 38: ...ecirculate air to maximize efficiency Using the heater or air conditioning continuously at the highest setting can reduce range by as much as 30 50 Use econo mode Do not leave AC radio additional ligh...

Page 39: ...example driving at a constant speed which puts a stable load on the battery is much more efficient compared to driving with hard acceleration and braking Although lithium ion phosphate batteries are a...

Page 40: ...ntire vehicle needs to be lifted off the ground use a hoist Do not lift either rear tire more than 1 in 25 mm off the ground Do not lift the front tire more than 6 in 152 mm off the ground Use the cor...

Page 41: ...hoist are not the same as the jacking points The correct hoist lift points are on the outer chassis tubes under the driver compartment These points are outlined in red in the image below The vehicle...

Page 42: ...re to take the following precautions Do not permit anyone to ride in the GO 4 EV while it is being towed Drive at a reduced speed Turn slowly and carefully Avoid any abrupt driving maneuvers Avoid ste...

Page 43: ...e WARNING Do not let the reservoir for the master cylinder run dry This may cause the brakes to fail Adding Fluid If the fluid is low 1 Carefully clean and remove the cap from the reservoir 2 Fill the...

Page 44: ...A DOT Quality Grades TREADWEAR Numerical Value TRACTION AA A B C TEMPERATURE A B C All Passenger Car Tires Must Conform to Federal Safety Requirements in Addition to These Grades Treadwear The treadw...

Page 45: ...vels of performance on the laboratory test wheel than the minimum required by law Warning The temperature grade for this tire is established for a tire that is properly inflated and not overloaded Exc...

Page 46: ...off the ground having the vehicle in the park drive mode will not prevent the vehicle from moving and possibly slipping off the jack To prevent inadvertent vehicle movement while changing a tire alway...

Page 47: ...starting this procedure 1 Break wheel lug nuts loose but do not remove 2 Raise vehicle Refer to section 5 1 Lifting the Vehicle and follow all warnings and guidelines in the section 3 Remove four lug...

Page 48: ...vehicle the tougher they are to remove Wash your vehicle often to prevent dirt salt chemicals and other material from damaging the paint and other finishes This is particularly important in areas whe...

Page 49: ...the battery in good operating condition will void the manufacturer s warranty Do not leave the unit for many days at a severely depleted charge At Least Twice a Year Check windshield wiper operation...

Page 50: ...gs Clean and inspect condition of the electromagnetic brake Visually inspect high voltage wiring for wear Clean battery connections and terminals on 12V auxiliary battery Clean door rail guides Lubric...

Page 51: ...V DC accessory port for phone radio etc LTA lateral thrust alarm safety device Optional rear view back up camera SEAT One passenger adjustable forwards and backwards adjustable back and headrest 3 poi...

Page 52: ...or agent to follow up any warranty claim Items not covered by warranty 1 Vehicles subject to misuse neglect negligence or accident 2 Normal service work beyond the repair and replacement of defective...

Page 53: ...G O 4 E V O p e r a t o r s M a n u a l 53 Contact Westward Industries for Manuals and Documentation Do not copy 7 2 Warranty Statement...

Page 54: ...anual Ensure proper lubrication of all components Maintain the correct tire air pressure Properly maintain and charge the battery in an appropriate environment Maintain proper documentation 8 1 Change...

Page 55: ...l 55 Contact Westward Industries for Manuals and Documentation Do not copy Personal Information Name Address Telephone Fax Local Westward Industries GO 4 Dealer Name Address Service Manager Telephone...

Page 56: ...f NHTSA receives similar complaints it may open an investigation and if it finds that a safety defect exists in a group of vehicles it may order a recall and remedy campaign However NHTSA cannot becom...

Reviews: