background image


12 

Operation 

  After  the  power  plug  and  the  soldering  iron  have  been  plugged  in 

and  the  soldering  iron  has  been  placed  in  the  stand,  turn  on  the 
soldering station with the ON/OFF switch (5). 

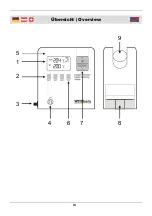
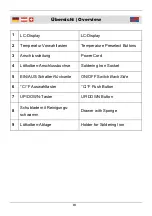
  In the display  (1)  you can see the current temperature in the upper 

line  and  the  preselected  temperature  in  the  lower  line.  The  prese-
lected  temperature  can  be  set  with  the  buttons 

“200°  C”,  “300°  C”, 

“400° C” and “UP, Down”. To change the scale from °C to °F or vice 
versa, press the “°C/°F” button (6). The scale in the display changes 
accordingly. 


After  you  have  pressed  e.g.  the  “300°  C”  button,  the  selected 
temperature is displayed as “SET 300° C” and the upper value to the 
right  of  “Temp.”  climbs  to  300°  C.  Meanwhile,  at  the  right  of  the 
display 

“HEAT  ON”  and  “WAIT”  will  be  displayed until  the  set  tem-

perature has been reached.  


“WAIT” appears in the display while the temperature of the soldering 
iron  is  increased  or  lowered.  Temperature  shifts  of  around  10°C 
around the set value are normal. 


With the “+ UP” and “DOWN –” button (7) you can set the tempera-
ture  with  a  resolution  of  1°  C  or  2°  F.  To  do  so,  briefly  press  the 
respective button. The set temperature will increase or decrease by 
1° C respectively 2° F. If you hold the button, the display will change 
in  steps  of  10°  C  /  18°  F.  When  the  desired  value  is  reached,  just 
release the button. 

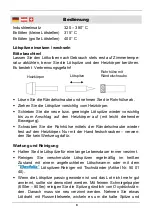
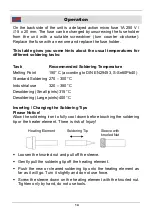
  Select  the  right  temperature  for  every  job  to  avoid  cold  soldering 

joints  or  damaging  delicate  components  or  burning flux  with  exces-
sive heat. Burnt flux will cause weak joints. 

In  electronic  circuitry 

  solder  with  a  colophony  flux  core  is  used. 

This  is  because  colophony  is  not  a  conductor  and  can  not  cause  a 
short-out  on  the  circuit  board.  Suitable  solder  can  be  ordered  from 

 under the article number 46 01 13 (100 g spool with 1 mm 

diameter) and additional colophony under the article number 88 53 68. 

In electrics and electronics 

 solder without a flux core and separate 

flux is used for less delicate work. Because flux can cause short-outs, 
residual  flux  must  be  cleaned  off  with  a  cloth  or  a  brush  and  alcohol. 
Otherwise, the flux might cause a short-out. 

Summary of Contents for 688044

Page 1: ...Digitale L tstation 24 V 48 W Artikel Nr 68 80 44 Digital Soldering Station 24 V 48 W Article No 68 80 44 Bedienungsanleitung Instruction Manual...

Page 2: ...ppropriately and help prevent misunderstandings and possible damage or injury F r L tarbeiten an empfindlichen Elektronikbauteilen besitzt diese L tstation einen Niedervolt L tkolben Mit Hilfe des pra...

Page 3: ...III bersicht Overview 1 2 3 4 7 8 9 6 5...

Page 4: ...g Power Cord 4 L tkolben Anschlussbuchse Soldering Iron Socket 5 EIN AUS Schalter R ckseite ON OFF Switch Back Side 6 C F Auswahltaster C F Push Button 7 UP DOWN Taster UP DOWN Button 8 Schublade mit...

Page 5: ...ng the Soldering Tips Page 13 Cleaning and Maintenance Page 14 Technical Data Page 15 Sicherheitshinweise Seite 2 Allgemeine Hinweise Seite 2 Erste Schritte Seite 3 In Betrieb nehmen Seite 4 Ausschalt...

Page 6: ...charfe Ecken und Kanten oder hei e Oberfl chen Ber hren Sie keine hei en Teile W hrend des Betriebs ist die Temperatur des L tkolbens sehr hoch Vorsicht bei Gebrauch des L tkolbens in der N he brennba...

Page 7: ...ie das Ger t niemals in Fl ssigkeiten Verwenden Sie das Ger t nicht zur Erhitzung von Fl ssigkeiten oder Kunststoffen Zerlegen Sie das Ger t nicht und unternehmen Sie keine Repara turversuche Das Ger...

Page 8: ...Sie jetzt den L tkolben in den Ablagest nder der L tkolben halterung 9 ab und stecken Sie nun das Anschlusskabel in die Anschlussbuchse 4 der L tstation Achten Sie darauf dass die Aussparung am Steck...

Page 9: ...Taste C F 6 Es ndert sich darauf die Einheit im Display Sobald Sie z B die Taste 300 C gedr ckt haben erscheint im Display die gew hlte Temperatur SET 300 C und der obere Wert rechts neben Temp steigt...

Page 10: ...elseele mit Zuhilfenahme von L tfett verwendet Da L tfett elektrisch leitend ist sollten die Reste nach den Arbeiten mit z B Spiritus und einem Lappen B rste entfernt werden Ansonsten k nnte das verbl...

Page 11: ...aus Hinweis Die L tstation merkt sich auch nach dem Ausschalten die zuletzt eingestellte bzw vorgew hlte Temperatur Sicherungswechsel Trennen Sie vor Beginn des Sicherungswechsels den Netzstecker von...

Page 12: ...Sie die Rohrh lse mittels der R ndelschraube wieder fest auf den Heizk rper Nur mit der Hand festschrauben verwen den Sie kein Werkzeug daf r Wartung und Reinigung Halten Sie die L tspitze f r eine l...

Page 13: ...l und ein leicht angefeuchtetes Tuch und lassen Sie das Ger t bis zur n chsten Benutzung vollst ndig trocknen Benutzen Sie zur Reinigung keine aggressiven Reinigungssubstan zen oder hnliches Technisch...

Page 14: ...very hot during operation Be extra careful when using the soldering gun around combustible materials Place the soldering station on a solid level surface During soldering harmful fumes may escape Wor...

Page 15: ...n the soldering station Make sure the notch in the plug faces up when you plug it in Tighten the retaining ring by turning clockwise Before use make sure the mains voltage in your area corresponds to...

Page 16: ...d the set value are normal With the UP and DOWN button 7 you can set the tempera ture with a resolution of 1 C or 2 F To do so briefly press the respective button The set temperature will increase or...

Page 17: ...oldering Station OFF After work allow some solder to melt on the soldering tip This is to protect the soldering tip during the period of non use Excess solder can be wiped off on the wet cleaning spon...

Page 18: ...Soldering 270 300 C Industrial use 320 380 C Desoldering Small joints 315 C Desoldering Large joints 400 C Inserting Changing the Soldering Tips Please Notice Allow the soldering iron to fully cool d...

Page 19: ...emery cloth After that the tip must be tinned again Roll some solder with a flux core around the tip and heat up the tip until the solder has molten around the tip Using additional colophony may be h...

Page 20: ...mperature 150 450 C 302 842 F Dimensions Station WxDxH 120 x 104 x 137 mm Dimensions Holder Soldering Iron 90 x 123 x 137 mm Weight 1400 g Spare soldering tips Soldering tips pencil point 0 6 mm for S...

Page 21: ...e basic requirements which are defined in the European Directives and their amendments 2011 65 EU 2011 65 EU Beschr nkung der Verwendung bestimmter gef hrlicher Stoffe in Elektro und Elektronikger ten...

Page 22: ...onsist of valuable materials which can be recycled Please do not discharge it in the garbage bin but check with your local council for recycling facilities in your area Entsorgung Disposal Deutschland...

Reviews: