background image


10 

Operation 

3.  Turn off the soldering station with the mains switch (11) and  allow 

the unit to fully cool down before storing. 

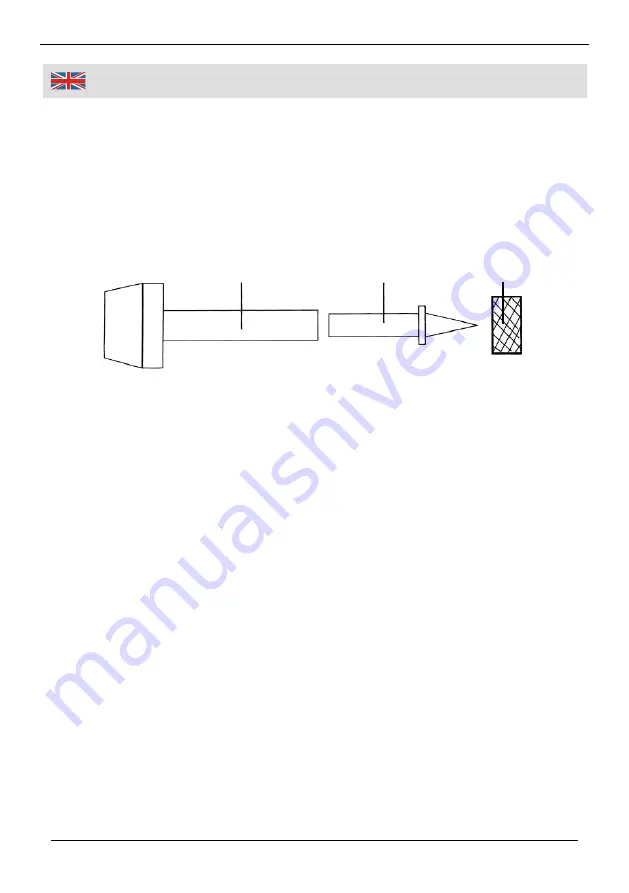
Inserting/Changing the Soldering Tip 

Please Note! 

Allow the soldering  iron to cool down  after  use before 

touching the soldering tip or the heating element. There is risk of Injury! 


1.  Turn the knurled nut (5) counter clockwise and remove it.  Now 

gently pull the soldering tip (4) out of the heating element (6). 

2.  Set the new or the cleaned soldering tip into the heating element as 

far as it will go. 

3.  Firmly screw the knurled nut on the heating element.  Do not over 

tighten – do not use tools, tighten by hand only. 


Only use replacement soldering tips recommended by Westfalia. 

Maintenance, Cleaning and Storing 

  Always keep the soldering tip coated with tin for a long service life. 

  Clean dirty soldering tips using the moistened  cleaning  sponge  (9) 

while the soldering iron is hot. 

  If the soldering tip became hard to wet, use solder and flux to 

reactivate it. Wrap some solder with included flux around the cold tip 
and heat the tip until the solder melts. 

  Regularly clean oxidation off the soldering tip after dismounting with 

fine emery paper (600 – 800 grain). This kind of residue also forms 
in the heating  element  –  carefully blow out.  After cleaning,  the 
soldering tip must be coated with tin as described above. 

Heating Element 

Soldering Tip 

Knurled Nut


Summary of Contents for 81 40 17

Page 1: ...Temperaturgeregelte Lötstation Artikel Nr 81 40 17 Temperature controlled Soldering Station Article No 81 40 17 Bedienungsanleitung Instruction Manual ...

Page 2: ...and keep it for future reference Bedienungsanleitungen enthalten wichtige Hinweise für den Umgang mit Ihrem neuen Produkt Sie ermöglichen Ihnen alle Funktionen zu nutzen und sie helfen Ihnen Missverständnisse zu vermeiden und Schäden vorzubeugen Bitte nehmen Sie sich die Zeit diese Bedienungsanleitung in Ruhe durchzulesen und bewahren Sie diese für späteres Nachlesen gut auf Sehr geehrte Damen und...

Page 3: ...III Übersicht Overview 8 7 6 5 4 3 9 10 11 1 2 ...

Page 4: ...ring Iron Stand 4 Lötspitze Soldering Tip 5 Rändelschraube Knurled Nut 6 Heizkörper Heating Element 7 Isolierter Handgriff Isolated Handle 8 Verbindungskabel Connection Cord 9 Reinigungsschwamm Cleaning Sponge 10 Temperaturregelung Temperature Dial 11 Netzschalter Mains Switch Übersicht Overview ...

Page 5: ...4 Ausschalten Seite 5 Lötspitze einsetzen wechseln Seite 5 Wartung Reinigung und Lagerung Seite 5 Technische Daten Seite 16 Safety Notes Page 7 Before first Use Page 9 Start up and Operation Page 9 Switching off the Unit Page 9 Inserting Changing the Soldering Tip Page 10 Maintenance Cleaning and Storing Page 10 Technical Data Page 16 ...

Page 6: ...rät nicht benutzen es sei denn sie werden durch eine Betreuerin einen Betreuer beauf sichtigt und unterwiesen Lassen Sie Kinder nicht mit dem Gerät spielen Es ist kein Spielzeug Überzeugen Sie sich dass die Netzspannung mit den Angaben auf dem Typenschild übereinstimmt Das Gerät ist für den Einsatz bis 2000 m über Meereshöhe ausgelegt Führen Sie das Netzkabel nicht über scharfe Ecken und Kanten od...

Page 7: ...ondern erfassen Sie stets den Netzstecker Lassen Sie das Gerät komplett abkühlen bevor Sie es reinigen oder lagern Wechseln Sie Lötspitzen nur im kalten Zustand Benutzen Sie das Gerät nicht im Freien Tauchen Sie das Gerät niemals in Flüssigkeiten Bei Beschädigungen am Gerät oder des Netzkabels darf das Gerät nicht weiter benutzt werden und muss von einer Fach kraft repariert werden Zerlegen Sie da...

Page 8: ...inn gedreht wird desto höher wird die Temperatur an der Lötspitze 3 Die Lötspitze 4 wird nun über den Heizkörper 6 aufgewärmt 4 Vor dem ersten Einsatz muss die Lötspitze verzinnt werden Geben Sie dazu bei Erreichen der Schmelztemperatur des Lötzinns etwas Lötzinn auf die Lötspitze und lassen Sie es zu einem gleichmäßigen dünnen Film zerfließen Dieser muss die gesamte Lötspitze umge ben 5 Verwenden...

Page 9: ...uf Zimmertemperatur abkühlen bevor Sie die Lötspitze und den Heizkörper berühren Verbrennungsgefahr 1 Drehen Sie die Rändelschraube 5 gegen den Uhrzeigersinn ab Ziehen Sie nun die Lötspitze 4 vorsichtig aus dem Heizkörper 6 2 Setzen Sie die neue bzw gereinigte Lötspitze vorsichtig bis zum Anschlag in den Heizkörper ein 3 Schrauben Sie die Rändelschraube wieder fest auf den Heizkörper Schrauben Sie...

Page 10: ...t das Gerät den vollen Leistungsumfang behält Ersatz spitzen erhalten Sie bei Westfalia Ziehen Sie vor jeder Reinigung den Netzstecker und lassen Sie das Gerät vollständig abkühlen Zum Reinigen des Gerätes verwenden Sie nur einen Staubpinsel und ein leicht angefeuchtetes Tuch und lassen Sie das Gerät bis zur nächsten Benutzung vollständig trocknen Benutzen Sie zur Reinigung keine aggressiven Reini...

Page 11: ...children play with this device It is not a toy Make sure the voltage corresponds to the type label on the electric device The unit is designed for operation in altitudes of up to 2000 m above sea level Do not run the power cord around sharp edges or over hot surfaces Do not touch any hot surfaces The soldering tip becomes very hot during operation Do not operate the soldering iron near combustible...

Page 12: ...xchange soldering tips only while it is cold Do not use the unit outdoors Do not immerse the unit in liquids of any kind Do not continue using the unit after it or the power cord have been damaged Have it repaired by a professional Do not disassemble the unit and do not attempt to repair it yourself It does not contain any parts serviceable by you In case of questions or problems turn to our custo...

Page 13: ...he soldering tip 4 4 Before first use the soldering tip must be tinned To do this let some solder melt on and flow around the tip The entire soldering tip must be evenly coated with a thin coat of solder 5 Use the according soldering temperature for each job So you can avoid cold soldering joints as well as excessive soldering tempera tures This may burn the flux and lead to bad soldering joints a...

Page 14: ...ver tighten do not use tools tighten by hand only Only use replacement soldering tips recommended by Westfalia Maintenance Cleaning and Storing Always keep the soldering tip coated with tin for a long service life Clean dirty soldering tips using the moistened cleaning sponge 9 while the soldering iron is hot If the soldering tip became hard to wet use solder and flux to reactivate it Wrap some so...

Page 15: ...nit to dry completely before next use Do not use abrasives or aggressive chemicals or similar cleaning agents Store the unit indoors in a dry place that is protected from dust dirt and extreme temperatures Store the unit out of reach of children This table gives you some hints about the usual temperatures for several soldering tasks Task Recommended Soldering Temperature Melting Point Approx 220 C...

Page 16: ...r une personne responsable de leur sécurité ou reçoivent les instructions d utilisation Ne laissez pas les enfants jouer avec l appareil Ce n est pas un jouet Assurez vous que l alimentation correspond aux spécifications sur la plaque signalétique L appareil est conçu pour une utilisation jusqu à 2000 m au dessus du niveau de la mer Ne pas passer le cordon d alimentation sur des arêtes vives ou de...

Page 17: ...areil refroidir complètement avant de le nettoyer ou le stockage Changer les pointes de soudure seulement lors qu elles sont froides Ne pas utiliser l appareil à l extérieur Ne pas plonger l appareil dans un liquide En cas de dommage à l unité ou le cordon d alimentation l appareil ne peut pas être utilisé et doit être réparé par un professionnel Ne démontez l appareil et n essayez pas de le répar...

Page 18: ...ppure senza aver ricevuto istruzioni sull utilizzo dell apparecchio Non lasciare che i bambini giochino con l apparecchio Non è un giocattolo Assicurarsi che l alimentazione corrisponda alle specifiche sulla targhetta Il dispositivo è progettato per l utilizzo fino a 2000 m al di sopra del livello del mare Non far passare il cavo di alimentazione su spigoli vivi o superfici calde Non toccare le pa...

Page 19: ...prima di pulirlo o di riporlo Modificare consigli solo quando è freddo Non utilizzare la macchina all aperto Non immergere l apparecchio in un liquido In caso di danni all unità o il cavo di alimentazione il dispositivo non può essere utilizzata e deve essere riparato da un professionista Non smontare mai il banco da lavoro o cercare di riparlo L attrezzo non contiene nessun pezzo che può essere r...

Page 20: ... Nennspannung 230 V 50 Hz Rated Voltage Leistungsaufnahme 40 48 W Nominal Power Schutzklasse I Protection Class Temperaturregelung 150 450 C Temperature Control Abmessungen BxTxH 155 x 145 x 130 mm Dimensions WxDxH Gewicht 656 g Weight ...

Page 21: ...ording to the basic requirements which are defined in the European Directives and their amendments 2011 65 EU 2011 65 EU Beschränkung der Verwendung bestimmter gefährlicher Stoffe in Elektro und Elektronikgeräten RoHS Restriction of the Use of certain hazardous Substances in electrical and electronic Equipment RoHS 2014 30 EU 2014 30 EU Elektromagnetische Verträglichkeit EMV Electromagnetic Compat...

Page 22: ...many of its components consist of valuable materials which can be recycled Please do not discharge it in the rubbish bin but check with your local council for recycling facilities in your area Deutschland Österreich Westfalia Westfalia Werkzeugstraße 1 Moosham 31 D 58093 Hagen A 4943 Geinberg OÖ Telefon 0180 5 30 31 32 Telefon 07723 4 27 59 54 Telefax 0180 5 30 31 30 Telefax 07723 4 27 59 23 Inter...

Reviews: