12
Start-Up
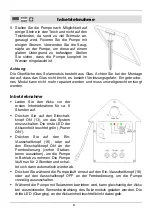
to decrease the water flow level. Additionally, the water flow level can be pre-
set by using the water flow controller (6) at the front side of the pump.
The LEDs (3) automatically light up in dark environment when the pump is
switched on.
Replacing the Batteries of the Remote Control
1. Before first use, remove the transport protection safety foil at the side of the
remote control.
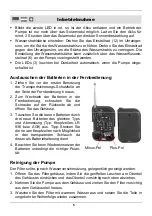
2. For replacing the batteries, loosen the
small screw at the rear side of the re-
mote. Carefully open the housing.
3. Replace the spent batteries with three
new ones of the same type and dimen-
sions (Type: Button Cells, LR 936 resp.
AG9). Hint: If possible, place the new
button cells in the transparent tube. The
tube serves as battery holder.
4. When reinserting the batteries into the
remote control observe the correct
polarity.
Cleaning the Pump
Clean the filter in regular intervals depending on the soiling of the water as
follows:
1. Depress the latches at the side of the pump housing and carefully remove the
upper part of the housing.
2. Remove the pump from the housing and pull the filter from the case.
3. Clean the filter in warm water and assemble the parts in reverse order.
4. Clean the riser pipe and the sprinkler elements in regular intervals with a
special brush for small tubes or with a pipe cleaner.
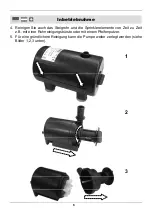
5. If you intend to clean the pump thoroughly, disassemble the pump as pictured
below (picture 1,2,3).
Minus-Pole
Plus-Pole


