2
3
QUICK START
Warning: Be sure the paintball marker is always pointed in
a safe direction. Read the following operating instructions
and WITHOUT LOADING ANY PAINTBALLS proceed several
times through the operating steps with your paintball mark-
er (dry fire the paintball marker at a safe target) so that
you will be able to operate the marker properly and safely.
Eye Protection: make sure everyone within range (200
yards) is properly protected from paintball impacts.
Tools Needed:
• 3/16” Allen key for velocity adjustment
• 1/16” Allen key for trigger adjustments
• 5/64” Allen key for grip panel / battery installation.
• 5/32” Allen key for feed neck tightening
A
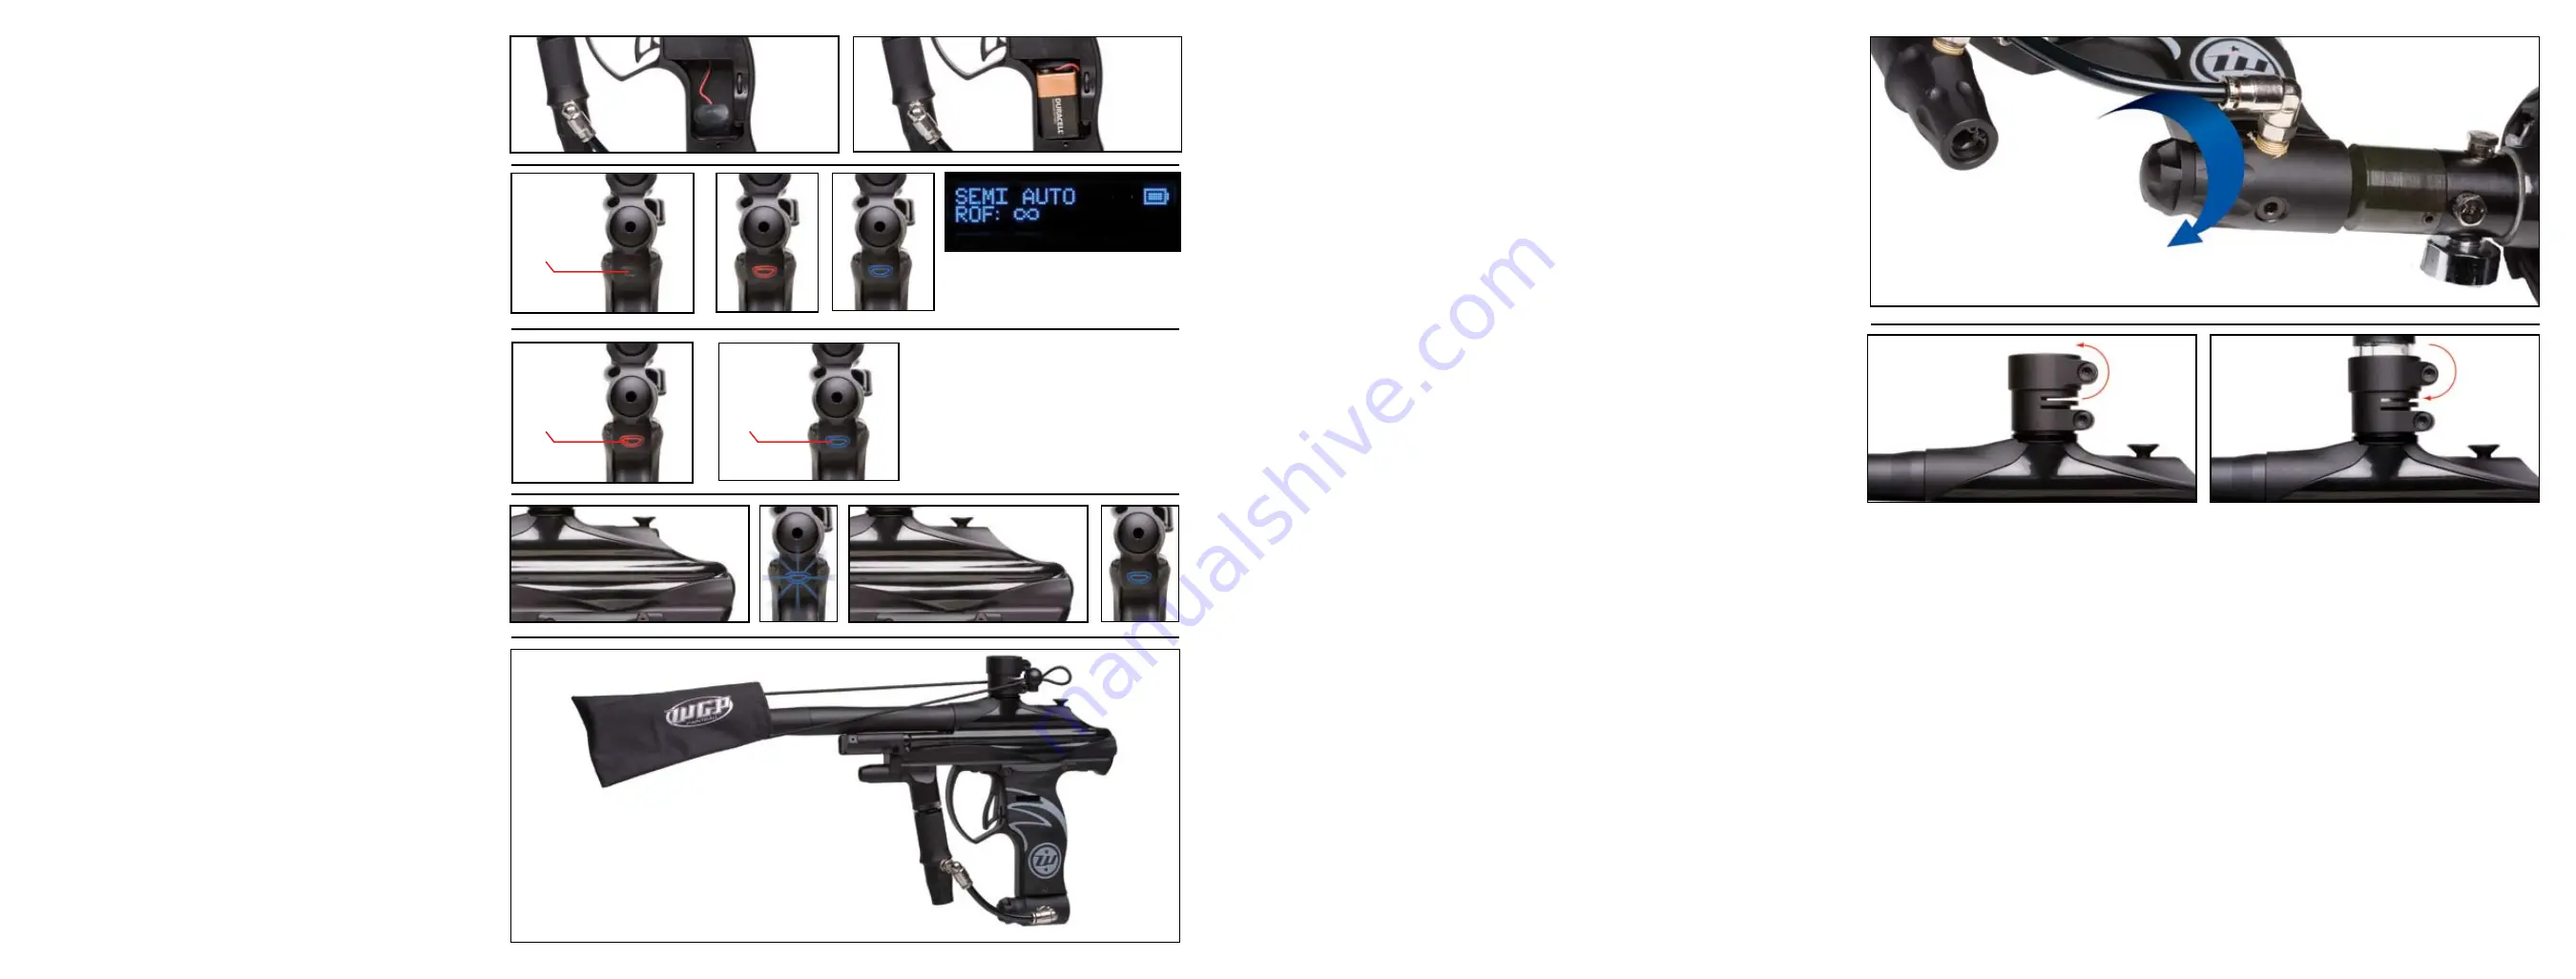
. Installing a 9V Battery: Use a 5/64” Allen key and remove the 3 screws on the left grip
panel. Pull the grip panel out to reveal the battery clip. Install a single 9 volt battery (not
included) to the battery clip and install in the marker. Reassemble the left grip panel and
tighten screws. PRO TIP: High performance (fast shooting) paintball markers work better with
high quality batteries.
B
. Switch the marker ON by pressing the rear push button located on the back of the grip
frame. Back LED will light up RED and BLUE momentary and then solid BLUE. OLED will also dis-
play mode, battery indicator, and rate of fire (ROF). The Break Beam Eyes will be ON. Warning:
Marker is live and ready to fire.
C
. Firing: pull the trigger and marker will make a “click” sound indicating a fire. With the
Break Beam Eyes ON, the marker will sound slow which is normal. To turn the Break Beam Eyes
OFF, press the rear push button located on the back of the grip frame and hold for 1.5 seconds.
When you see the back LED turn solid RED, release the push button. Pull the trigger and marker
will make a “click” sound indicating a fire. With the Break Beam Eyes OFF, marker should
sound much faster. To turn the Break Beam Eyes ON, press the rear push button and hold for
1.5 seconds. When you see the back LED turn solid BLUE, release the push button.
D
. Checking and Testing the Break Beam Eyes: When you first turn the marker ON, the Break
Beam Eyes will be on and ready, rear grip frame LED will be solid BLUE. With the Break Beam
Eyes ON, pull the bolt back past the eye sensor. The LED on the rear of the grip frame will flash
BLUE indicating the eyes are functional. Push the bolt forward blocking the eyes and the LED
will light up solid BLUE. Your Break Beam Eyes are functioning and ready for use. NOTE: you
can not check and test for eye function when you turn the Break Beam Eyes OFF (solid RED
LED on rear of grip frame), turn the eyes ON first before testing. If eyes are not functioning
properly, go to troubleshooting guide.
E
. Switching the marker OFF by pressing and holding the rear push button for at least 3
seconds, the OLED screen and rear LED will turn OFF signifying that the marker is OFF.
F
. Attach your barrel. Now attach the barrel sock by sliding the cover over the barrel and attach-
ing the strips to the marker’s feedneck or the rear of the frame. It is very important that the
barrel sock be attached when in an area where people are not wearing protective gear. Using
the barrel sock correctly is a very important paintball safety practice.
G
. Confirm marker is OFF prior to tank/air source install. Once you have a full compressed gas
cylin-der (High Pressure Compressed Air recommended) attach the cylinder to the marker via
the Bottom Line Air Source Adaptor (ASA) at the bottom of the grip frame. Screw the cylinder all
the way into the ASA until it stops. Turn the bottom line ON/OFF screw clockwise all the way in
to pressurize the marker.
H
. Attaching the loader is simple and will require a 5/32” Allen HEX key. Unscrew the top
screw on the clamping feed neck. Now attach the loader to the marker via the clamping feed
neck by press fitting the loader neck down into the feed neck. Note: make sure the loader is
pushed all the way down. Now tighten the screw on the feed neck so that the loader is held
securely in place and also make sure the screw holding the feed neck to the marker is secure.
I
. Firing paintballs and adjusting velocity: Before testing/adjusting velocity you must put on
your paintball goggle system, fill loader with paintballs and turn your loader ON (if electronic).
Always keep your marker pointed in a safe direc-tion. Always keep your marker OFF and barrel
cover on until you are ready to fire. When safe and ready to fire, remove barrel cover and turn
marker ON. Pull the trigger and fire the marker. Organized paintball fields require markers
to be chronographed to measure velocity. Your marker is preset to under 300 feet per second.
Adjust the velocity with a 1/4” Allen key by turning the HP regulator adjustment screw. Never
adjust your velocity above 300 feet per second. Velocity may also be adjusted by turning the
IVG cap on the back of the marker. With a 3/16” Allen key (included) turn the IVG in clockwise
to turn the velocity up. Additional detailed info available in the following owner’s manual.
Follow all rules specified by your organized paintball field. You are now ready for play. BE SAFE
and HAVE FUN!
A
B
On/Off
C
Push and hold
1.5 Sec Release
Push and hold
1.5 Sec Release
D
F
G
H
Summary of Contents for AUTOCOCKER SR
Page 1: ......
Page 9: ...12 13 SCHEMATIC s ...
Page 10: ...14 15 ...
Page 13: ...20 WORR GAME PRODUCTS 5818 El Camino Real Carlsbad CA 92008 800 587 2246 worr com ...


