


4
5
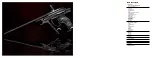
THE AUTOCOCKER SR
The latest addition to the WGP family of quality markers, the completely redesigned Autococker
SR now brings superior speed and reliability into its operating performance with high perfor-
mance rates of fire capable of exceeding 25+ BPS. The SR features include:
Electronic Features:
1. Quick Dial™ thumb dial knob for easy access to programming and fire modes.
2. OLED display screen
3. Break beam eyes with manual on/off
4. Completely programmable function and adjustments including: Debounce, Cycle percentage
filter, Anti-mechanical bounce, Ball in Place delay, Max rate of Fire, Ramp start, Breakout
Mechanical Features:
1. Closed bolt accuracy.
2. Ergonomic grip frame assembly
3. High speed MP5 ram assembly with integrated TRV (Turbo Relief Valves)
4. Redesigned front pneumatics assembly eliminating low pressure hoses
5. Dual soft rubber ball stops.
6. Gasket sealed front block.
7. Macroline quick release hose.
8. Internal pump rod.
9. Adjustable low and high pressure regulators
10. On/Off bottom line.
11. Clamping feed-neck.
12. 14” 2 piece barrel.
13. Fully adjustable trigger.
14. Quick release pull pin.
15. Redesigned light weight delrin bolt.
12 Fire Modes:
Mode 1 semi-automatic with an unlimited rate of fire
Mode 2 semi-automatic with an adjustable rate of fire
Mode 3 PSP auto-response
Mode 4 PSP 50% ramping
Mode 5 PSP 100% ramping
Mode 6 PSP burst
Mode 7 NXL full-automatic
Mode 8 auto-response
Mode 9 50% ramping
Mode 10 100% ramping
Mode 11 3 round burst
Mode 12 full-auto
PCBA OPERATION
AND PROGRAMMING
Features:
• Fully functional including 12 fire modes: uncapped semi-auto, capped semi-auto, PSP auto-response, PSP 50% ramping, PSP 100% ramping, PSP burst, NXL full-automatic,
auto-response, 50% ramping, 100% ramping, 3 round burst, and full-automatic
• Trigger switch monitors, using an interrupt based scan.
• AMB (anti-mechanical bounce) and CPF (cycle percentage filter) algorithms help to eliminate mechanical bounce and switch bounce
• Programming mode allows changes to DEBOUNCE, SEAR ON, BIP DELAY, AMB, FIRE MODE, MAX ROF, CPF, RAMP START, BREAK OUT , OPEN DELAY, WATCH TIME, CLOSE TIME, and EYE OFF ROF.
• All settings are stored in non-volatile memory so they are not lost when battery is disconnected
• One-touch startup enables the marker to fire instantly
• Automatic idle power down saves batteries
• Eye ON and OFF indicators
• Low battery indicator hardware and software shows battery level each time the marker is turned on
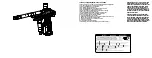
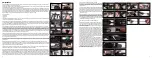
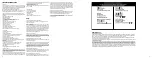
LED and OLED Indicator: (Figure 1)
The multi-color LED on the rear of the grip frame shows which mode of operation the marker is currently in:
Solid Blue, ready to fire
Slow Blinking Blue, used to check if eyes are working
Solid Red, Eye OFF, max rate of fire reduced to current user set
Power: ON/OFF is handled by the rear power button at the back of the frame. Pressing it instantly boots the marker, and will show a BLUE LED for eyes enabled. The OLED screen will show the
current fire mode and the current Rate of Fire (ROF). The marker is ready to fire. Power OFF by pressing the rear power button and hold down for at least 3 seconds until the LED and OLED turns
OFF, then release.
Eye Operation and Logic : (Figure 2)
The break beam eyes are used to increase speed and prevent chopped paintballs. When used, the marker will cycle as fast as possible. The eyes are enabled when the marker is first turned ON.
Rear LED should be BLUE. OLED screen will display the current fire mode and the current eye ON ROF.
-To turn the eyes OFF, press the rear power button and hold for 1.5 seconds and release when rear LED turns RED. When eyes are OFF, the rear LED will be RED and the OLED will display current fire
mode and the eyes OFF ROF. NOTE: When the eyes are off, the rate of fire is limited and adjustable from 10 to 25 balls per second.
-To turn the eyes back ON, press the rear power button and hold for 1.5 seconds and release when rear LED turns BLUE. OLED screen will revert back to eye ON display.
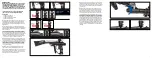
Eye diagnostics check: (Figure 3)
Note: We recommend this be done prior to hopper and tank install, confirm that the marker is not pressurized. Turn the marker ON. The rear LED should be a solid BLUE. Pull the pull pin up half
way and slide the bolt back. Once you slide the bolt past the eyes, the rear LED should now blink BLUE indicating that the eyes are good. Now slide the bolt back forward and confirm that the LED
is now solid BLUE. Realign the bolt and pull pin with the slide and push the pull pin all the way down until the ball detent inside of the bolt retains the pin. Note: If the LED does not change when
you move the bolt back, this means that there is something blocking the eyes or your eyes are faulty. Go to eye cleaning section.
Eye Modes – Two eye modes are available:
1. ON – Used to fire the marker as fast as possible minimizing and eliminating chop balls. The ASR is a closed bolt system so unlike open bolt systems, the ASR will fire if there is no ball in the
breech. Once fired, the logic will hold the bolt open a period of time to allow a ball to fully drop into the breech. Once the ball is fully breeched, the bolt will close and be ready for the next firing
sequence. Note: If you are attempting to fire the marker with out balls, the marker will feel slow. There is nothing wrong with the marker. It should be slow because there is a time that is setup in
the program to allow a ball to drop into the breech. This time is adjustable and would only be recommend being adjust lower if a high speed loader is available, for example a View Loader Vlocity.
2. OFF – This mode will fire the marker much faster and is not recommend when shooting paintball because you may chop and break a ball. This mode is for the user who may experience a
problem with the eyes during a game and want wants to fire the marker faster. The ROF is adjustable and should be setup initially depending on what type of hopper you have. For example, if
you have a Vlocity, you can set your eye OFF ROF higher then 10 because the hopper can keep up. If you have a gravity feed hopper, you should setup your eye OFF ROF lower to prevent chops.
Eye OFF can also be a training mode, with the right parameters and without shooting paintballs, the marker will works with any fire mode selected giving you a feel for operation. Note: Eyes OFF
will be limited to 25 Cycles Per Second (CPS).
Ready to Fire
Check Eyes
Eye Off
Push and hold
1.5 Sec Release
Push and hold
1.5 Sec Release
Figure 1
Figure 2
Turn Eyes Off
Turn Eyes On
Figure 3
Pull the pull pin up half way and
slide the bolt back.
slide the bolt back forward and confirm that
the LED is now solid BLUE
Summary of Contents for AUTOCOCKER SR
Page 1: ......
Page 9: ...12 13 SCHEMATIC s ...
Page 10: ...14 15 ...
Page 13: ...20 WORR GAME PRODUCTS 5818 El Camino Real Carlsbad CA 92008 800 587 2246 worr com ...


