background image


14


MANUFACTURER: Whalen Furniture Manufacturing 
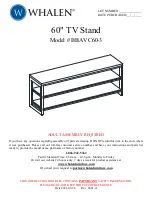
CATALOG: 60" TV Console 
MODEL # BBAVC60-3 


QUALITY GUARANTEE 

We are confident that you will be delighted with your Whalen Furniture purchase. 

Should  this  product  be  defective  in  workmanship  or  materials  or  fail  under  normal  use,  we  will  repair  or 
replace  it  for  up  to  one  (1)  year  from  date  of  purchase.  Every  Whalen  Furniture  product  is  designed  to  meet 
your highest expectations. We guarantee that you will immediately see the value of our fine furniture. 

This warranty gives you specific legal rights and you may also have other rights which vary from state to state. 


Whalen Furniture Manufacturing 

1578 Air Wing Road, San Diego, CA 92154, USA 

Customer Service: 1-866-942-5362 

8:30 a.m. - 4:30 p.m., PST, Monday to Friday 

www.whalenfurniture.com 


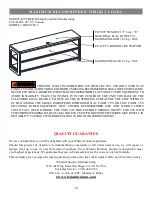
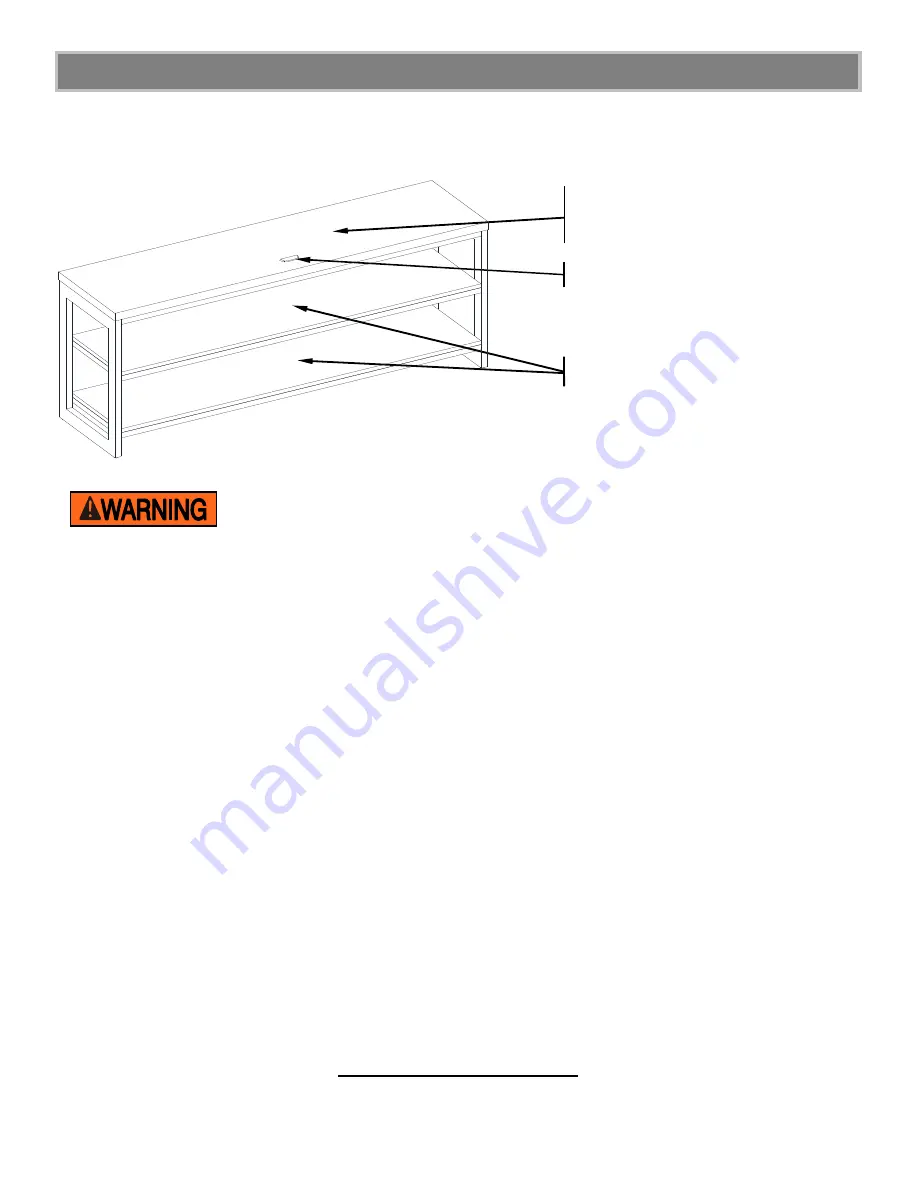
M A X I M U M   R E C O M M E N D E D   W E I G H T   L O A D S  

PLACE TV BEHIND THE STOPPER 

FITS UP TO MOST 177.8 cm / 70” 
DIAGONAL FLAT PANEL TVs 
MAXIMUM LOAD 36.3 kg / 80 lb


THIS UNIT IS NOT INTENDED FOR USE WITH CRT TVS. USE ONLY WITH FLAT 

PANEL TVS AND AUDIO/VIDEO EQUIPMENT MEETING RECOMMENDED SIZE AND WEIGHT LIMITS. 
NEVER USE WITH LARGER/HEAVIER THAN RECOMMENDED FLAT PANEL TVS OR EQUIPMENT. TO 
AVOID  INSTABILITY,  PLACE  FLAT  PANEL  TV  IN  THE  CENTER  OF  THE  UNIT;  THE  BASE  OF  THE 
TELEVISION MUST BE ABLE TO REST ON THE SUPPORTING SURFACE OF THE UNIT WITHOUT 
OVER-HANGING THE EDGES. IMPROPERLY POSITIONED FLAT PANEL TVS, OR FLAT PANEL TVS 
INCLUDING  OTHER  EQUIPMENT  THAT  EXCEED  RECOMMENDED  SIZE  AND  WEIGHT  LIMITS 
COULD  FALL  OFF  OR  BREAK  THE  UNIT,  CAUSING  POSSIBLE  SERIOUS  INJURY.  FOR  USE  WITH 
TELEVISIONS WEIGHING 80 LBS (36.3 KG) OR LESS. USE WITH HEAVIER TELEVISIONS MAY RESULT IN 
INSTABILITY CAUSING TIP OVER RESULTING IN DEATH OR SERIOUS INJURY. 

MAXIMUM LOAD 22.7 kg / 50 lb 

Summary of Contents for BBAVC60-3

Page 1: ...NOT return this item to the store where it was purchased Please call our toll free customer service number and have your instructions and parts list ready to provide the model name part name or factory number 1 866 942 5362 Pacific Standard Time 8 30 a m 4 30 p m Monday to Friday Or visit our website 24 hours a day 7 days a week for product assistance at www whalenfurniture com Or e mail your requ...

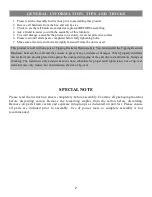
Page 2: ... discarding carton Remove any remaining staples from the carton before discarding Remove all parts from carton and separate into groups as indicated on part list Please ensure all parts are included prior to assembly Use of power tools to complete assembly is not recommended This product is sold with one sets of Tipping Restraint Hardware Kit You must install the Tipping Restraint Hardware between...

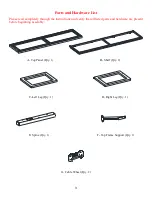
Page 3: ...pletely through the instructions and verify that all listed parts and hardware are present before beginning assembly A Top Panel Qty 1 B Shelf Qty 2 C Left Leg Qty 1 D Right Leg Qty 1 E Spine Qty 1 F Top Frame Support Qty 1 G Cable Wheel Qty 2 ...

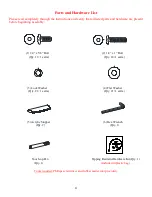
Page 4: ...efore beginning assembly 1 1 4 x 5 8 Bolt 2 1 4 x 1 Bolt Qty 11 1 extra Qty 14 1 extra 3 Lock Washer 4 Flat Washer Qty 21 1 extra Qty 21 1 extra 5 Acrylic Stopper 6 Hex Wrench Qty 2 Qty 1 Touch up Pen Tipping Restraint Hardware Kit Qty 1 Qty 1 Included in plastic bag Tools required Phillips screwdriver and rubber mallet not provided ...

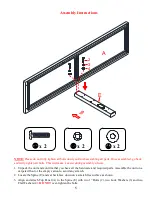
Page 5: ...unit 1 Unpack the unit and confirm that you have all the hardware and required parts Assemble the unit on a carpeted floor or the empty carton to avoid any scratch 2 Locate the Spine E and set back face down on a scratch free surface as shown 3 Align and attach Top Panel A to the Spine E with two 1 Bolts 2 two Lock Washers 3 and two Flat Washers 4 DO NOT over tighten the bolts x 2 2 4 3 E A x 2 x ...

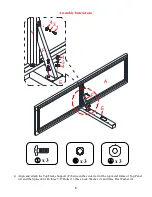
Page 6: ... 4 Align and attach the Top Frame Support F between the center rail of the top metal frame of Top Panel A and the Spine E with three 5 8 Bolts 1 three Lock Washer 3 and three Flat Washer 4 x 3 x 3 x 3 4 1 3 1 4 3 A E F F A E ...

Page 7: ...tructions 5 Fasten the Shelves B to the Spine E with two 1 Bolts 2 two Lock Washers 3 and two Flat Washers 4 per shelf 2 4 3 E B B E B x 4 x 4 x 4 The metal frames will face the floor when the unit is turned upright ...

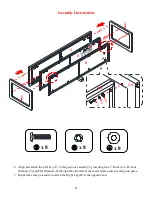
Page 8: ...he previous assembly by inserting four 1 Bolts 2 with Lock Washers 3 and Flat Washers 4 through the side rails of the metal frames and screwing into place 7 Repeat the same procedure to attach the Right Leg D at the opposite end 2 4 3 B B A C D C D A B x 8 x 8 x 8 ...

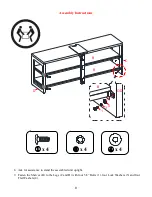
Page 9: ... Instructions 8 Ask for assistance to stand the assembled unit upright 9 Fasten the Shelves B to the Legs C and D with four 5 8 Bolts 1 four Lock Washers 3 and four Flat Washers 4 1 4 3 D C B B C D B x 4 x 4 x 4 ...

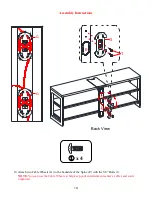
Page 10: ...tructions 10 Attach two Cable Wheels G to the backside of the Spine E with the 5 8 Bolts 1 NOTE You can use the Cable Wheels to help keep your entertainment center s cables and cords organized G 1 E G G x 4 Back View ...

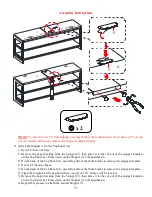
Page 11: ...Press down on the Stopper 5 to help adhesion 2 On the back of the Top Panel A carefully pull out the thumb tacks to remove the stopper template b If your TV has two bases 1 On the back of the Top Panel A carefully pull out the thumb tacks to remove the stopper template 2 Align the template at the position where one of your TV s bases will be located 3 Remove the paper backing from the Stopper 5 th...

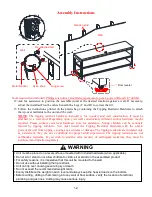
Page 12: ...e unit from tipping causing any accidents or damage The tipping restraints are intended only as a deterrent they are not a substitute for proper adult supervision The tipping restraints are not earthquake restraints If you wish to add the extra security of earthquake restraints they must be purchased and installed separately Wall Long screw Metal bracket Pre attached bolt Floor leveler Wall Wooden...

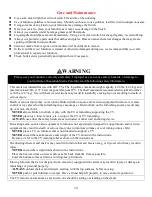
Page 13: ... serious injury Death or serious injury may occur when children climb on audio and or video equipment furniture A remote control or toys placed on the furnishing may encourage a child to climb on the furnishing and as a result may tip over onto the child NEVER allow children to climb or play with the TV or furnishing supporting the TV NEVER place toys food remote etc on top of the TV or TV furnish...

Page 14: ...w whalenfurniture com MAXIMU M RECOMMEND ED WEIGHT LOADS PLACE TV BEHIND THE STOPPER FITS UP TO MOST 177 8 cm 70 DIAGONAL FLAT PANEL TVs MAXIMUM LOAD 36 3 kg 80 lb THIS UNIT IS NOT INTENDED FOR USE WITH CRT TVS USE ONLY WITH FLAT PANEL TVS AND AUDIO VIDEO EQUIPMENT MEETING RECOMMENDED SIZE AND WEIGHT LIMITS NEVER USE WITH LARGER HEAVIER THAN RECOMMENDED FLAT PANEL TVS OR EQUIPMENT TO AVOID INSTABI...

Page 15: ...rne esté producto a la tienda donde lo compro Por favor llame a nuestro departamento de ayuda al cliente teniendo su instructivo y lista de partes para proveer el modelo nombre de parte o el número de fábrica 1 866 942 5362 Hora estándar del Pacífico 8 30 a m 4 30 p m de Lunes a Viernes O visite nuestra página de Internet 24 horas al día 7 días a la semana para asistencia www whalenfurniture com O...

Page 16: ... tirar el cartón Retirar cualquier grapa del cartón antes de tirar Retirar todas las partes del cartón y separar en grupos como es indicado en la lista de partes Por favor de asegurar que todas las partes están presentes antes del ensamble El uso de herramientas eléctricas para completar el ensamble no es recomendado INFORMACIÓN GENERAL RECOMENDACIONES Y TRUCOS Esté producto viene con 1 juegos de ...

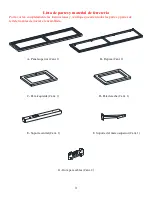
Page 17: ...nstrucciones y verifique que estén todas las partes y partes de ferretería antes de iniciar el ensamblado A Panel superior Cant 1 B Repisa Cant 2 C Pata izquierda Cant 1 D Pata derecha Cant 1 E Soporte central Cant 1 F Soporte del marco superior Cant 1 G Guía para cables Cant 2 ...

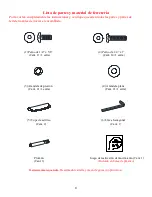
Page 18: ...r el ensamblado 1 Perno de 1 4 x 5 8 2 Perno de 1 4 x 1 Cant 11 1 extra Cant 14 1 extra 3 Arandela de presión 4 Arandela plana Cant 21 1 extra Cant 21 1 extra 5 Tope de acrílico 6 Llave hexagonal Cant 2 Cant 1 Plumón Juego de restricción de movimiento Cant 1 Cant 1 Incluido en bolsa de plástico Herramientas requeridas Desarmador estrella y mazo de goma no provistos ...

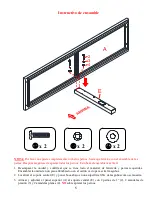
Page 19: ...firmar que se tiene todo el material de ferretería y partes requeridas Ensamblar la unidad en un piso alfombrado o en el cartón vacío para evitar rasguños 2 Localizar el soporte central E y poner boca abajo en una superficie libre de rasguños como se muestra 3 Alinear y adjuntar el panel superior A al soporte central E con 2 pernos de 1 2 2 arandelas de presión 3 y 2 arandelas planas 4 NO sobre ap...

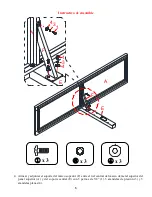
Page 20: ...djuntar el soporte del marco superior F entre el riel central del marco de metal superior del panel superior A y del soporte central E con 3 pernos de 5 8 1 3 arandelas de presión 3 y 3 arandelas planas 4 x 3 x 3 x 3 4 1 3 1 4 3 A E F F A E ...

Page 21: ...etar las repisas B al soporte central E con 2 pernos de 1 2 2 arandelas de presión 3 y 2 arandelas planas 4 por repisa 2 4 3 E B B E B x 4 x 4 x 4 Los marcos de metal apuntaran hacia al piso cuando la unidad este en posición vertical ...

Page 22: ...revio insertando 4 pernos de 1 2 con las arandelas de presión 3 y arandelas planas 4 a través de los rieles laterales de los marcos de metal y atornillar en su lugar 7 Repetir el mismo procedimiento para adjuntar la pata derecho D al lado opuesto 2 4 3 B B A C D C D A B x 8 x 8 x 8 ...

Page 23: ...amble 8 Pedir asistencia para poner la unidad ensamblada en posición vertical 9 Sujetar las repisas B a las patas C y D con 4 pernos de 5 8 1 4 arandelas de presión 3 y 4 arandelas planas 4 1 4 3 D C B B C D B x 4 x 4 x 4 ...

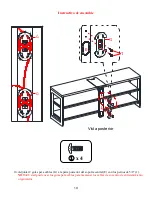
Page 24: ...ntar 2 guías para cables G a la parte posterior del soporte central E con los pernos de 5 8 1 NOTA Usted puede usar los guías para cables para mantener los cables de su centro de entretenimiento organizados G 1 E G G x 4 Vista posterior ...

Page 25: ... el tope 5 para ayudar a la adhesión 2 En la parte posterior del panel superior A jalar con cuidado las tachuelas para retirar el templete del tope b Si su TV tiene dos bases 1 En la parte posterior del panel superior A jalar con cuidado las tachuelas para retirar el templete del tope 2 Alinear el temple en la posición donde una de las bases de su TV estará 3 Retirar el respaldo de papel del tope ...

Page 26: ...nción para prevenir la inclinación de la unidad causando cualquier accidente o daño El tope de movimiento es solo un impedimento no hay substituto para la supervisión adulta El tope de movimiento no es contra terremoto Si deseara añadir la seguridad extra contra terremotos deben ser comprados e instalados separadamente Pared Perno largo Soporte de metal Perno pre adjuntado Nivelador de piso Pared ...

Page 27: ...den ocurrir cuando los niños se trepan al equipo de audio y o video del mueble Un control remoto o juguetes puestos sobre el mueble pueden animar a un niño a treparse al mueble y causar que el mueble se caiga sobre el niño NUNCA permita que niños se trepen o jueguen con la TV o equipo de soporte para TV NUNCA poner juguetes comida controles etc sobre la TV o el mueble SIEMPRE use el equipo de segu...

Page 28: ...ar del Pacífico 8 30 a m 4 30 p m de Lunes a Viernes www whalenfurniture com MÁXIMO PESO R ECOMENDADO PONER TV ATRAS DEL TOPE PERMITE TVs DE PANTALLA PLANA DE HASTA 177 8 cm 70 EN DIAGONAL CARGA MÁXIMA 36 3 kg 80 lb CARGA MÁXIMA 22 7 kg 50 lb ESTA UNIDAD NO DEBE UTILIZARSE CON TV S CRT O DE TUBO UTILIZARSE UNICAMENTE CON TELEVISIONES DE PANTALLA PLANA Y EQUIPO DE AUDIO VIDEO QUE TENGA LA MEDIDA PE...

Reviews: