background image

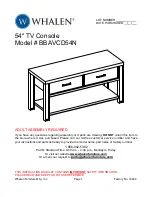
Model # BBAVCD54N 

Please call for replacement parts or assistance: 

1-866-942-5362


Whalen Furniture Mfg., Inc.  


    Page 4 


              Factory No. 16434 

Assembly Instructions 


NOTE

: Please do not fully tighten all bolts until you finish assembling all parts. Once assembled, 

go back and fully tighten all bolts. This will make the assembly easier.


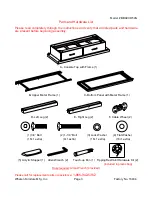
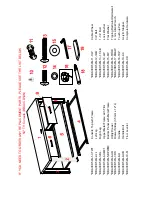
1.  Unpack the unit and confirm that you have all the hardware and required parts. 


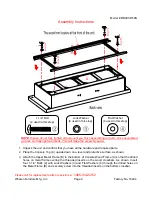
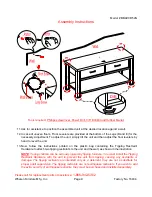
2.  Place the Console Top (A) upside down on a level and protective surface, as shown. 


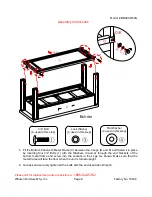
3.  Attach the Upper Metal Frame (B) to the bottom of Console Wood Frame (A) so that the drilled 

holes on metal frame overlap the threaded inserts on the wood crossbars. As shown. Insert 
four 1-1/4” Bolts (2) with Lock Washers (3) and Flat Washers (4) through the drilled holes on 
the Metal Frame (B) and securely screw into the threaded inserts on the bottom crossbar.  


A

UP

1-1/4” Bolt 

(4 used in this step) 


Lock Washer 

(4 used in this step)

Flat Washer 

(4 used in this step)

Summary of Contents for BBAVCD54N

Page 1: ...g assembly or if parts are missing DO NOT return this item to the store where it was purchased Please call our toll free customer service number and have your instructions and parts list ready to prov...

Page 2: ...This warranty gives you specific legal rights and you may also have other rights which vary from State to State Customer Service 1 866 942 5362 8 30 a m 4 30 p m PST Monday to Friday www whalenfurnitu...

Page 3: ...ed parts and hardware are present before beginning assembly A Console Top with Frame 1 B Upper Metal Frame 1 C Bottom Panel with Metal Frame 1 D Left Leg 2 E Right Leg 2 F Cable Wheel 2 1 3 4 Bolt 2 1...

Page 4: ...the hardware and required parts 2 Place the Console Top A upside down on a level and protective surface as shown 3 Attach the Upper Metal Frame B to the bottom of Console Wood Frame A so that the dril...

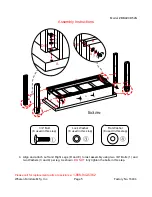
Page 5: ...No 16434 Assembly Instructions 4 Align and attach Left and Right Legs D and E to last assembly using two 3 4 Bolts 1 and two Washers 3 and 4 per leg As shown DO NOT fully tighten the bolts in this ste...

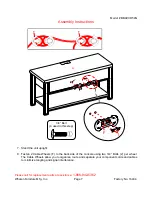
Page 6: ...it in place by inserting four 3 4 Bolts 1 with the Washers 3 and 4 through the end brackets of the bottom metal frame and screw into the sockets in the Legs As shown Make sure that the metal frame wil...

Page 7: ...No 16434 Assembly Instructions 7 Stand the unit upright 8 Fasten 2 Cable Wheels F to the backside of the console using two 3 4 Bolts 2 per wheel The Cable Wheels allow you to organize route and separa...

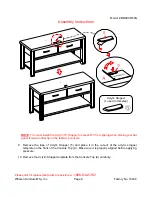
Page 8: ...prevent TV from tipping when placing your flat panel television directly on the table top console 9 Remove the tape of Acrylic Stopper 5 and place it in the cut out of the acrylic stopper template on...

Page 9: ...floor levelers by hand to level the unit 13 Now follow the instructions printed on the plastic bag containing the Tipping Restraint Hardware to attach two tipping restraints to the unit and the wall...

Page 10: ...ting within the furniture finish z Stains or marks from crayons or ink markers will be difficult to remove z In the event that your furniture is stained or otherwise damaged during use we recommend th...

Page 11: ...VCD54N 4 UMFT Upper Metal Frame with Trim BBAVCD54N 14 LW Lock Washer BBAVCD54N 5 BPWMF Bottom Panel with Metal Frame BBAVCD54N 15 FW Flat Washer BBAVCD54N 6 UD Utility Drawer BBAVCD54N 16 TRHK Tippin...

Reviews: